




Stone Look Pillar Cladding Tiles Guide 2026
by Shivam Tayal 19 Nov 2026 0 Comments
You're choosing a stone finish for a letterbox pier or verandah column, and the sample looks right against the brickwork. Then the tiler asks about the backing, the cap and whether the property has a bushfire rating. Suddenly, the stone picture on the face isn't the main decision.
Stone look pillar cladding tiles are only the skin. For a Melbourne exterior, the specification starts with rain exposure, the pillar's construction and any fire requirements. The right format and cutting plan matter too, especially when a broad tile has to wrap a narrow pier.
What Stone Look Pillar Cladding Tiles Are
Say you have a rendered letterbox pier that you want to resemble split stone or bluestone. Rather than rebuilding it from solid stone, you fix a decorative facing over the prepared structure.
Stone-look pillar cladding usually means porcelain or ceramic tiles that imitate travertine, stacked slate, ashlar or another stone pattern. Thin natural-stone veneer is often considered alongside these products, although its face is actual stone rather than an imitation. Neither should be confused with the structural pillar underneath.
Separate the finish from the building work
Buyers often combine several different jobs into a single expectation:
- Decoration: The facing supplies colour, texture, pattern and the visible corner detail.
- Weatherproofing: The backing, terminations, drainage and capping manage water.
- Fire performance: The complete construction must satisfy the requirements applying to that building and site.
A tile can provide the first without establishing either of the others. A convincing stacked-stone face doesn't tell you whether water can enter behind it or whether its backing is suitable for the building.
Specification rule: Choose the appearance from the sample, but approve the installation from the system documentation.
The Housing Industry Association's guidance on AS 3958:2023 explains that the standard addresses ceramic and stone tile installation, including external adhesive work, but isn't itself a mandatory NCC obligation. Installation guidance and statutory compliance aren't interchangeable.
Location, material, face dimensions and fixing method therefore belong in the same decision. Bring in a qualified installer or engineer as soon as the pillar's height, wind exposure, substrate or building classification is uncertain, rather than asking the tiler to resolve an unsuitable structure with stronger adhesive.
Indoor Versus Outdoor Pillars and the Decision Tree
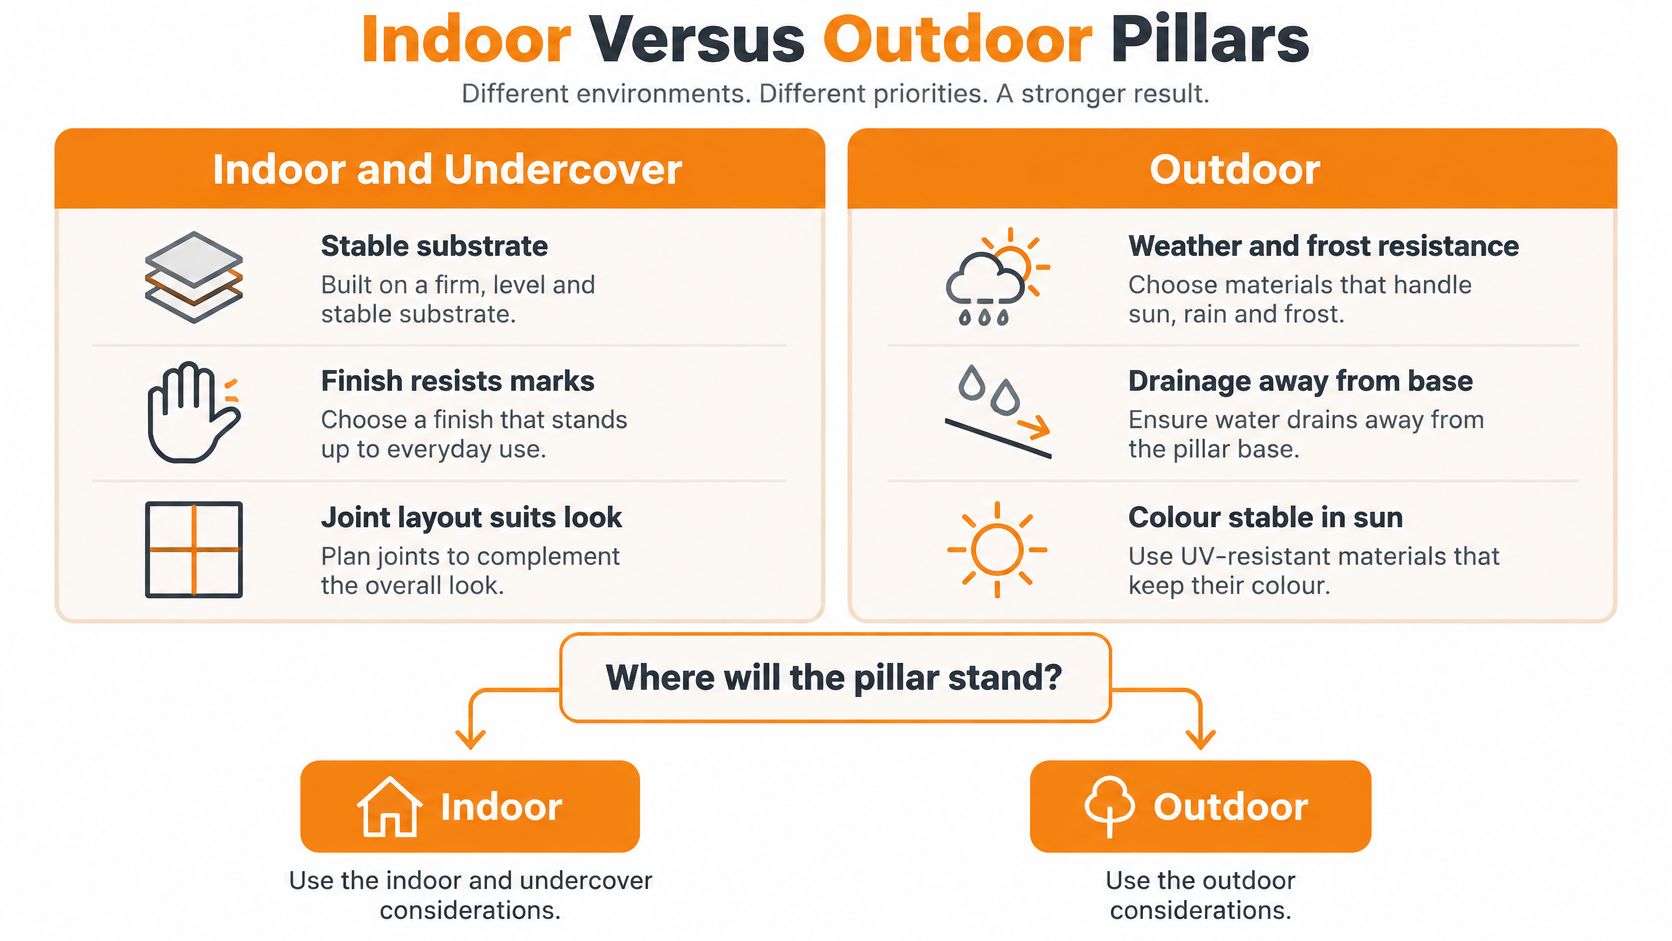
Decide where the pillar stands before choosing its finish. An indoor column needs a stable backing, a surface that tolerates hand marks and a joint arrangement that looks intentional. An undercover entry needs the same attention, but shelter alone doesn't make it an indoor environment.
An outdoor Melbourne pier must accommodate sunlight, temperature changes and wind-driven rain. Specify the tile, adhesive, grout and exposed finishing details for their actual use. Ask for product evidence of weather and frost suitability where the site requires it.
Use this checklist to distinguish a decorative interior from an exposed installation.
Follow the construction before the colour
Work through these questions with the designer or builder:
- Freestanding or attached? A garden feature and a pier connected to the house may have different structural, water-management and approval considerations.
- What building classification applies? Don't assume residential-looking architecture means the same rules apply to every project.
- Masonry or framed construction? Sound rendered masonry and a sheeted stud frame require different substrate and fixing checks.
- Decorative or protective? Establish whether the pillar finish merely changes appearance or forms part of the weatherproofing or fire-performing construction.
A framed pier isn't automatically unsuitable for tiles. It does, however, need a documented lining and support arrangement rather than a decorative sheet selected because it looks flat.
Check the bushfire exposure and low zone
Bushfire selection starts with the site assessment, not the tile name. Ember attack, radiant heat and flame contact affect the construction required.
The James Hardie bushfire technical supplement reproducing AS 3959:2018 requirements identifies BAL-Low, BAL-12.5, BAL-19, BAL-29, BAL-40 and BAL-FZ, and states that exposed external-wall parts less than 400 mm from the ground, or less than that distance above decks, carport roofs, awnings and similar elements, require non-combustible material or another permitted construction solution.
That low zone deserves particular attention around the pillar base, returns and penetrations. Don't treat the threshold as a blanket rule applying identically to every freestanding garden ornament. Have the project designer establish which provisions apply to the actual construction.
For applicable Type A and Type B buildings, external-wall non-combustibility requirements also need professional assessment. The NCC's fire-separation provisions reinforce the distinction between a decorative facing and a fire-performing external wall.
A porcelain face is not a compliance certificate. The backing, adhesive, joints, fixings and complete assembly need checking against the project's BAL, the NCC and applicable Victorian controls before the finish is approved.
Which Material Suits a Pillar
Stone-look materials for pillar cladding
| Material | Best pillar role | Weight and handling | Exposed Melbourne exterior | Main risk if misused |
|---|---|---|---|---|
| Full-body porcelain | Default stone-look face indoors and out | Dense; handling effort increases with thickness and format | Yes, if exterior-rated and approved for the application | Indoor adhesive or missing movement joints |
| Glazed ceramic | Indoor columns and sheltered entries | Often lighter and easier to cut than comparable porcelain | Only if the product is exterior-rated | Porous body or indoor-only glaze exposed to rain |
| Natural stone tile or slab | Feature piers where genuine variation matters | Heavy, particularly in slab form; assess lifting and sealing | Yes, with suitable stone and an engineered installation where required | Excess mass, open pores and unmatched replacements |
| Flexible stone veneer | Tight curves and lightweight feature work | Light facing; check the complete system weight | Only as a documented exterior system | Combustible or non-draining backing |
These are buying categories, not interchangeable specifications. Compare the actual product's thickness, mass, intended application and installation instructions before treating a material name as an approval.
Porcelain and ceramic are different starting points
Exterior-rated porcelain is a sensible starting point for an exposed stone-look pier. Its dense body makes it practical where rain and routine cleaning are expected. That doesn't remove the need for a compatible installation system.
Check what “full-body” means in the product documentation. A stone pattern printed on the face may not continue through a cut edge, even when the underlying body is dense and durable. This becomes obvious at exposed corners and letterbox openings.
Glazed ceramic offers broad decorative choice for indoor columns. Don't reject every ceramic exterior application, but don't carry an indoor wall tile outside just because it has the right colour. The product's declared suitability must match the exposure.
Our guide to natural stone-look tiles can help distinguish the visual effects before you assess the construction requirements.
Real stone and flexible veneer need different checks
Natural stone offers genuine depth, irregularity and mineral variation. Those qualities can make a feature pier attractive, but they also make repairs and matching more demanding. Establish the stone's sealing requirements and whether the pillar can carry the proposed finish.
Flexible veneer can follow shapes that rigid tiles can't readily wrap. Its backing, reinforcement and adhesive deserve at least as much scrutiny as the visible stone layer. A thin or lightweight product isn't automatically suitable for fire-sensitive or wet external work.
Match the material to exposure first. Use the finish to refine the appearance, not to compensate for an unsuitable product.
For touchable entry columns, matt or modestly textured faces are practical choices. Honed surfaces suit a quieter interior, while gloss demands closer attention to reflected light and fingerprints. Deep relief looks convincing but requires more deliberate cleaning around ledges and recesses.
The shortlist is straightforward: start with exterior-rated porcelain or an appropriately designed stone system outdoors. Indoors, compare ceramic and porcelain primarily by appearance, handling and maintenance.
Sizes Patterns and Ordering Allowances
Face formats for stone-look pillars
The dimensions below are nominal tile formats in millimetres, not required pillar dimensions.
| Format | Look on a pillar | Corner and cutting | Use when |
|---|---|---|---|
| 600x600 | Broad stone field with fewer joints | Substantial offcuts on narrow faces | Pier faces suit the module |
| 600x1200 | Long stack, vertical or horizontal | Requires careful handling and a planned cutting layout | A broad pier can use the length effectively |
| 300x600 | Stack or bond at residential scale | Manageable returns | Cladding a house pier or letterbox column |
| 200x200 or subway and kit-kat | Busier joints and easier wrapping | Smaller pieces can fit tight returns | The pier is small or has awkward details |
| Mosaic or narrow pieces | Curved or highly textured skin | Numerous joints require careful finishing | The face is curved or strongly featured |
A large tile can look calm on a showroom wall and awkward on a narrow pier. The problem isn't just waste. A thin strip at the visible corner can make a substantial column look like a wrapped box.
A residential-scale rectangle is often easier to compose around a letter slot, light fitting or gate connection. Compare orientation with a dry layout: horizontal courses can visually broaden a pier, while vertical pieces emphasise height. Our tile-size guide helps narrow the format before the tiler develops the cutting plan.
Draw the corners before counting boxes
Use a tape, straightedge and face-by-face sketch rather than multiplying a convenient measurement.
- Measure every face separately: Record taper, out-of-square corners and changes in width around openings.
- Choose the visible corner: Decide whether it uses a return piece, trim, overlapping edge or a supported mitred detail.
- Lay out the pattern: Mark joints and openings so prominent cuts don't become narrow slivers.
- Count usable cuts: Identify which offcuts can serve another face before setting the ordering allowance.
Rectified tiles have precisely cut square edges that support a uniform layout. They still need joints. Non-rectified edges are slightly rounded and can show minor dimensional differences, so the installer needs to allow a suitable joint rather than forcing pieces into an unrealistically tight grid.
Allow for the actual batch
Tiles can show slight shade or size variation, and separate batches can differ in colour and dimensions. At Tiles Mate Pty Ltd, we recommend having your tiler verify all measurements before you order.
Keep the cut allowance tied to the drawing, fragile details and realistic breakage risks. An arbitrary extra percentage can leave either an expensive shortage or boxes of unusable surplus.
Retain labelled spare tiles with the product and batch details. Confirm batch continuity before fixing starts, especially where a broken corner would otherwise require an obvious replacement from a different production run.
How to Prepare Fix and Grout a Pillar
The installation sequence should be agreed before materials reach the pier. Write down the substrate, any membrane, adhesive classification, grout, movement-joint locations and water-shedding details.
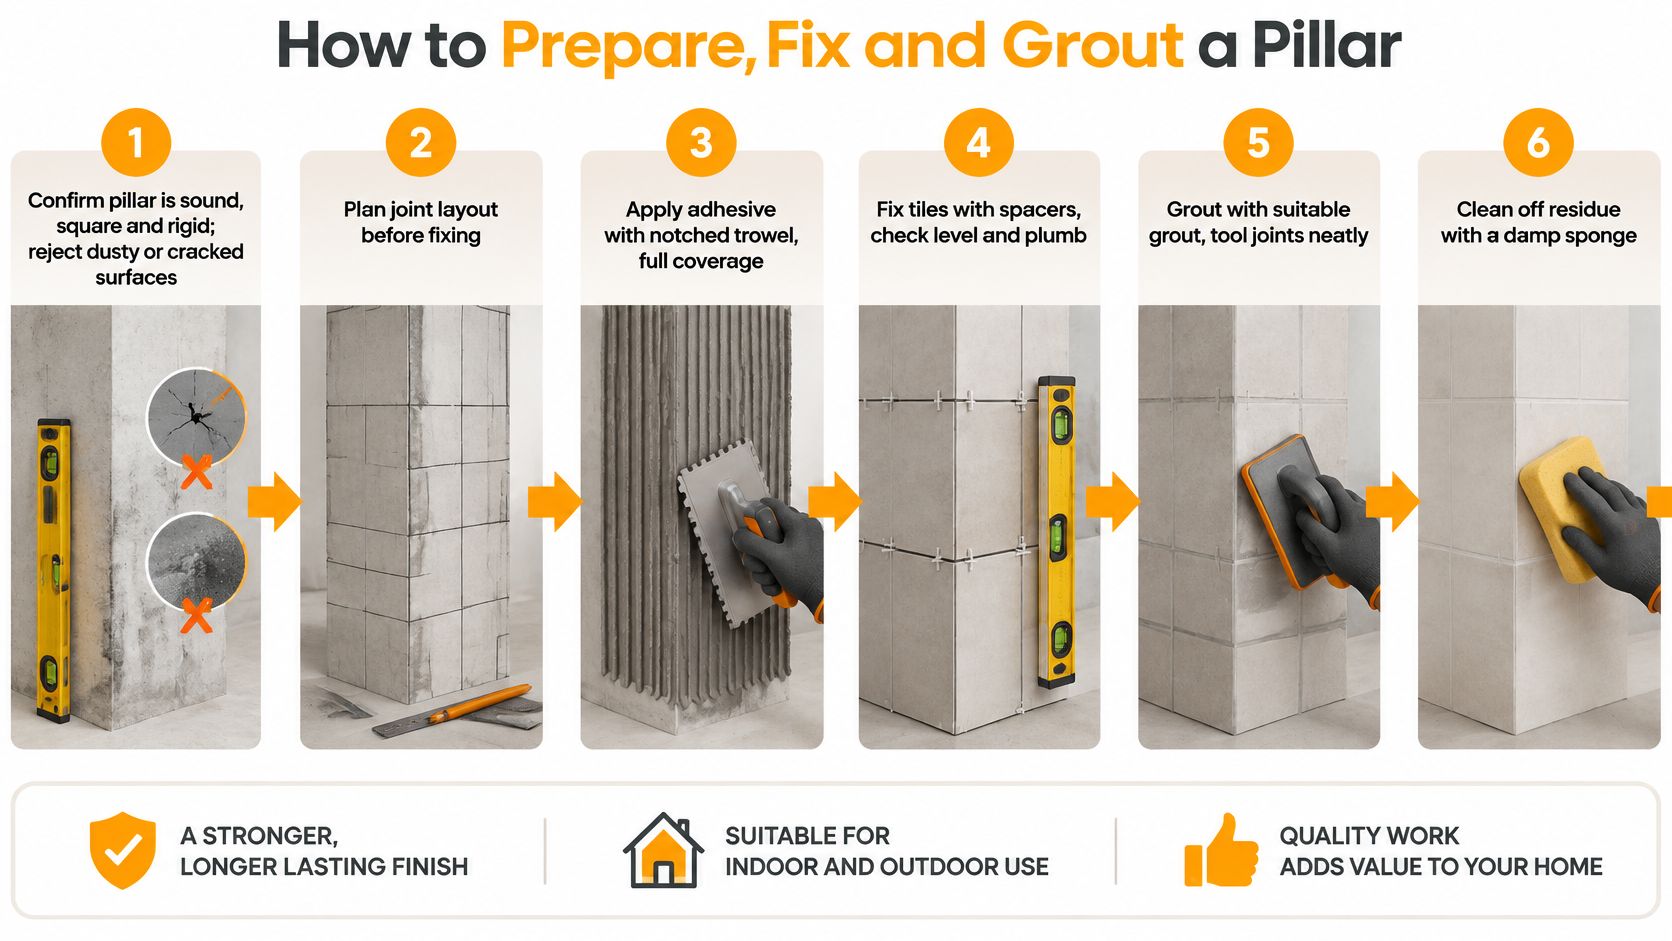
The overview below shows the basic tiling workflow. Exterior water management and structural checks belong within that workflow, not after it.
Prepare the backing and water details
- Confirm that the pillar is sound, square and rigid. Check rendered masonry with a straightedge and inspect framed work for movement and suitable sheet support. Remove dust and weak coatings; investigate cracks instead of covering them. Adhesive bonded to loose render will only hold as well as that render.
- Design a route for water to escape. Detail the cap, head, terminations and drainage before fixing. The NCC roof and wall cladding provisions address harmful water penetration and identify AS 4654.1 and AS 4654.2 for applicable above-ground external waterproofing membranes. Where a membrane is required, confirm its compatibility with the adhesive and backing. A sealed-looking face can still conceal trapped water.
- Set out the bond and movement joints. Start from the most visible corner and send less attractive cuts towards the least visible face. Have the installer detail movement accommodation at material changes, relevant corners and other required locations. Don't turn the entire pier into a rigid tiled box with grout bridging every junction.
Fix and finish without hiding defects
- Select the adhesive for the actual assembly. Match it to the tile, substrate, exposure and membrane where used. Our wall-tile adhesive guide explains the selection considerations. Taller, heavier or framed installations may need engineered support or mechanical restraint. Stop if the proposed fixing method hasn't been established.
- Bed the tiles fully and finish the correct joints. Comb adhesive consistently with a suitable notched trowel, back-butter where needed and lift a freshly placed tile to check contact. Keep joints clean and consistent. Use suitable exterior grout outdoors, but use compatible sealant at movement joints rather than hard grout. Consider epoxy grout where staining or chemical exposure justifies it, with supplier confirmation.
- Complete the coping and penetrations. Fit a cap or flashing that sheds water clear of the face and detail openings around lights and letter slots. Missing head protection can undermine otherwise careful tiling. Clean residue with products suitable for the tile and grout, without flooding uncured work.
For a visual reference while discussing the fixing process with your installer, use this demonstration alongside the specified system instructions.
After the required curing period, arrange a controlled hose check of the cap, corners and penetrations. It's a useful practical inspection, not a substitute for formal testing or compliance documentation.
Pillar Cost and Waste
Inspect grout, sealant and exposed edges as carefully as the tile face. A hard, intact tile doesn't prove that every joint remains serviceable. Investigate cracking before repairing it, and don't paint over a joint that needs movement or has water behind it.
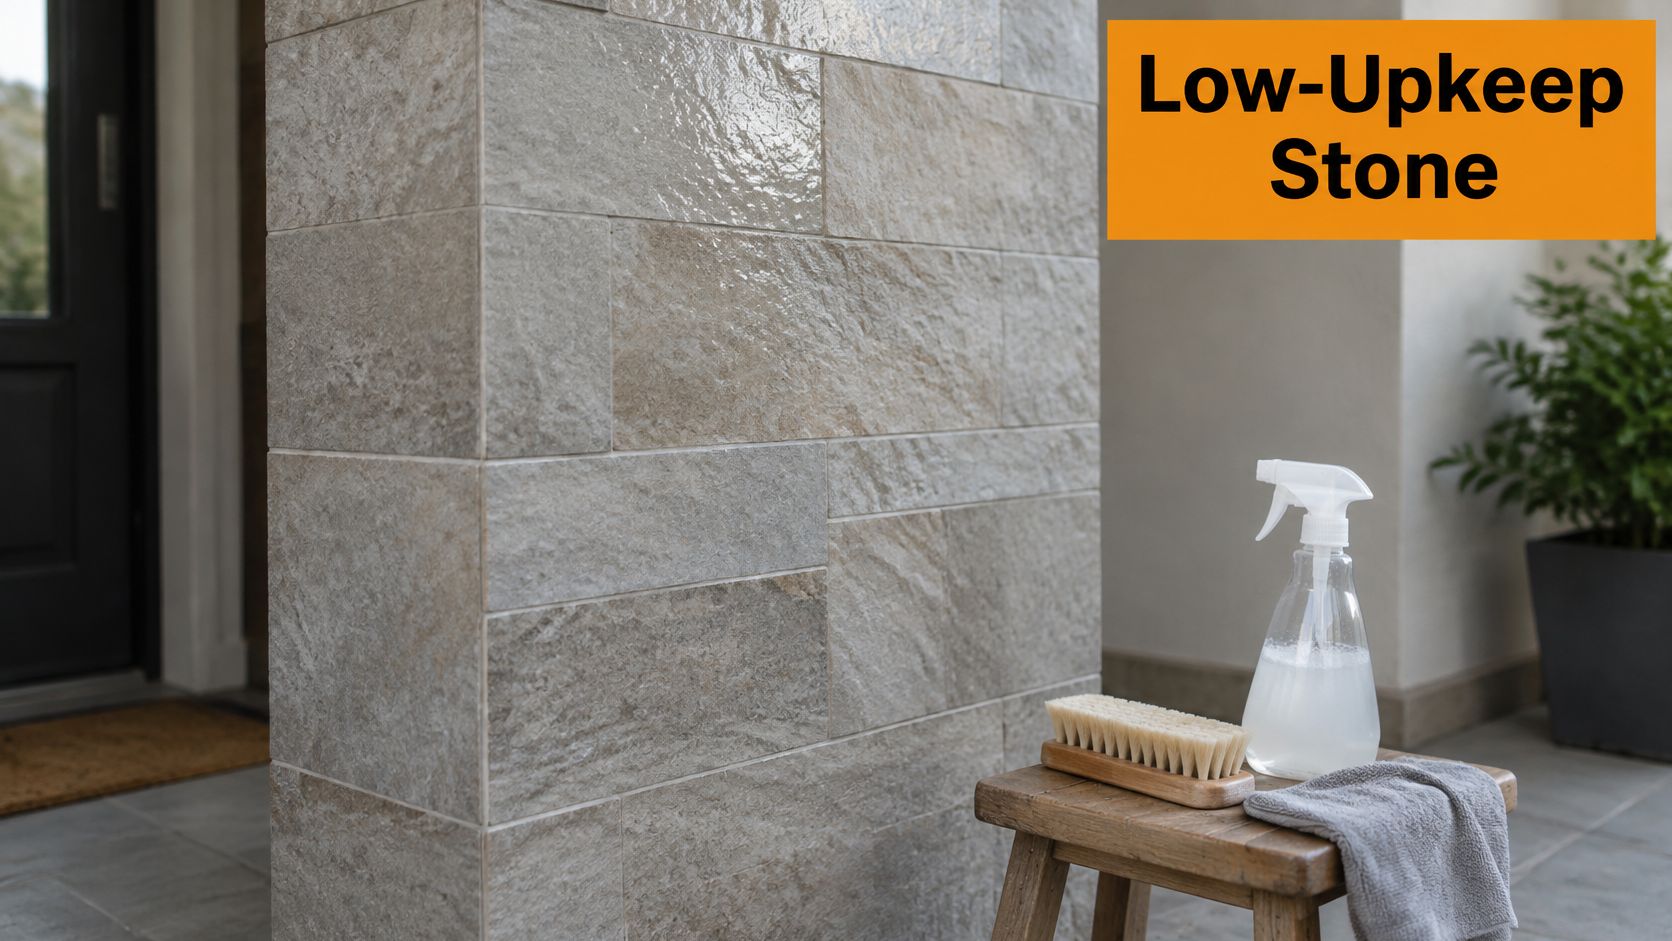
For routine cleaning, start with mild detergent, a soft brush and a rinse. Textured faces collect dirt in recesses, while natural stone may need a compatible sealer. Avoid acid cleaners that can damage susceptible stone and cement-based grout.
The close-up below shows why surface texture and joint quality deserve attention alongside the overall stone effect.
Price the completed pillar
Pillar cost and waste drivers
| Cost line | What to count | Overrun or waste risk |
|---|---|---|
| Tile supply | Measured face area plus documented cut allowance | Wrong module or batch mismatch |
| Adhesive and exterior grout | Coverage per face and joint width | Indoor product used outdoors |
| Coping or flashing | Every exposed top edge and associated returns | Omitted cap allows water entry |
| Membrane if required | Specified coverage, junctions, penetrations and compatible accessories | Membrane incompatible with adhesive |
| Cutting and labour | All faces, openings and corner returns | Corner breakage on narrow piers |
| Freight | Tile weight, format and protective handling | Heavy panels damaged in transit |
| Spares and repairs | Labelled tiles from the same batch | Discontinued batch cannot be matched |
Ask for a scope that separates these items. A low tile price doesn't compensate for omitted capping, extensive corner work or replacing an unsuitable backing.
For builders pricing repeated piers or larger schedules, a resource such as Exayard construction estimating software can be considered alongside a clearly itemised take-off. The estimator still needs an accurate drawing and an agreed construction scope.
Compare waste across the whole job
The CEFC's Australia's Waste(d) Opportunity 2025 report reports that Australian construction projects waste an average of 141 kilograms of material per square metre, with concrete, masonry and tiles among the largest discarded categories. That's a whole-construction benchmark, not a pillar-cladding waste allowance.
A stone effect isn't automatically a low-waste choice. Judge the cutting, packaging, replacement and disposal together.
Compare proposed formats by usable yield and likely repairability. A large panel may reduce joints but leave awkward offcuts; smaller pieces may simplify local replacement but require more joint maintenance.
Ask about packaging, batch availability and take-back or reuse options without assuming a supplier offers them. Require product-specific evidence for sustainability claims, rather than accepting a natural-looking face as proof.
Confirm Samples and Trade Supply Before You Order
A sample should answer a design question, not merely confirm that the website photograph was attractive. Hold it against the actual pier, near the surrounding brick, render, gate and paving. Check it in daylight and shade, then wet the face lightly if you're assessing an outdoor application.
Look at the edge as well as the centre. A face that resembles bluestone may reveal a contrasting body at a cut, while a strong repeating pattern may look artificial when wrapped around a compact column.
Sample first, then confirm the supply
Through our samples service, you can see, touch and feel tiles before committing to the project. Use that opportunity to compare texture, colour and the likely appearance of a corner rather than choosing entirely from a screen.
Bring a short selection sheet to the discussion:
- Appearance: Note the preferred material, finish and laying direction.
- Geometry: Include face sketches, openings and the proposed corner treatment.
- Supply: Confirm the product reference, intended quantity, batch and spare-stock requirement.
- Installation: Record who is responsible for approving the backing and fixing system.
A sample isn't a guarantee that every delivered piece will have identical markings. Ask the tiler to inspect the supplied material and agree how pieces will be distributed before permanent fixing. An unexpected shade grouping is easier to resolve while the tiles are still loose.
Keep purchasing and technical approval connected
We're a Melbourne retailer and wholesaler based in Truganina, so homeowners and trade buyers can discuss the selection in the context of a local project. Call 1300 680 580 with your preferred finish and pillar details to confirm exterior suitability, current stock, batch availability and spare tiles before ordering.
For builders and developers, keep the purchasing schedule tied to the approved specification. Substituting a similar-looking tile late in the job may change edge treatment, handling or fixing requirements, even when the colour appears close.
Don't treat a product page as a waterproofing or bushfire certificate. Keep the project-specific system approval with the installer, designer or engineer, and place the order when the sample, available batch and documented fixing method agree.
Tiles Mate Pty Ltd offers tile selection and a samples service to help you assess stone-look finishes before committing to your pillar project. Visit Tiles Mate Pty Ltd to explore suitable options, then bring your face measurements and installation requirements to the selection discussion.