




Freestanding Bath Guide for Australian Homes
by Shivam Tayal 15 Sep 2026 0 Comments
A freestanding bath isn't a simple swap for a built-in tub. In a Melbourne renovation, the bath's shape is only one decision. The waste position, slab or joist access, finished floor level, cleaning clearance, delivery route and Australian plumbing requirements can determine whether the installation is straightforward or becomes an expensive change halfway through the project.
The right approach is blunt and practical. Measure the room and the access path first, confirm the plumbing rough-in with your plumber, check the floor condition, then choose a bath that suits the actual building. A sculptural tub that can't be serviced, levelled or legally specified isn't a luxury feature. It's a future defect.
The Reality of Installing a Freestanding Bath
Bathroom galleries encourage homeowners to choose the bath by silhouette. That advice is backwards. A freestanding bath needs a suitable room, a precise waste connection and enough exposed floor around it to clean and maintain the installation. Replacing a built-in bath can mean relocating plumbing, altering the waterproofing strategy and dealing with difficult access beneath the finished floor.
The most serious problems usually appear before the bath arrives. On a concrete slab, the waste may need carefully planned access or a suitable connector arrangement. On an upper-storey bathroom, the plumber and builder need to understand the floor structure, pipe routes and serviceability before the room is tiled. Once the waterproofing and tiles are complete, moving a waste is no longer a minor adjustment.
Practical rule: Don't order the bath until the plumber has confirmed the waste position, the floor access and the installation method.
Freestanding baths also need room around the shell. The space isn't just for appearance. It lets a cleaner reach the floor and allows a tradesperson to inspect the waste connection, seals and surrounding surfaces. A bath pushed tightly against a wall may look efficient in a plan, but it can create a cleaning and maintenance problem in daily use.
What a successful renovation checks early
A sensible pre-order inspection should cover:
- The room layout: Check the bath against the vanity, toilet, shower screen and door swing, not just the empty floor.
- The delivery route: Measure doorways, hallways, stairs and turns. A rigid bath can't be bent around a corner.
- The floor condition: Identify uneven surfaces, damaged flooring and any structural concerns before installation.
- The waste route: Confirm where the trap and final connection will sit, and whether future access remains possible.
- The tap position: Decide whether the filler is wall-mounted, deck-mounted or floor-mounted before the bath is fixed.
A useful overview of the broader design decisions appears in this Australian bathtub planning guide, but the final installation still needs site-specific advice from a licensed plumber and builder. The most attractive bath is the one that fits the room, drains properly and doesn't force the project team to undo completed work.
A Lasting Staple in Australian Bathroom Design
Freestanding baths have genuine Australian design history. Clawfoot-style tubs were common in Victorian, Federation and Edwardian homes, placing their widespread local use in the late nineteenth and early twentieth centuries, as documented by Creative Style's history of bathing in Australia. These baths belonged to the architecture of the period, not merely to imported decoration.
Their popularity declined in the 1920s as built-in baths became more common. Built-in models suited changing expectations around compact planning, cleaning and standardised bathroom construction. The freestanding form didn't disappear, though. It returned in later renovation cycles, first through renewed interest in period homes and then through contemporary bathrooms that use the bath as a central sculptural element.
From claw feet to clean composite forms
The old Australian image is a raised tub with decorative feet and a strong period character. That style still works in a restored Victorian terrace or an Edwardian home, especially where the bath supports existing architraves, timber details and traditional tapware.
Modern versions have a different attitude. Smooth acrylic shells, stone-resin composites and simplified plinth or flat-bottom designs can sit comfortably beside large-format porcelain, restrained brassware and clean-lined cabinetry. The form remains familiar while the construction changes to suit contemporary bathrooms and different maintenance expectations.
That continuity matters to homeowners deciding whether the look will date quickly. The style has already moved through a cycle of popularity, decline and revival in Australian homes. It isn't a short-lived overseas idea pasted onto local architecture. It has repeatedly adapted to the way Australians renovate period properties, new builds and modern apartments.
Design value without false promises
A freestanding bath can give a bathroom a strong focal point, but it won't rescue a poor layout. In a heritage renovation, a period-inspired tub should support the building's proportions rather than compete with them. In a new Melbourne home, a restrained white bath can provide contrast against textured tile and timber-look joinery without forcing the whole room into a traditional theme.
My recommendation is to treat the bath as an architectural decision. Choose the style that belongs to the room, then make the plumbing and access work before committing to the finish.
Sizing and Spatial Clearances for Australian Bathrooms
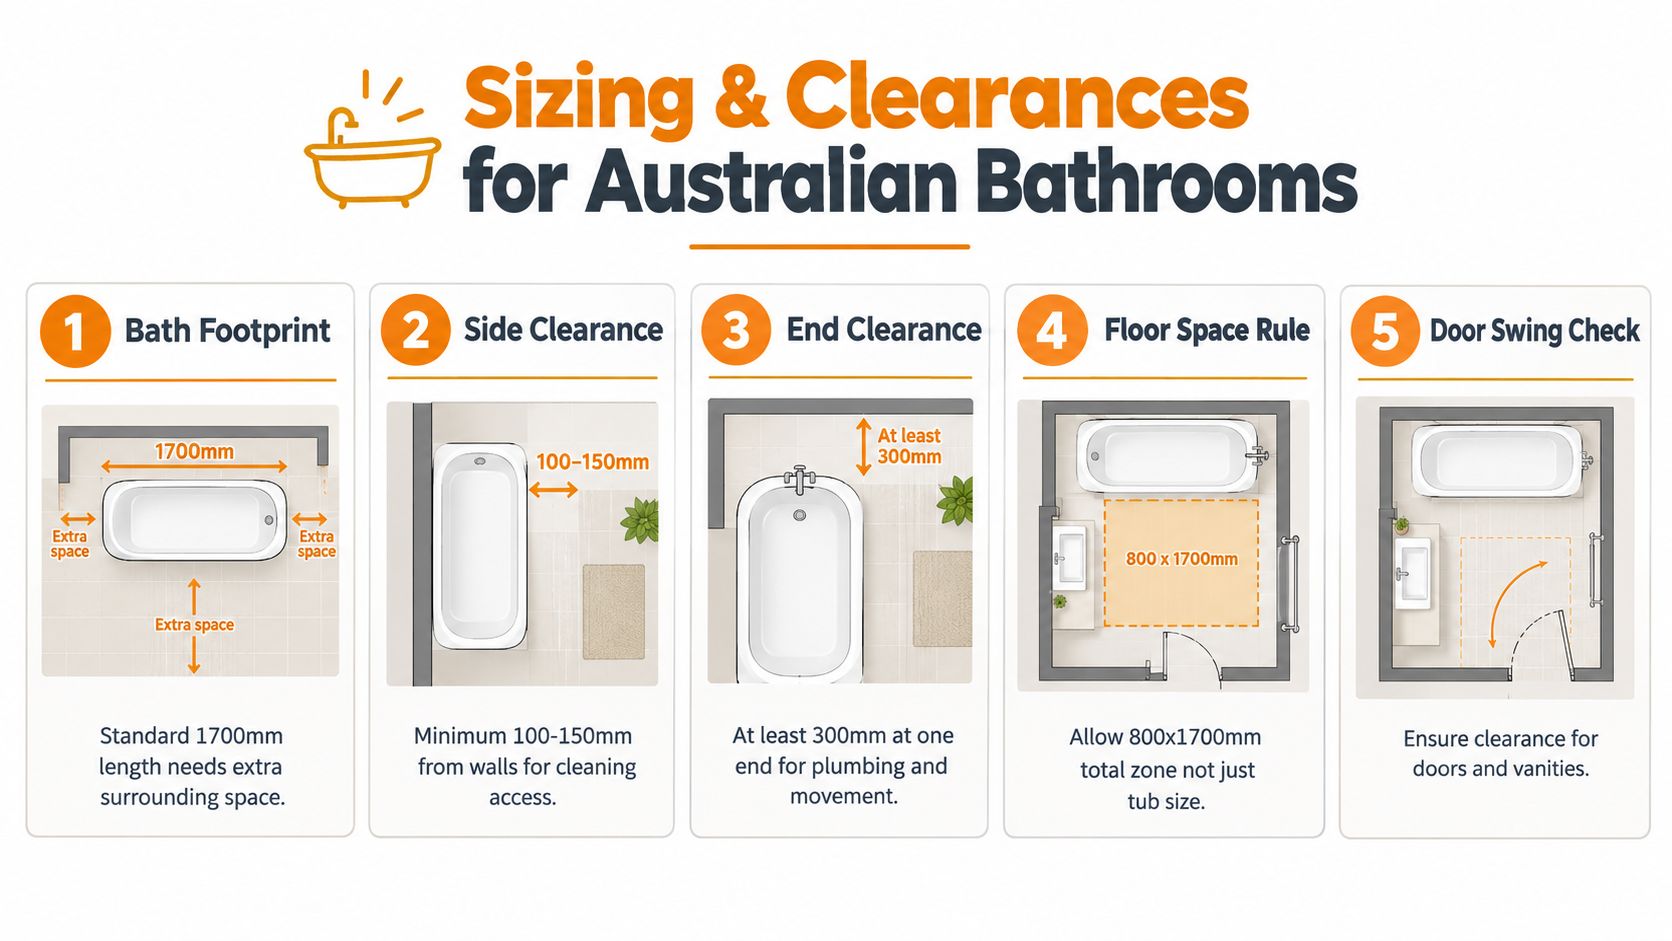
A bath's advertised footprint is only the starting point. Australian buying guidance commonly describes a standard bath at around 1700 mm x 700 mm, while compact freestanding models may be around 1400 mm long. The market commonly includes 1500 mm and 1700 mm lengths, according to The Blue Space's freestanding bath guide.
Those dimensions describe the product, not the usable bathroom zone. You still need space to walk around the shell, clean the floor, reach the tap and avoid clashes with the vanity, toilet, shower screen and door. A 1700 mm bath can technically fit where a built-in model once sat, yet feel much larger because the room now exposes the sides and ends.
Measure the whole room, not only the tub
Start with a scaled plan showing the bath's full length and width. Add the clearance you need for cleaning and movement, then draw the door swing and the opening arcs of vanity doors and drawers. Mark the shower screen, toilet projection and any nib walls. If one of those elements cuts into the bath zone, the installation may work on paper but fail in daily use.
Compact bathrooms need sharper decisions. A 1400 mm or 1500 mm tub may be more appropriate than forcing a 1700 mm statement bath into a room already crowded by a shower and vanity. A shorter bath can still deliver a comfortable soak if its internal depth and back angle suit the user, but check the manufacturer's actual specifications rather than judging from a showroom photograph.
Clearance is also access
The space around the bath affects more than visual balance. Installers need a workable route for carrying the shell into place, levelling it and connecting the waste. Future trades need access if a leak develops or the waste fitting requires attention.
Use this simple test before ordering:
- Draw the bath at full external size: Include feet, plinths, tap projections and any overflow fittings.
- Trace the route into the room: Check every doorway, corridor, stair turn and threshold.
- Open everything nearby: Swing doors, drawers and shower screens through their full movement.
- Stand in the proposed walking path: If the room feels pinched before the bath is installed, it'll feel worse once the shell is in place.
- Ask for the technical drawing: Internal bathing space, overflow location and waste position matter as much as external length.
Space test: If you can't reach the floor beside the bath with a mop or cleaning cloth, you've designed a display piece rather than a practical bathroom.
Don't let a showroom's generous display space distort your judgement. A freestanding bath needs breathing room, but the right compact model can work well when the layout is planned around its real dimensions.
Plumbing Constraints and Floor Loading Requirements
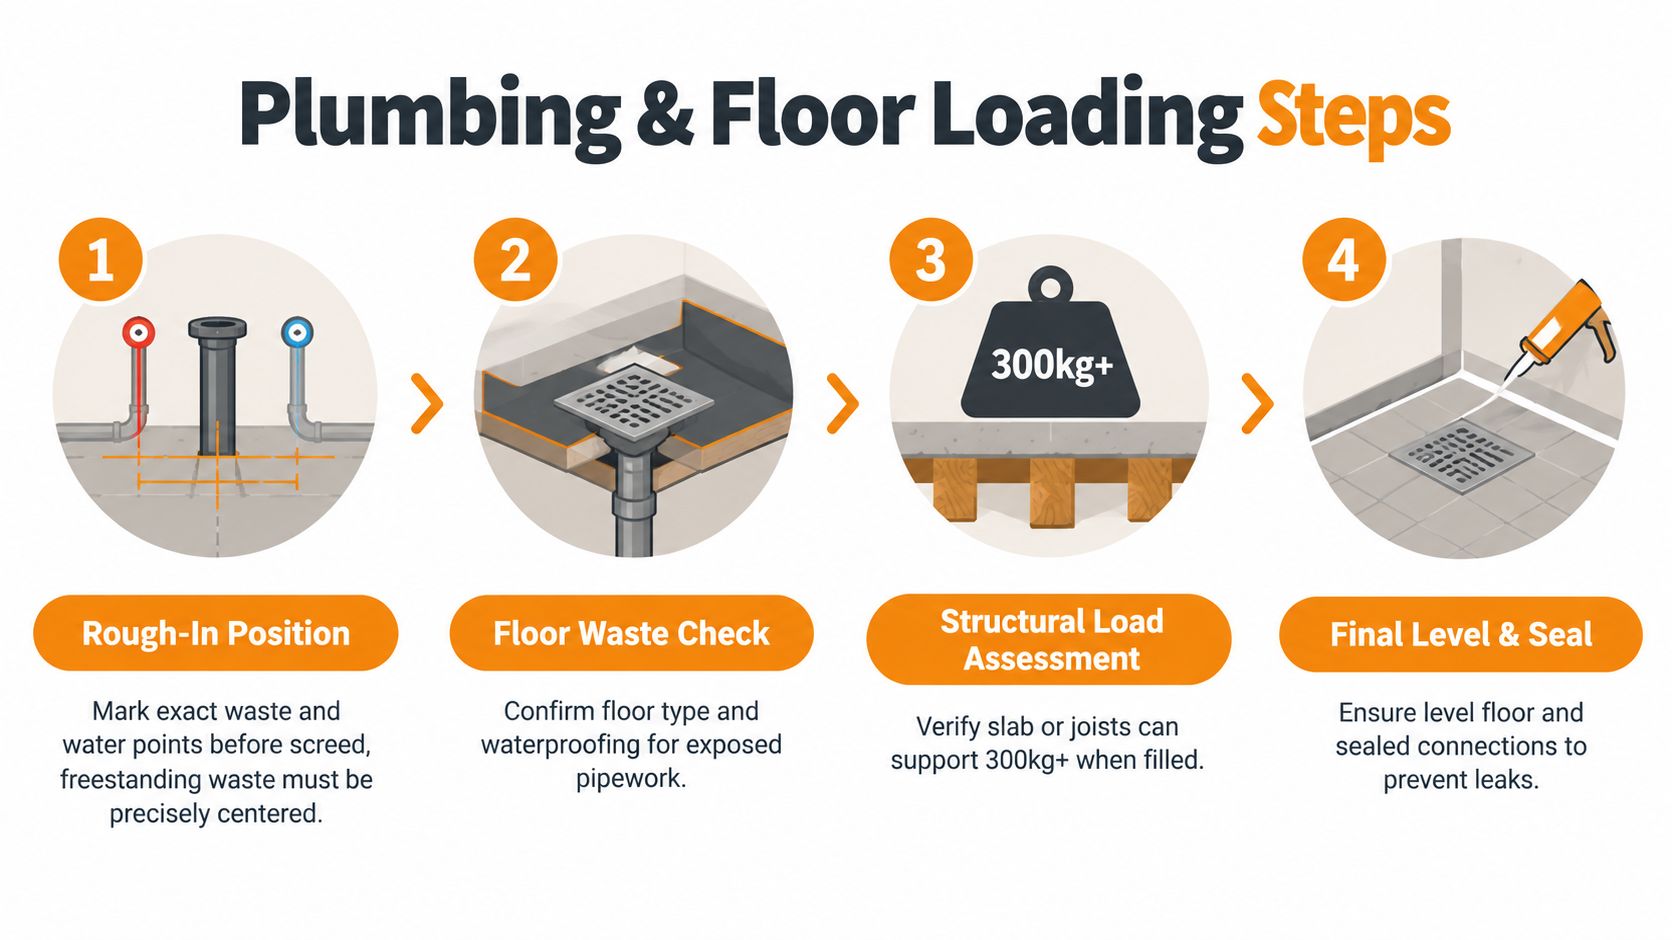
The waste rough-in is where many freestanding bath projects go wrong. The final waste connection must comply with AS/NZS 3500, and Australian installation guidance requires the bath location to be coordinated with waste position, floor access and the local plumbing requirements before tiling or sealing. Freestanding bath installation instructions also identify flexible or connector solutions where access is restricted, including slab floors and upper-storey installations.
The plumber should confirm the exact bath model before roughing in the waste. “Centred” isn't enough if the selected shell has a different outlet position, a concealed base detail or a specific trap requirement. Get the manufacturer's drawing, mark the finished floor level and photograph the pipe route before the screed or tiles hide the work.
The installation sequence matters
Australian documentation describes a bath shell supported by self-levelling feet and held 3 to 5 mm above the finished floor, rather than bearing directly on the floor surface. The installer levels the unit, connects the waste, water-tests for leaks and seals only after the test passes, as set out in Decina's freestanding bath installation manual.
That small gap has a practical purpose. Direct contact can load the shell unevenly and raise the risk of cracking, while accurate levelling helps the bath drain fully toward the waste outlet. Don't use silicone to compensate for a floor that isn't properly prepared. Correct the support and level first.
A reliable pre-tiling sequence looks like this:
- Confirm the model and outlet: Use the bath's technical drawing, not a generic catalogue dimension.
- Set the rough-in: Position the waste and trap around the final floor build-up and the accessible side of the bath.
- Review the substrate: Check the slab, joists, screed and finished floor for level and suitable support.
- Complete waterproofing and tiling: Protect the planned service route and avoid sealing access that the installer still needs.
- Install and level the shell: Adjust the self-levelling feet so the bath sits correctly above the finished floor.
- Connect and test: Water-test the waste and overflow before applying final seals.
If you're managing several trades, a practical plumbing software comparison for one to five can help a small plumbing business organise jobs, notes and follow-up tasks. It won't replace a site inspection, but clear records reduce confusion between the plumber, builder and tiler.
For uneven substrates, discuss preparation with the installer and review guidance on self-levelling cement for bathroom floors. The floor must be ready before the bath becomes the room's focal point.
Here is a visual reference for the installation process:
Material Trade-Offs and Project Budgeting
Material choice changes more than the purchase price. It affects handling, delivery, floor assessment, heat retention, repair expectations and the time available to keep the renovation moving. Australian guidance places entry-level freestanding baths around $750, while premium options can reach the thousands, with installation labour added separately, as explained in hipages' built-in versus freestanding bath comparison.
Acrylic and fibreglass are usually the practical choices for a tighter renovation budget. They're easier to handle than heavier premium materials and offer broad access to contemporary shapes. Stone-resin baths provide a more substantial feel and a premium finish, but they demand greater attention to delivery, handling and floor support.
| Material | Cost Bracket | Weight & Floor Loading | Typical Lead Time |
|---|---|---|---|
| Fibreglass | Entry-level | Relatively light, but still needs correct support and levelling | Confirm with supplier |
| Acrylic | Entry to mid-range | Lighter than stone-resin alternatives, with model-specific support requirements | Confirm with supplier |
| Stone-resin | Premium, often into the thousands | Substantially heavier and requires delivery and floor planning | Three to eight weeks, according to Australian stone-resin bath guidance |
The final row's source is included for lead-time guidance only. Confirm the actual availability for your chosen model before setting the demolition or tiling dates.
Budget for the parts people forget
The bath price is only one line in the renovation budget. Allow for the items that can change the installation:
- Waste and overflow fittings: The selected bath may need a compatible waste, overflow and connection arrangement.
- Plumbing relocation: Moving an existing waste can be simple in one room and disruptive in another, especially where slab access is restricted.
- Floor preparation: Uneven substrates may need levelling before the shell can sit correctly.
- Delivery and handling: A heavy bath may need additional people, careful access planning or specialist handling.
- Tapware: Floor-mounted fillers, wall-mounted spouts and deck-mounted fittings each create different rough-in requirements.
- Future access: A cheaper installation that permanently hides every connection can cost more if a leak later requires demolition.
For an additional cost-planning reference, compare the line items in this SouthRay Kitchen & Bath price guide, then ask your builder to convert the generic allowances into a site-specific quotation.
My material recommendation
For most Melbourne family bathrooms, choose acrylic when the room needs a dependable, manageable installation and the budget doesn't justify a heavier shell. Choose stone-resin when the tactile finish and heat-retention qualities matter, and only after the builder confirms the delivery path and floor support. Fibreglass can suit a basic project, but I wouldn't choose it solely because the bath looks inexpensive in a showroom.
Order premium materials early. A three-to-eight-week lead time can hold up the critical path if the bath is required for final plumbing, waterproofing coordination or fit-off.
Tile Pairings and Styling for Melbourne Homes
The bath should lead the styling, but the tiles must support its shape and the room's practical demands. In Melbourne homes, I favour a calm floor with one deliberate feature surface rather than covering every wall in competing pattern. A freestanding bath already attracts attention, so the tile needs to frame it rather than fight for the same role.
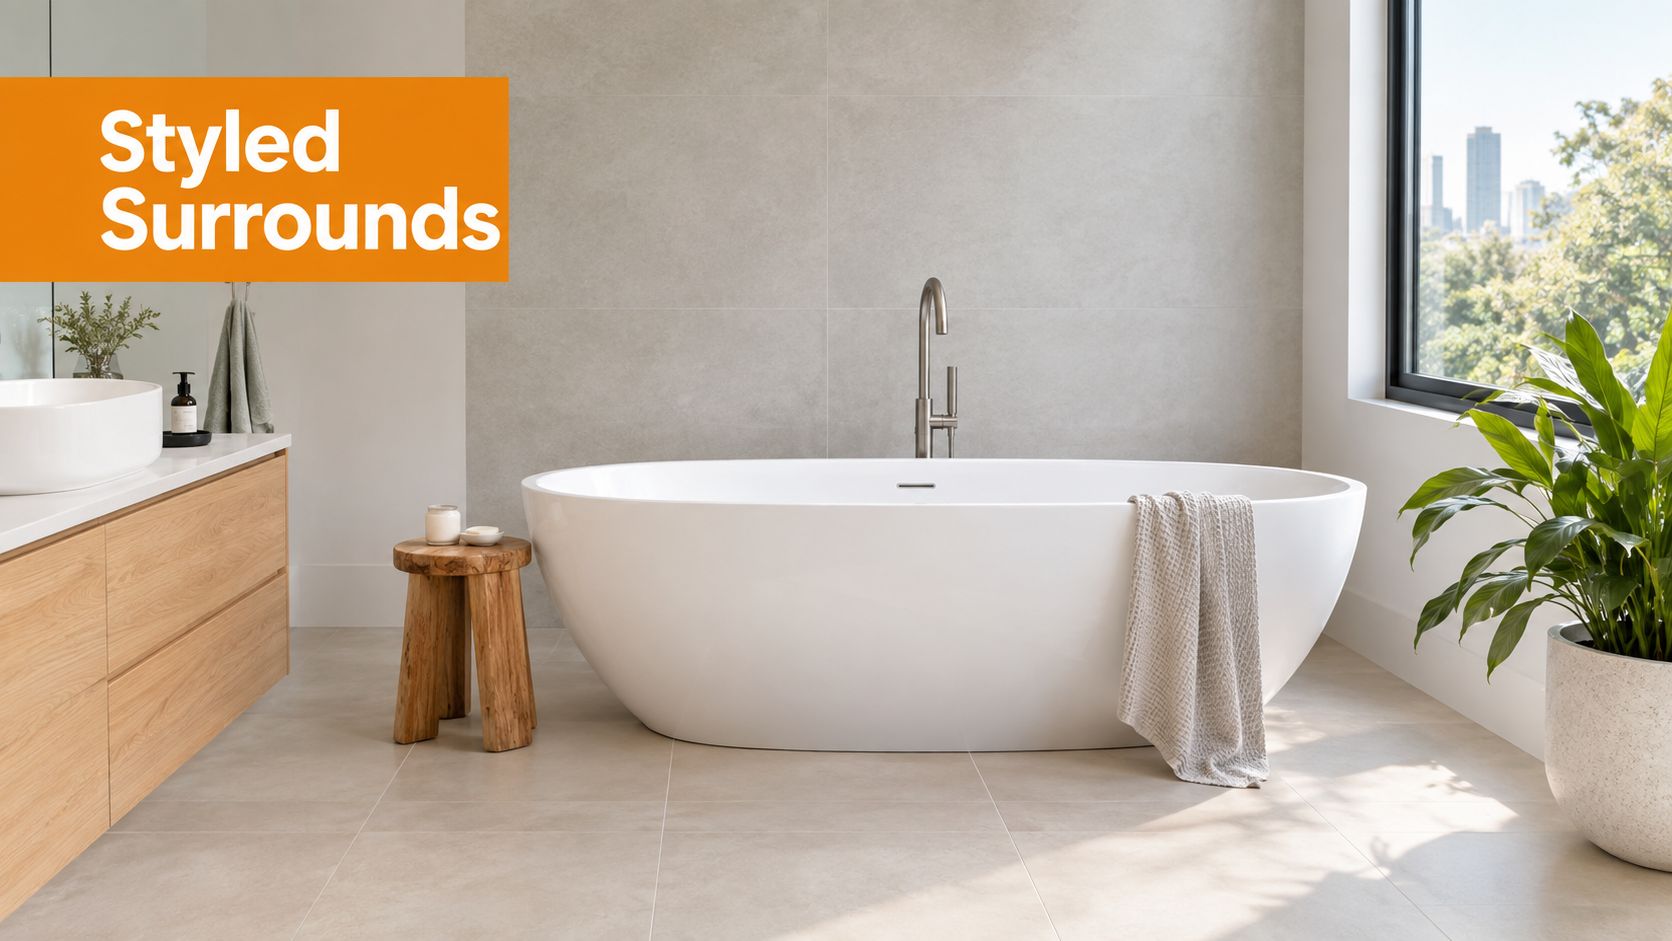
Large-format porcelain works well beneath a contemporary white bath. Fewer grout lines create a quieter background around the shell, and a matt or lightly textured finish can balance the bath's gloss without making the floor visually busy. Always confirm that the chosen tile and finish are suitable for the wet-area application and provide appropriate slip resistance for the room.
Three pairings that suit Melbourne projects
White bath with stone-look porcelain. Pair a gloss white bath with honed-look grey, beige or warm limestone-effect porcelain on the floor. This gives the room depth without relying on real stone maintenance, and it suits both contemporary townhouses and renovated period homes.
White bath with a vertical kit-kat feature. Use a restrained floor tile and place a kit-kat tile vertically behind the bath or vanity. The repeated narrow format adds height and texture, while a matt surface keeps reflections controlled. Keep the grout colour close to the tile if you want the wall to read as a continuous surface.
Period bath with mosaic detail. A clawfoot or roll-top bath can take a more decorative treatment. Use a natural stone mosaic or small-format porcelain on the floor, then keep the main walls calmer so the bath and floor share the heritage character without making the bathroom feel themed.
Texture needs control
Gloss walls reflect light and can make a small bathroom feel brighter, but a glossy floor can be a poor choice in a wet area if its slip performance isn't suitable. A balanced Melbourne scheme often uses matt floor tile, a gentle sheen on the wall and one textured feature tile.
The floor also needs to work with the installation. Large tiles can look excellent, but the tiler must plan falls, penetrations and the bath's final support points carefully. Small mosaics can accommodate changes in floor direction more easily, yet they add grout maintenance. Browse these modern bathroom tile ideas for formats and combinations, then test physical samples beside the actual bath finish and tapware.
Don't select the tile only from a screen. View the colour in the bathroom's natural light, check how the surface feels underfoot and confirm that the pattern won't make the bath look visually unstable.
Accessibility Compliance and Local Sourcing
Freestanding baths need a different accessibility conversation in Australia because they don't provide adjoining walls for grabrails. KBDi's summary of the Livable Housing Design Standard states that, after the transition period, the standard was adopted in most States and Territories in October 2023, and that freestanding baths are excluded from the wall-reinforcement requirement applying to baths with adjacent walls, as explained in KBDi's accessible bathroom guidance.
That exclusion doesn't make the room automatically accessible or future-proof. It means the freestanding bath is treated as a distinct category because grabrails can't be fixed to surrounding bath walls. The wider layout still needs sensible circulation, safe floor finishes, clear access to fixtures and a realistic discussion about how the bathroom may be used later.
Compliance starts with the plan
Ask the designer and builder to document:
- The bath position: Keep the shell from creating an avoidable obstruction beside the toilet, vanity or shower.
- The wall construction: Confirm which walls require reinforcement for other fixtures and future grabrail locations.
- The floor finish: Specify a wet-area-appropriate, slip-conscious tile and coordinate falls before laying it.
- The plumbing access: Make sure service connections aren't sealed away without a considered maintenance plan.
- The user profile: Design for the people living in the home, not only for the bathroom photograph.
Local sourcing helps when the tile, bath and installation decisions need to be coordinated quickly. A Melbourne supplier can provide physical samples, discuss finishes and help match tile formats to the room's scale. Tiles Mate Pty Ltd offers porcelain and natural stone tiles, mosaics, slip-rated outdoor and flooring products, sample packs and design consultations, with trade sourcing and pricing options available for project professionals.
The bath should be approved only after the compliance, plumbing and access checks are complete. A beautiful bathroom is still a poor result if the owner can't clean around the bath, the plumber can't reach the waste or the layout ignores future needs.
Before ordering a freestanding bath, send your room measurements, floor plan and preferred tile direction to Tiles Mate Pty Ltd. Their Melbourne team can help you compare suitable tile finishes, organise samples and coordinate a practical surface palette around the bath, so your design decision supports the installation rather than complicating it.