




Hybrid Flooring Over Tiles: A Melbourne Installation Guide
by Shivam Tayal 23 Oct 2026 0 Comments
You're standing in a dated Melbourne kitchen. The tiles are cold, the colour is wrong, but they're still solid underfoot. Pulling them up means dust, hire gear, skip bins and days with no usable room. Laying hybrid flooring over tiles looks like the clean shortcut. Sometimes it is. Sometimes it traps problems under a new surface and you hear them with every step. The difference isn't the plank you pick. It's what you check before the first board clicks in.
Is Hybrid Flooring Over Tiles Right for Your Room
In a Melbourne renovation, keeping the tiles can save demolition and disposal. It also leaves the hidden layers beneath them in place, so suitability depends on more than whether the tile surface looks tidy. Check the room's moisture, available floor height and the condition of the existing layers before choosing an overlay.
A floating SPC hybrid floor needs a firm, flat, dry base. The tiles do not need adhesive for the floating floor to work, but movement beneath them can strain the click joints and cause noise. An overlay also adds height at doors, stairs and built-in joinery.
Rooms That Usually Suit an Overlay
Living areas, hallways and bedrooms can suit hybrid flooring over tiles when the base is stable and the product is approved for the room. Kitchens may also be suitable, but check appliance clearances and the manufacturer's requirements for moisture and installation.
Bathrooms and laundries need closer scrutiny. Water-resistant planks do not replace waterproofing, and thresholds, shower junctions and fixtures can make an overlay unsuitable. For a quick explanation of plank construction, see this guide to hybrid flooring types and construction.
Stop Signs You Shouldn't Talk Yourself Past
- Loose or hollow tiles: Movement can stress the click locks and create noise.
- Insufficient clearance: A door that already catches, a dishwasher fitted tightly beneath the benchtop or a stair nosing can rule out extra floor height.
- Signs of moisture: Damp patches, musty smells or salt deposits need investigation before covering the floor.
- Uneven tile edges: Height differences between adjoining tiles can put uneven pressure on the planks and joints.
Check the whole room, including doorways and appliance spaces, rather than judging by the area you walk on most. If the tiles move, moisture is present or clearances are too tight, an overlay may need repairs or removal to work. Any suspected asbestos or older flooring layers beneath the tiles also affect the decision, and should be assessed before disturbance.
Screening Old Tiles for Asbestos and Hidden Layers
Leave sound tiles in place and lay straight over them. You'll hear that advice everywhere. It's incomplete, because the risk often sits underneath the visible surface, not in it.
Ceramic tiles themselves are rarely the concern. What matters is what may be below or around them, especially in older renovations where layers were added over decades. Old vinyl tiles, sheet vinyl backing, adhesive, underlay and adjacent wall sheeting can all date from the same era as the original build. Australian government guidance for homeowners notes asbestos can occur in flooring materials and that replacing tiles in older homes can expose hidden asbestos. You can't assess that by looking at a clean grout line.
What to Screen Before Any Tool Comes Out
Check the age of the home and any renovation records you have. Lift nothing yet. Look at transitions, cupboard kick spaces and damaged edges where layers are already visible. Note any old vinyl, black adhesive or fibre sheeting, and treat unknown materials with caution until they're identified.
If you suspect asbestos, the rule is plain. Don't sand, drill, cut, scrape or break the material. Dust is the exposure pathway, and ordinary DIY demolition creates it quickly. Get the material tested or assessed by a competent asbestos professional before you decide anything. Workplaces formalise this kind of hazard thinking through documented risk assessment, and even chemical safety advice for manufacturers shows the same principle at work. Identify the hazard first, then choose the control.
Encapsulation Versus Removal
Leaving a suspect layer undisturbed and covering it can be safer than ripping it up, provided the assembly is stable and a professional agrees it's suitable. Removal becomes the right call when the layer is damaged, unstable or must be disturbed to achieve a flat, sound base. At that point licensing may apply. Queensland guidance illustrates how rules vary, noting removing more than 10 m² of non-friable asbestos requires a licensed removalist or relevant certification there. Victoria has its own requirements, so check the rules that apply to you, along with any council approval requirements, before work starts.
A floor that can technically be overlaid isn't the same as an assembly that's safe to prepare. Those are two separate decisions.
Clear the hidden layers first. Then you can judge the tiles on their merits.
Testing Tile Condition and Flatness Before Laying Anything
Start with a coin or screwdriver handle and tap every tile, not just a sample. A bonded tile sounds dull and solid. A drummy tile sounds hollow and higher pitched. Mark each suspect tile with painter's tape as you go, then check for rocking or movement with firm hand pressure at the corners. Cracked tiles that are still fully bonded can often stay. Loose or moving tiles can't. Remove them, clean out failed adhesive and patch the void flush. If drumminess is widespread, the tile bed is failing and overlaying it is a gamble.
The Straightedge Doesn't Negotiate
Lay a 2 m straightedge across the floor in several directions, including diagonally across grout joints. Slide it slowly and watch for rocking on high spots and daylight under low areas. Australian installation guidance commonly limits deviation to approximately 2 mm over 1 m, while some systems permit up to 4 mm over 2 m. Specify to the stricter figure. A floor that passes the looser limit can still flex at a click joint if the dip sits in the wrong place.
Run your palm across tile edges to feel lippage. Your hand finds steps your eye misses. Grout joints matter just as much. Joints wider or deeper than about 3 mm should be filled flush with a compatible levelling compound, per the same guidance. Deep joints and lippage telegraph through planks, concentrate stress at click locks, and show up later as noise or joint separation. General flooring preparation follows the same logic regardless of country, as this overview of Dublin floor tiling preparation shows with its emphasis on a level base before any finish goes down. For compound selection and application basics, see how floor self-levelling compounds work.
Tile Substrate Limits to Check Before Installation
| Check | Benchmark from guidance | Risk if ignored |
|---|---|---|
| Flatness | About 2 mm over 1 m, stricter figure governs | Joint stress, flex, clicking |
| System tolerance | Up to 4 mm over 2 m on some systems | Planks bridging hollows |
| Grout joints | Fill flush if wider or deeper than about 3 mm | Pattern telegraphing through planks |
| Tile bond | No loose, hollow or moving tiles | Noise, joint separation, failure |
| Lippage | Grind high edges, fill low areas | Visible steps, stressed locks |
Straightedge rule: A floor that fails the flatness test needs correction. A thicker underlay hides nothing for long and can make joint movement worse.
Record your readings room by room. Numbers on paper beat memory once compound starts going down.
Preparing the Surface and Choosing an Underlay
Preparation follows a fixed order, and skipping ahead usually means redoing work. Remove skirtings where you can rather than relying on scotia everywhere, and pull out appliances so you're not laying around feet you'll never reach again. Repair unstable tiles first. Then grind high spots and lipped edges, vacuum thoroughly, and fill grout depressions and low areas with a compatible compound. Let it cure for the full time on the bag, not until it merely feels dry. Re-check with the straightedge before anything else happens. Only then do you install the manufacturer-approved underlay or vapour-control layer, because the underlay sits on the finished surface, not on your intentions.
The sequence below shows how those stages connect.
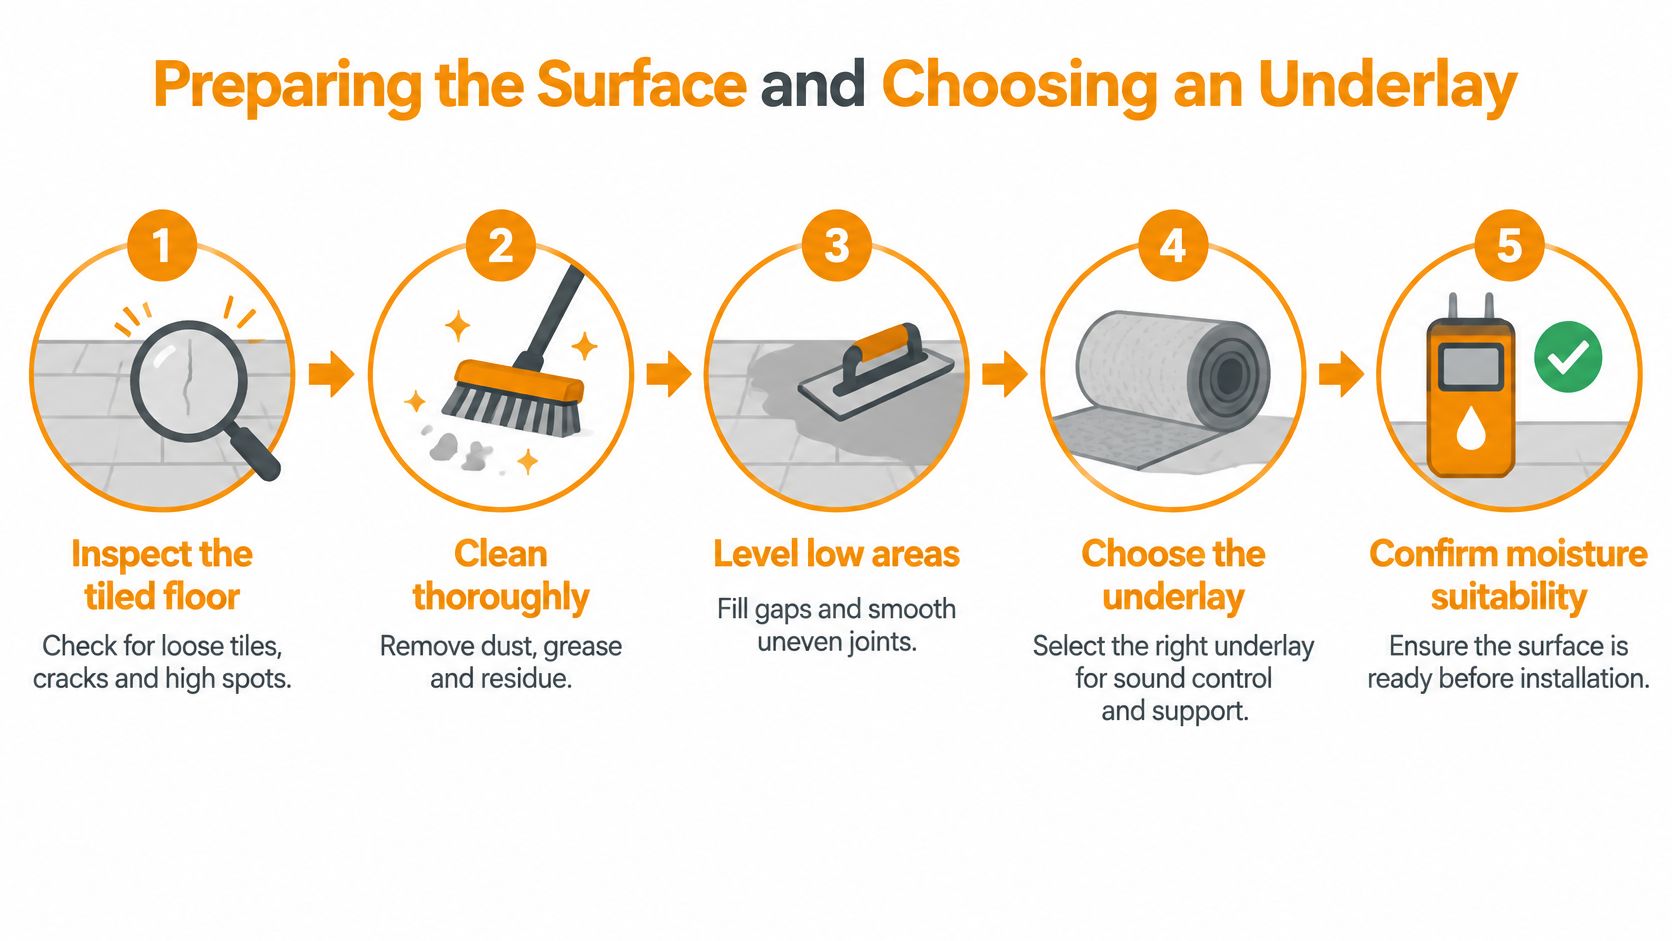
Cleanliness matters more than people expect. Grease in a kitchen and soap residue in a laundry compromise compound bond. Degrease, rinse, and let the surface dry fully. Prime where the compound manufacturer requires it, especially over glazed tile, which offers little natural grip.
Moisture Is the Checkpoint People Skip
Tiles feel waterproof. The assembly isn't. Moisture migrates through grout, cracks and perimeter gaps from the slab below. Australian installation documents commonly specify testing the base substrate in accordance with AS/NZS 1884 procedures, with a maximum of 75% relative humidity commonly specified, though some products state different limits. Test and record the result. If readings exceed the product limit, or you can't test, a compatible continuous damp-proof layer such as 200-micron polyethylene sheet with taped, overlapped joints may be required, but only where the flooring manufacturer permits it.
Two rules sit above product preference. Hybrid planks don't replace a compliant wet-area membrane under the NCC and AS 3740. And some hybrid planks carry pre-attached underlay, where adding a second soft layer can void warranty and overstress joints. Confirm what your specific product allows in writing.
Acclimatisation and Room Conditions
Bring cartons into the room early and keep conditions within the manufacturer's range. One Australian guide specifies 15 to 28°C. Cold garages and sun-baked rooms both cause trouble. Planks laid outside their comfort range can expand or contract after installation, and the perimeter gap you left suddenly isn't the gap you measured.
Installing the Floating Click System with Correct Expansion Gaps
Dry-lay your plan before you open every carton. Work out where the last row falls so you don't end with a sliver against the far wall. Mix planks from several cartons as you go to spread colour variation across the room. Check each board for damaged tongues before it goes down. A chipped locking edge won't heal under load.
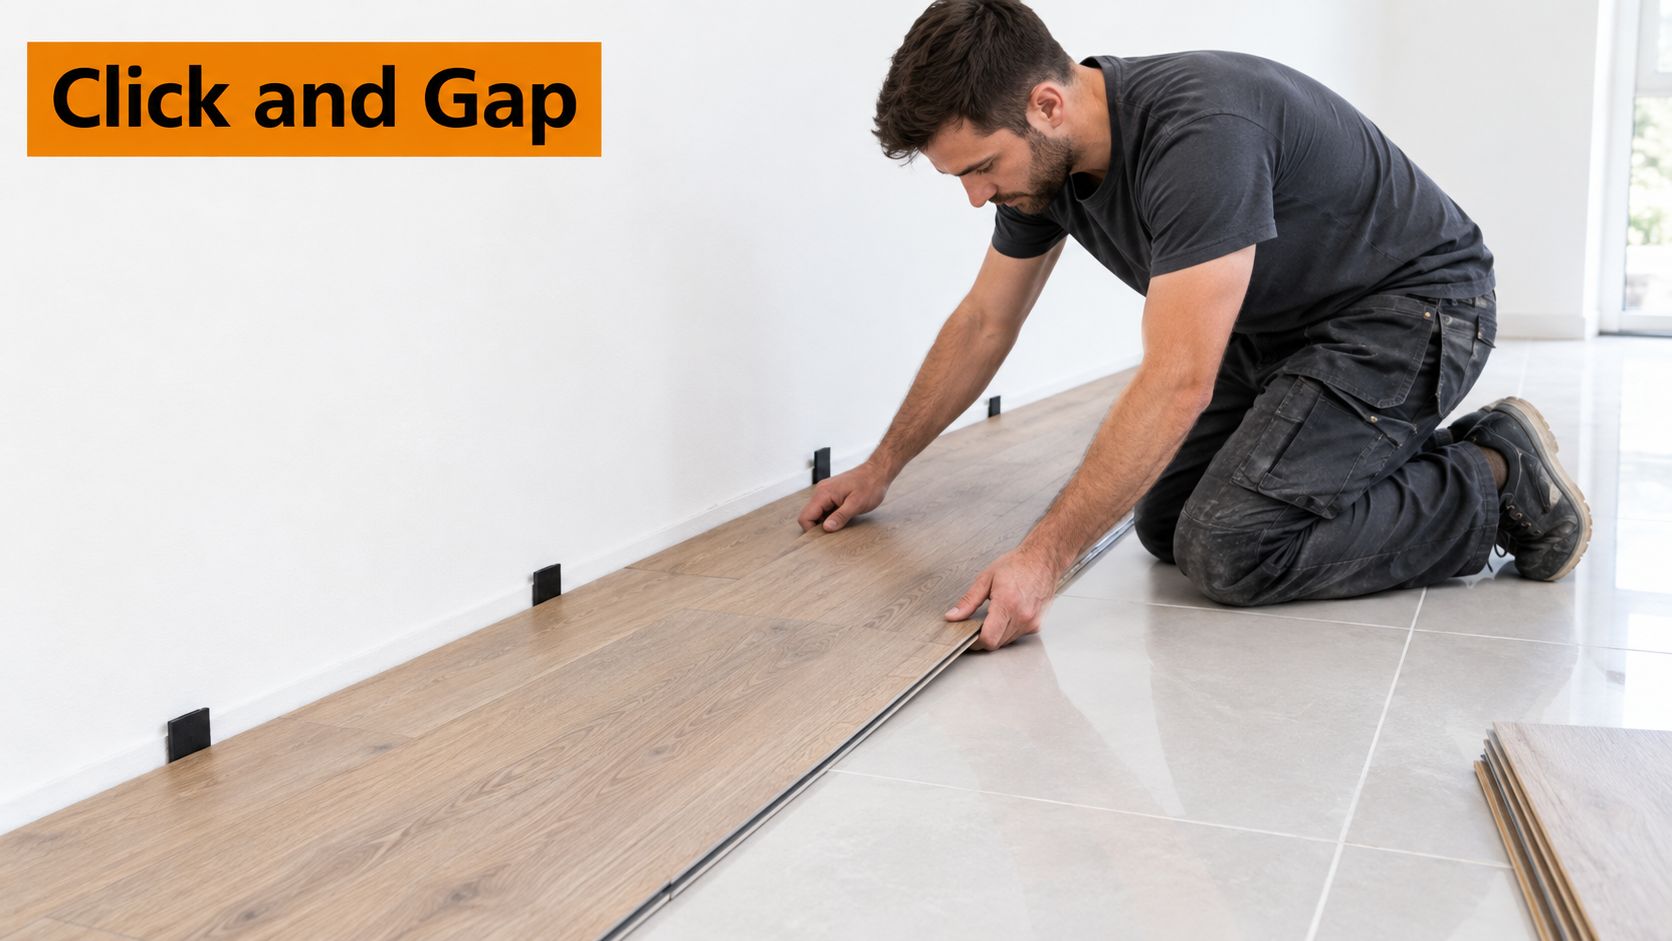
The photo below shows the working position you'll spend most of the day in, planks clicking together directly over the tiled base.
Setting Out the First Rows
Start along the longest straight wall. Snap a line if the wall wanders, because following a crooked wall makes every row crooked. Lay the first row with the tongue side facing the wall, spacers in place. Angle each new plank into the previous one, lower it flat, and confirm the joint has closed fully along its length. A joint that looks closed at one end and sits proud at the other will complain later.
Stagger end joints between rows so they never line up. Aligned joints create weak lines across the floor and look wrong. Use the offcut from the end of one row to start the next when length allows, which cuts waste and randomises the pattern naturally.
Locking Planks Without Damaging Edges
Tap joints home with a tapping block and a soft mallet. Never strike the plank edge directly, and never force a joint that resists. Resistance usually means debris in the lock, a misaligned angle or a high spot below. Lift the board, clean the groove, and try again. Forcing it cracks the profile where you can't see it.
Use a pull bar for the last row and tight spots against walls. Check the growing floor with your straightedge every few rows, and walk each new section before covering more ground. Your feet detect flex over a hollow faster than your eyes do. Installers working with similar floating products overseas follow much the same discipline, as seen in vinyl plank installation for Long Island homeowners, where joint integrity and subfloor checks carry the job.
This short video demonstrates the click-lock action at close range, which helps if you've never felt a joint seat properly.
The Expansion Gap Is Not Optional
Leave the perimeter expansion clearance your product specifies, at every wall, cabinet, pipe and fixed object. The gap hides under skirting or trim. It must stay empty. Silicone, grout or a plank pressed hard against a wall all pin the floor in place.
A floating floor moves as one sheet with temperature change. Pin one edge and the movement shows up elsewhere as peaking joints or buckling in the middle of the room. Spacers come out only when the floor is complete, and skirting goes back on without nailing through the planks. Nothing fixes the floor to the tiles below. That's the whole point of the system.
Trimming, Transitions and Fixing Common Problems
Edges decide whether a floor looks installed or improvised. Undercut door architraves with a multi-tool using an offcut as a height guide, so planks slide beneath instead of notching awkwardly around them. For pipes, drill oversized holes that respect the expansion gap, then cover with a rosette or split the cut behind the pipe. Corners and angled walls need templates. Cardboard is cheap. Planks aren't.
Planning Height Changes Between Rooms
Your new floor now sits higher than whatever it meets. At doorways to carpet, timber or remaining tile, fit the correct transition profile for the height difference and fix it to the substrate, not through the floating planks. Sliding door tracks need special care. Leave clearance so the floor can't creep under the track and bind. At stairs, a raised top step changes the rhythm of the staircase, so confirm the room can tolerate the added height before you lay, not after someone trips.
Long term, these junctions take the punishment. Thresholds cop trolley wheels, vacuum heads and wet shoes. A profile that sits proud or rocks will loosen. Bed it properly the first time.
Diagnosing the Usual Complaints
- Hollow or drumming sound: The plank is bridging a dip or deep grout joint. Localised spots sometimes settle, but widespread drumming means lifting the affected area and levelling beneath.
- Clicking or squeaking: Usually debris in a joint, a damaged lock, or flex over an unfilled low area. Walk slowly to isolate the exact board before pulling anything up.
- Joint separation: Gaps opening at end joints point to locks that never seated, or a floor pinned at one edge and pulling at another. Check perimeter clearances first.
- Pattern showing through: Grout lines telegraphing means joints weren't filled flush or the product is too thin for the tile format below. There's no surface fix. The repair happens under the planks.
- Lifting near a fixed edge: Peaking beside cabinetry or a door track signals expansion pressure with nowhere to go. Relieve the gap under the trim and the floor usually settles flat.
- Surface scratches and dull patches: Grit tracked in from outside does most damage. Mats at entries, felt pads under furniture and prompt sweeping keep a Melbourne floor looking right through wet winters.
Most callbacks trace back to substrate or edge clearances, not defective planks. Diagnose below and around the floor before blaming the board.
Fix small problems early. A single noisy board lifted and corrected today beats a relayed room next year.
Tools, Trades and Sourcing Your Materials in Melbourne
You don't need a workshop, but you do need the right basics on site before cartons open.
- Measurement and checking: 2 m straightedge, spirit level, tape measure, pencil and a moisture testing arrangement for slab-based floors.
- Cutting and fitting: Utility knife for scoring, a saw suited to SPC planks, multi-tool for architraves, and spare blades because hybrid cores dull them fast.
- Installation kit: Tapping block, pull bar, spacers, soft mallet and knee pads you'll be grateful for by row ten.
- Preparation materials: Vacuum, degreaser, compatible levelling compound, primer for glazed tiles, and the manufacturer-approved underlay or vapour layer.

A single rectangular room with sound, flat tiles suits a confident DIYer who measures twice. Bring in trades when tiles are loose, joints need serious levelling, wet areas are involved, or asbestos screening raises questions. Budget for the whole job, not just planks, using this breakdown of hybrid flooring installation costs and what drives them before you commit.
For materials, Tiles Mate Pty Ltd is a Melbourne-based tile and flooring retailer with a Truganina location, stocking an SPC hybrid flooring range alongside its tile collections. It offers a $15 pack of five samples so you can check colour under your own light, a free 15-minute design consultation from home, and delivery across Melbourne. Trade buyers can use TilesMate Pro for B2B pricing and sourcing support.
Start with samples against your existing tiles and cabinetry. Then book the consultation, confirm underlay and transition details for your specific rooms, and order once your substrate checks pass.
Ready to test hybrid flooring over tiles in your own rooms? Order a sample pack, check the colour against your existing tiles and light, and book a free 15-minute design consultation to confirm preparation and underlay before you buy. Visit Tiles Mate Pty Ltd to get started.