




600x1200 Marble Look Porcelain Tiles: A Buyer's Guide
by Shivam Tayal 04 Nov 2026 0 Comments
The usual advice for choosing marble-look tiles is to pick a vein pattern, choose a finish and use a large format to make the room feel bigger. That puts the decisions in the wrong order. With 600x1200 marble look porcelain tiles, the first questions are whether the substrate is suitable, whether the exact surface has the right slip classification, and whether the installer can support and align each tile properly.
Get those decisions right and the marble effect can look convincing without dominating the room. Get them wrong and even an expensive tile can leave you with uneven edges, awkward shower drainage or a floor that's unsuitable when wet.
600x1200 Specs That Set Porcelain Apart
Start with the product datasheet, not the display photograph. Check the material, nominal dimensions, water absorption, finish and approved applications before comparing colours.
600x1200 porcelain versus standard ceramic floor tile
| Specification | 600x1200 Porcelain | Standard Ceramic Floor Tile |
|---|---|---|
| Face area per tile | 0.72 m², calculated from the nominal dimensions | Calculate length multiplied by width for the selected size |
| Water absorption | 0.5% or less | Approximately 3% to 10% |
| Firing temperature | Higher than ordinary ceramic | Lower than porcelain |
| Strength and durability | Exceptionally strong, suited to high-traffic indoor and outdoor areas when appropriately specified | Select a floor-rated product suitable for the intended traffic |
| Grout joints per square metre | Fewer than smaller formats | More when using smaller formats |
Porcelain's higher firing temperature produces a strong, durable body. Its water absorption of 0.5% or less is a useful specification for rooms exposed to routine splashes, although the surface and installation still need separate assessment. The ceramic comparison is a general guide, not a substitute for the selected product's test information.
The format changes the appearance as much as the material changes performance. Broad faces reduce the interruption from grout lines, while the long edge establishes a strong direction across a floor or wall. That suits marble prints with flowing veins, but it also makes poor alignment easier to notice.
What the specifications mean in a renovation
Low absorption means the tile body takes up very little water. It doesn't mean the floor assembly is waterproof, and it doesn't prevent water sitting on the surface.
For a useful material overview, RBA Home Plans explains why builders choose porcelain tile. Our porcelain tile durability guide also helps separate the tile body's durability from the conditions that determine its service life.
There's a clear local reason to give bathroom specifications particular attention. Compare the Market's Australian home-improvement analysis identified bathroom renovations as Victoria's leading home-improvement interest.
Buying rule: Low absorption is a material property, not permission to install the tile on every wet floor.
Outdoor suitability, shower use and high-traffic performance must be confirmed for the actual product. A marble print and a porcelain label don't establish those uses by themselves.
Calacatta, Statuario, Carrara and Real Marble Compared
Choose the vein pattern from full tiles rather than a cropped online image. A dramatic vein that looks balanced in a sample can become the strongest feature in a compact bathroom.
These examples show the visual differences between the main marble-look families.
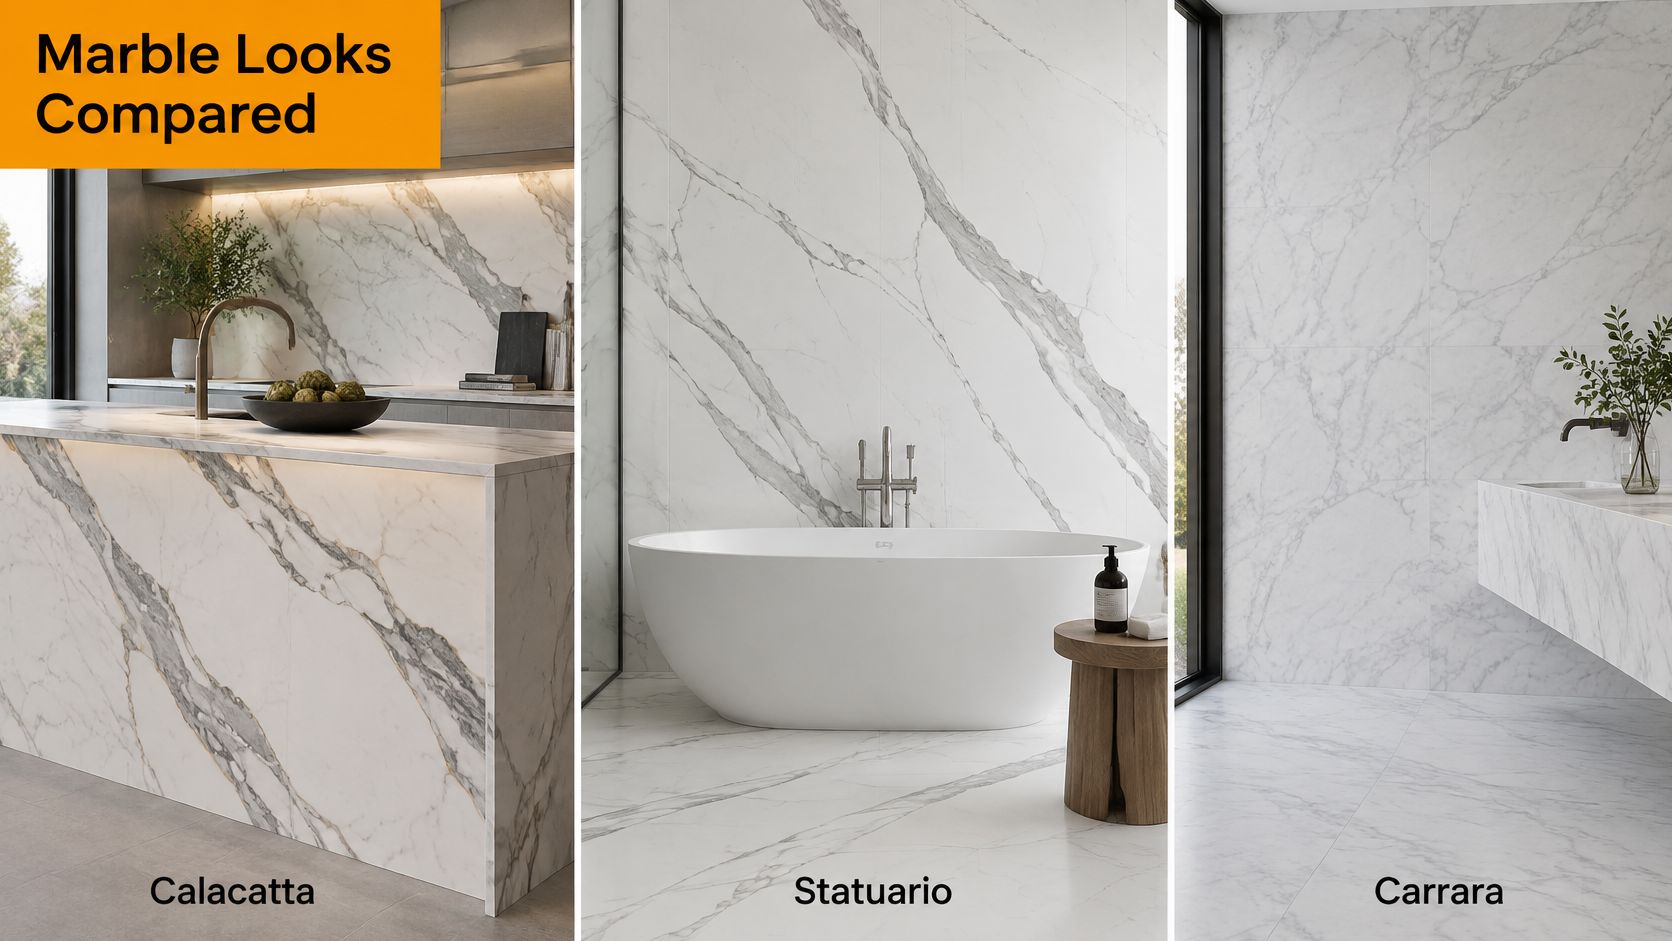
Calacatta-inspired designs generally use a bright background and prominent, irregular veining. They work well when you want a feature wall or statement bathroom, but competing patterns in the benchtop and floor can make the room feel busy.
Statuario-inspired designs often combine a white base with grey veins and tonal shifts. For a calmer result, choose a product with more open background and less contrast rather than assuming the name guarantees a restrained pattern.
Carrara-inspired designs tend towards finer grey veining and a quieter overall appearance. They're useful when cabinetry, tapware or furniture should remain the focus. These names describe design families, not tightly controlled porcelain specifications, so compare the actual prints.
Natural variation or printed consistency
Real marble and marble-look porcelain ask different things of the owner. Porcelain offers a controlled design and straightforward tile-body maintenance; natural marble offers variation that a printed product can't reproduce exactly.
Real marble versus 600x1200 marble-look porcelain
| Attribute | 600x1200 Marble-Look Porcelain | Real Marble |
|---|---|---|
| Water absorption | 0.5% or less | Porous, with absorption determined by the stone |
| Stain resistance | Low absorption helps resist staining, but residues still need cleaning | Vulnerable to staining; sealing reduces risk rather than eliminating it |
| Maintenance | Routine cleaning, generally no sealing of the tile body | Stone-compatible cleaning and periodic assessment for resealing |
| Veining | Printed faces repeat within a product range | Natural veining is unique to each slab |
| Price per m² | Compare the selected product's current price and installed quote | Obtain a stone-specific supply, preparation and installation quote |
High-contrast veining can disguise small marks, but don't choose it purely to hide wear. A polished surface may still reveal scratches or residue when light crosses it.
Use the video alongside physical samples when considering the overall marble effect.
Before committing, lay several full-size samples in the intended orientation. Check them in morning and evening light, looking for repeated motifs, background colour and reflections from windows. The best-looking sample is still only a design choice until its finish is approved for the intended location.
Gloss, Matt, Honed and Textured Finishes Compared
Choose the surface before the marble pattern. Finish affects reflected light, visible residue and cleaning effort, while the tested slip classification determines whether that particular surface is appropriate underfoot.
Australian Chalkline floor-covering guidance notes that polished tiles rarely exceed R9, whereas some matt or textured porcelain products achieve R10 or R11. Those are product-specific results, not ratings you can assign by looking at a sample.
Finish options for 600x1200 marble-look porcelain
| Finish | Look and Feel | Cleaning Trade-off | Slip Performance Note |
|---|---|---|---|
| Gloss | Reflective surface closest to polished marble | Shows water spots, smears and footprints | Generally direct towards dry floors or walls unless documented otherwise |
| Matt | Soft, low-sheen appearance | Disguises many everyday marks, though residue can still build up | Confirm the classification of the exact matt product |
| Honed | Smooth, muted, sometimes velvety appearance | Less reflective, but not automatically scratch-proof | Honed describes appearance, not a tested slip class |
| Textured | Surface relief with a more pronounced feel underfoot | Recesses can retain soap film and dust | Verify suitability for the specific wet or external zone |
Gloss works particularly well on feature walls, where reflections add depth without introducing a walking-surface issue. On floors, check the sample against your windows and lighting: the reflection that looks luxurious in a showroom may highlight every footprint at home.
Matt and honed finishes are useful when you want the vein rather than the reflection to stand out. Run your hand across the sample and inspect it obliquely, because manufacturers don't all use finish names in exactly the same way.
Cleaning is part of finish selection
Textured porcelain isn't automatically the best choice throughout a bathroom. It may provide the surface characteristics needed in a wet zone, but you'll need to work a brush into the relief to remove soap deposits.
A sensible routine is straightforward:
- Remove grit: Sweep or vacuum with a suitable hard-floor attachment before mopping.
- Use a compatible cleaner: Start with a pH-neutral product and avoid leaving detergent residue.
- Rinse relief surfaces: Work clean water through textured areas rather than pushing dirty solution into the grooves.
- Treat grout separately: Confirm whether the selected grout requires sealing; cementitious and epoxy systems don't have identical requirements.
Avoid aggressive acid cleaners and abrasive pads unless the product manufacturer expressly permits them. Compare shortlisted finishes wet to understand their appearance and cleaning behaviour, but don't treat a home sample test as a substitute for laboratory slip documentation.
Matching Finishes to Each Room and Wet Zone
A marble appearance doesn't make a tile suitable everywhere in the house. Specify the room, exposure and exact finish, then ask for the corresponding test certificate.
The testing systems aren't interchangeable. P classifications relate to wet pendulum testing, while R classifications come from a shod ramp test; a P result isn't a barefoot rating or a conversion from an R result. CSIRO's surface-testing guidance identifies AS 4586 pendulum testing as a method for classifying the wet slip resistance of new flooring materials.
Finish direction and slip target by room or zone
| Room or Zone | Finish Direction | Slip Target to Confirm | Key Check |
|---|---|---|---|
| Living room and bedrooms | Gloss or matt | Classification appropriate to dry internal use | Flat substrate and transitions to adjoining floors |
| Kitchen floor | Matt or suitably textured | Tested suitability for foreseeable spills | Cut lines around cabinetry and appliances |
| Bathroom floor | Matt or textured | Wet-use classification appropriate to the design | Falls and waste position |
| Laundry floor | Matt or textured | Wet-use classification appropriate to the design | Drainage requirements and appliance locations |
| Shower floor | Suitable matt, textured or smaller-format product | Shower-specific suitability, including relevant barefoot assessment | Falls, waste geometry and necessary cuts |
| Bathroom walls and splashbacks | Gloss, matt or honed | No walking-surface slip target | Waterproofing and adhesive compatibility |
| Covered alfresco and entry | Externally suitable matt or textured | Classification matched to actual weather exposure | Wind-driven rain and tracked-in water |
| Pool surrounds | Purpose-selected textured surface | Documented suitability for pool-surround use | Barefoot use, contaminants and maintenance |
These are selection directions, not a declaration that every matt tile is safe or every room has an identical mandatory rating. Ask the designer or tiler to nominate the applicable target and match it to the certificate for the actual product.
Give the shower its own specification
A large tile can work beautifully on a shower wall and be awkward on the floor beneath it. A central waste requires intersecting falls, so the tiler may need envelope cuts or a smaller format to form the drainage geometry properly.
A linear waste can make a large-format arrangement more practical, but only when the floor design supports it. Don't move the drain or flatten the falls to preserve an uninterrupted marble print.
The NCC wet-area waterproofing provisions distinguish water-resistant surface materials from the compliant substrate and waterproofing assembly beneath them. Tile selection doesn't replace that assembly.
If heating is planned, ShamFix's discussion of floor tiles for underfloor heating provides useful background for coordinating the floor build-up. Have the installer confirm compatibility across the heating system, substrate, membrane and adhesive.
Before approving a wet-zone product:
- Obtain the certificate: Match its product and finish identifiers to your order.
- Confirm intended use: Have the tiler assess drainage and surface suitability together.
- Verify waterproofing separately: Document the system and junction details.
- Keep the records: Retain the product reference and relevant installation documentation.
Layout and Grout Choices for Large Format
Layout determines where the eye follows the joints and where the tiler must control alignment most carefully. Decide it on a scaled plan, then dry-lay enough tiles to see the vein sequence before adhesive goes down.
A straight stack produces clean, continuous joint lines. It suits architectural interiors, but it exposes crooked set-out and uneven edges, especially where window light crosses the floor.
A running bond with a modest offset breaks up the joint grid without forcing the centre of every tile against the end of its neighbour. A half-offset layout can look more active, but it may exaggerate differences between the centre and ends of tiles that aren't perfectly flat.
Select the pattern around the actual tile
| Layout | Best Reason to Choose It | Main Installation Check |
|---|---|---|
| Straight stack | Clear lines and controlled vein direction | Squareness, joint alignment and perimeter cuts |
| Modest-offset running bond | A less rigid grid | Manufacturer's permitted offset and tile flatness |
| Half-offset running bond | Strong staggered rhythm | Whether the product permits it without unacceptable lippage |
Don't nominate an offset from a photograph alone. The tiler should check the manufacturer's layout restrictions and inspect the supplied tiles before confirming the pattern.
Rectified edges allow a precise-looking joint, but they don't justify butt-jointing. Set the joint width from the manufacturer's recommendation, tile consistency and installation requirements, and keep movement joints separate from ordinary grout joints.
For a quieter marble effect, choose grout close to the background colour. A contrasting grout makes the rectangular grid more visible, while very pale grout can demand more cleaning on a busy floor. Our guide to the best grout colour for white tiles helps compare those visual outcomes.
A grout colour should work when the floor is in use, not just when the sample board is clean.
Epoxy grout can be useful where stain resistance matters, but it adds material and installation cost and needs careful cleanup. Select the grout system with the tiler rather than treating it as a last-minute colour purchase.
Open multiple boxes and sort the faces before laying. Avoid obvious repeats beside each other, and plan wall-to-floor junctions deliberately rather than expecting veins to connect by chance. Smaller formats are easier to manoeuvre through tight access, while the larger format offers longer uninterrupted printed faces at the cost of more demanding handling.
How to Lay 600x1200 Tiles Without Voids or Lippage
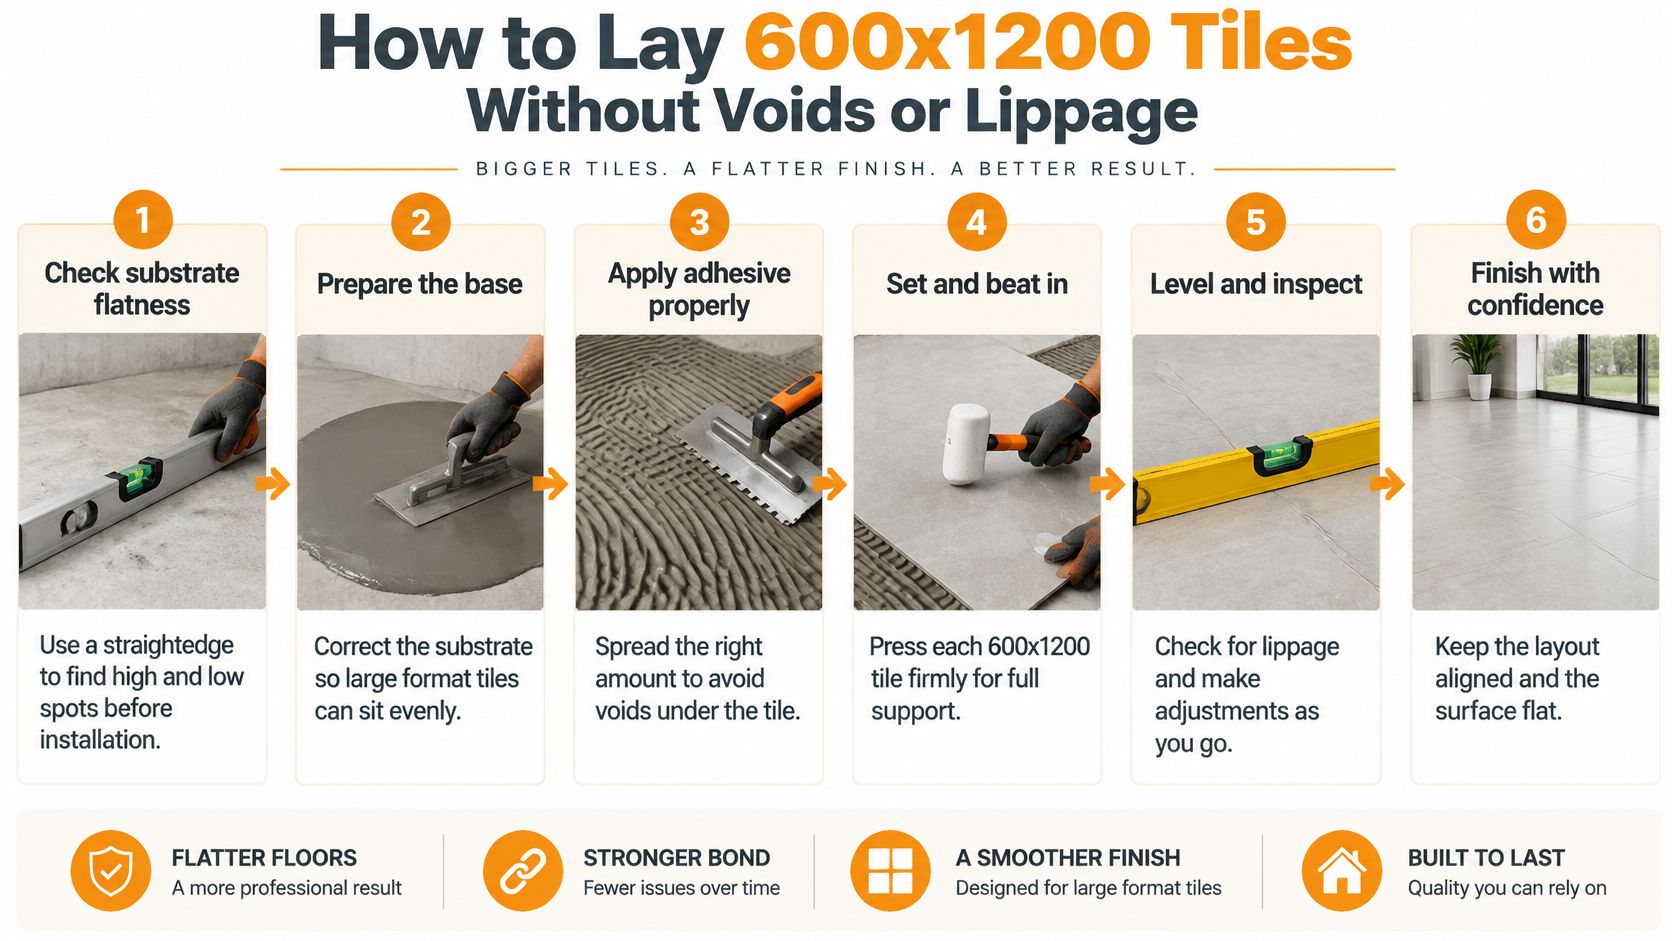
Large-format installation rewards preparation, not speed. Levelling clips can help manage adjoining edges, but they can't repair an uneven substrate or compensate for missing adhesive beneath a tile.
The installation sequence starts before the first tile is unpacked.
Prepare, support and inspect
- Check the substrate with a straightedge. Work across the floor in different directions and mark high and low areas. Correct them with a preparation system compatible with the substrate and any waterproofing, rather than trying to hide major unevenness in adhesive.
- Select the adhesive and trowel together. Use an adhesive approved for large-format porcelain and the particular wall or floor assembly. Comb consistent, directional ridges and avoid spreading more than you can cover before the adhesive skins.
- Verify coverage by lifting tiles. The National Tiles installation specification calls for at least 85% adhesive coverage for interior installations and, under its stated conditions, at least 72 hours before grouting or light foot traffic, with protection from heavy traffic for at least seven days. Treat that coverage figure as guidance within that specification, not a universal wet-area target; use the requirements of your selected system and application, back-buttering where needed to achieve proper support.
- Plan handling before mixing adhesive. Use suitable suction equipment and arrange assistance for stairs, narrow doorways and wall placement. Check the route from delivery point to room so a large tile isn't twisted through a tight opening.
- Set, bed and inspect continuously. Move each tile across the adhesive ridges to collapse them, then check alignment, joint spacing and adjacent edges. Our tile levelling clips guide explains their role, but the tile still needs proper bedding underneath.
- Sequence the difficult cuts. Mark niches, wastes, taps and floor penetrations against the agreed set-out before cutting. Support the tile fully on appropriate equipment and avoid forcing fragile cut sections into place.
- Protect the installation while it cures. Follow the adhesive, membrane and grout system's actual waiting periods, accounting for site conditions. Don't let following trades load the floor just because the tile surface feels firm.
Why coverage matters
Unsupported areas can leave edges vulnerable to cracking and allow movement under load. Spot bonding is particularly unsuitable for a floor that needs continuous, reliable support.
The NCC housing wet-area provisions also make the compliant substrate part of the water-resistant surface assembly. The installer therefore needs to assess the base as a construction element, not merely a surface to cover.
Before ordering, confirm that the tiler is comfortable with the format and has included preparation, handling and difficult cuts in the quote. A low laying rate isn't a saving if essential work has been excluded.
Order Verified 600x1200 Tiles With a Clear Budget
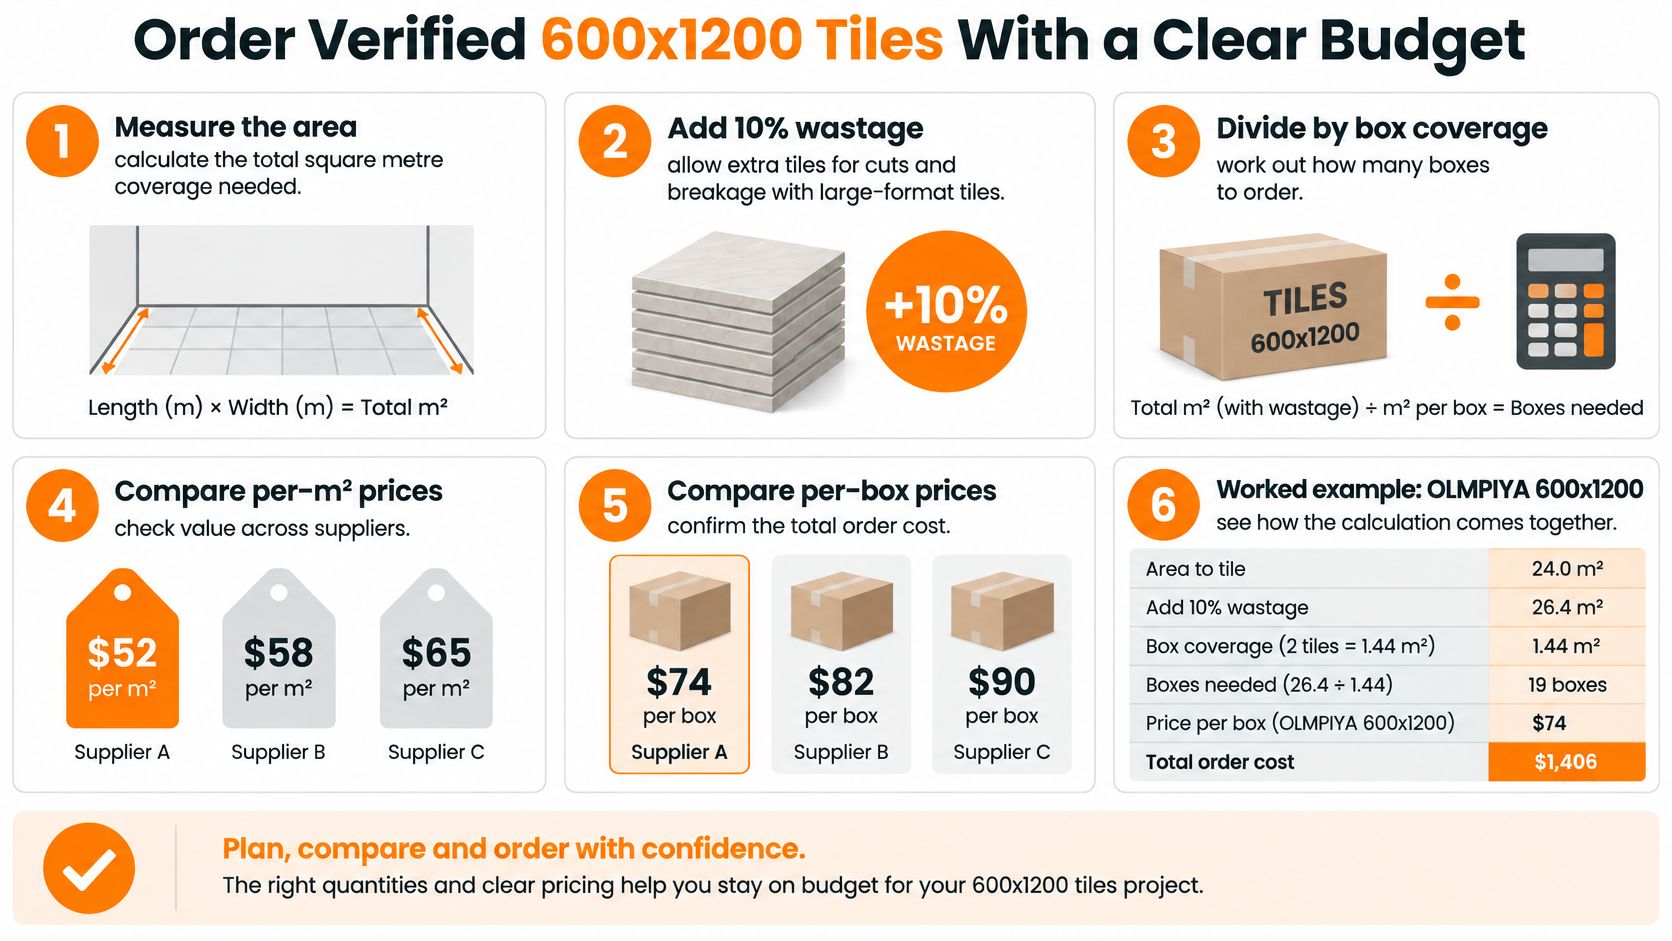
Budget from the number of boxes you must buy, then add the work required to install them. Comparing only the advertised square-metre price can conceal differences in box rounding, preparation and labour.
Use this calculation sequence, with the cutting allowance agreed for your particular layout.
A worked tile-only budget
For a hypothetical 20 m² floor, allow 10% for cuts and breakage as an estimating assumption, subject to the tiler's layout check. That gives a target purchase area of 22 m².
Our OLMPIYA 600x1200 gloss tile covers 2.16 m² per box and is listed at $97.20 per box, equivalent to $45/m². The calculation is:
| Calculation | Worked Example |
|---|---|
| Floor area plus assumed allowance | 20 m² × 1.10 = 22 m² |
| Boxes required | 22 ÷ 2.16, rounded up to 11 boxes |
| Area purchased | 11 × 2.16 = 23.76 m² |
| Tile-only cost | 11 × $97.20 = $1,069.20 |
That total excludes adhesive, grout, substrate preparation, waterproofing where required, delivery and installation. The purchased coverage exceeds the target because you're buying whole boxes, not an exact measured area.
Ask for the installed quote to identify preparation separately. Grinding, levelling, wall correction and complex cuts should be visible costs rather than assumptions hidden inside a square-metre rate.
Approve the order, not just the colour
Tiles from different batches can differ slightly in colour and size. We recommend having your tiler verify all measurements before ordering, particularly where the layout depends on balanced cuts or aligned junctions.
Keep a compact approval record:
- Measured area: Include the agreed cutting allowance and box rounding.
- Application: Identify each floor, wall and wet zone separately.
- Product approval: Record the exact finish and written slip classification.
- Installation plan: Confirm layout, grout, substrate preparation and site access.
- Sample sign-off: Approve colour and vein under the room's actual lighting.
- Final quantity: Have the tiler verify measurements before purchase.
Retain spare tiles from the order for future repairs where practical. The aim isn't to buy the cheapest box, but to buy a verified product in a workable quantity with a realistic installed budget.
Tiles Mate Pty Ltd offers marble-look porcelain selections, a $15 pack of five samples and a free 15-minute design consultation to help compare finishes and layouts. Visit Tiles Mate Pty Ltd with your room measurements and intended applications, then have your tiler confirm the substrate, slip documentation and final quantities before you order.