




Natural Stone Mosaic Tiles: A Complete Buyer's Guide
by Shivam Tayal 28 Sep 2026 0 Comments
You're halfway through a Melbourne bathroom renovation when the sample board starts causing trouble. The marble penny round looks superb under showroom lights, the travertine feels warmer, and the herringbone sheet seems certain to become the room's feature. Then someone asks the questions that matter more than colour: Will it stay safe when wet? Will acidic cleaners damage it? How often will it need sealing?
That's the right point to slow down. Natural stone mosaic tiles are a room-and-maintenance decision before they're a pattern decision. Marble, travertine, quartzite and granite behave differently under water, grime, cooking heat and foot traffic. Choose the stone first, then choose the format.
What Natural Stone Mosaic Tiles Actually Are
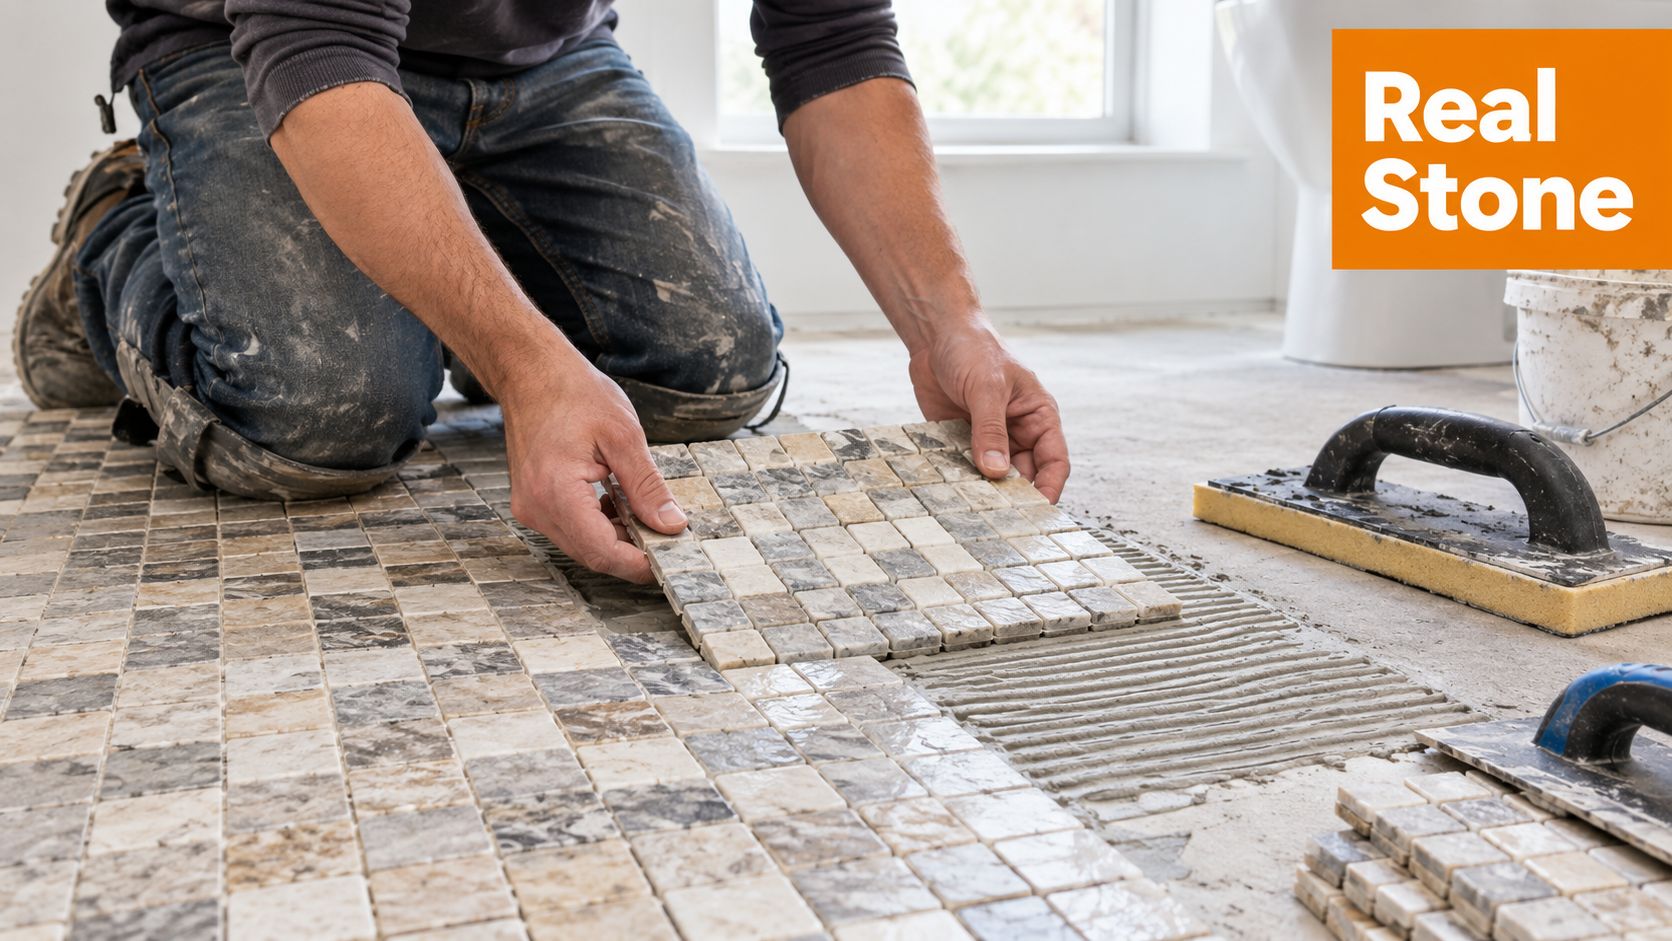
A natural stone mosaic is made from small pieces cut from genuine stone, commonly marble, travertine, limestone, granite or quartzite. Manufacturers arrange those pieces into a repeating pattern and usually bond them to mesh sheets, making installation faster than placing every unit individually. The stone still retains its natural variation, so neighbouring pieces may differ in tone, veining, pores and texture.
That distinction matters when you compare stone with ceramic or porcelain mosaics. Ceramic and porcelain are manufactured to produce more controlled colour, density and shape. Natural stone has a less uniform surface because it was formed as a geological material, not printed to imitate one. A box of Carrara marble may contain soft grey veining and tonal movement that makes the finished floor feel layered. It can also contain variation you need to blend during installation.
Mosaic itself has an ancient design history. Australian-facing industry coverage notes that the technique began more than 4,000 years before the Classical civilisations of Greece and Rome, while Greek makers mastered stone-pebble mosaics about 2,400 years ago. Nerang Tiles' history of mosaic applications connects that early stone composition with the formats still used in bathrooms, feature walls and pool-adjacent spaces.
Why the small pieces change the decision
Small units create more grout joints than large tiles. That can help a wet-area floor because the joints interrupt the surface and add texture under bare feet. It also gives the tiler more work to align, clean and seal.
Australia has long treated natural stone tiles as a distinct import category. A 2012 industry review recorded A$165,329,340 in building-related natural stone imports, including slabs and tile, with the total customs value only 0.4% lower than in 2011 and 0.5% lower than in 2010. The review includes tariff category 680210, covering natural-stone tiles, cubes and similar articles. The Australian Stone Advisory Association market review supports a practical conclusion: natural stone surfaces were already an established Australian supply category, not a new decorative experiment.
Showroom advice: Order samples to judge the stone's behaviour and finish, not just its pattern. A beautiful surface that's wrong for the room will remain wrong after installation.
Stone Types Compared for Mosaics
Start with the stone's working qualities. Marble offers the strongest decorative payoff but demands the most disciplined care. Travertine brings a softer, earthy appearance with open pores and pits. Quartzite and granite are denser choices where resistance to staining, abrasion and heavy use matters more than a delicate veined look.
| Stone Type | Mohs Hardness | Porosity | Typical Look | Best-Fit Rooms |
|---|---|---|---|---|
| Marble | Medium | Moderate to high | Veined, refined, often cool-toned | Bathroom walls, feature floors, splashbacks |
| Travertine | Medium to moderately hard | High, with natural pits | Warm, layered, earthy | Bathroom floors, laundries, feature walls |
| Quartzite | Hard | Low to moderate | Dense, crystalline, often directional | Kitchens, floors, pool-adjacent areas |
| Granite | Hard | Low to moderate | Speckled or granular, highly varied | Kitchens, floors, outdoor applications |
Mohs hardness is useful for shortlisting, but it isn't a complete performance test. Porosity and finish often matter more in a bathroom. A honed marble mosaic may provide a more practical underfoot surface than polished marble, even though both come from the same stone family. Travertine can look excellent on a floor when its texture is part of the design, but its pits need proper filling or acceptance as part of the aesthetic.
Marble
Choose marble when the room can support regular care and you want veining to do the visual work. Carrara mosaics suit restrained bathrooms and splashbacks, while stronger veining can turn a small wall into the room's focal point. For more guidance on the character of Carrara formats, compare Carrara mosaic tiles before ordering.
Travertine
Travertine is the better choice for renovators who prefer warmth over polish. Its pores, mineral markings and irregularities are not defects to hide completely. They're the reason it works in relaxed bathrooms, laundries and feature walls. The trade-off is clear, acidic products and neglected sealing can make it a persistent maintenance job.
Quartzite and granite
Quartzite and granite make more sense where the surface must tolerate busy use. They're particularly suitable for kitchen splashbacks, floors and some exterior settings, provided the selected finish and slip performance suit the location. Don't assume every slab or mosaic from a named stone family has identical absorption. Ask for the actual product's technical data.
Popular Mosaic Formats and Patterns
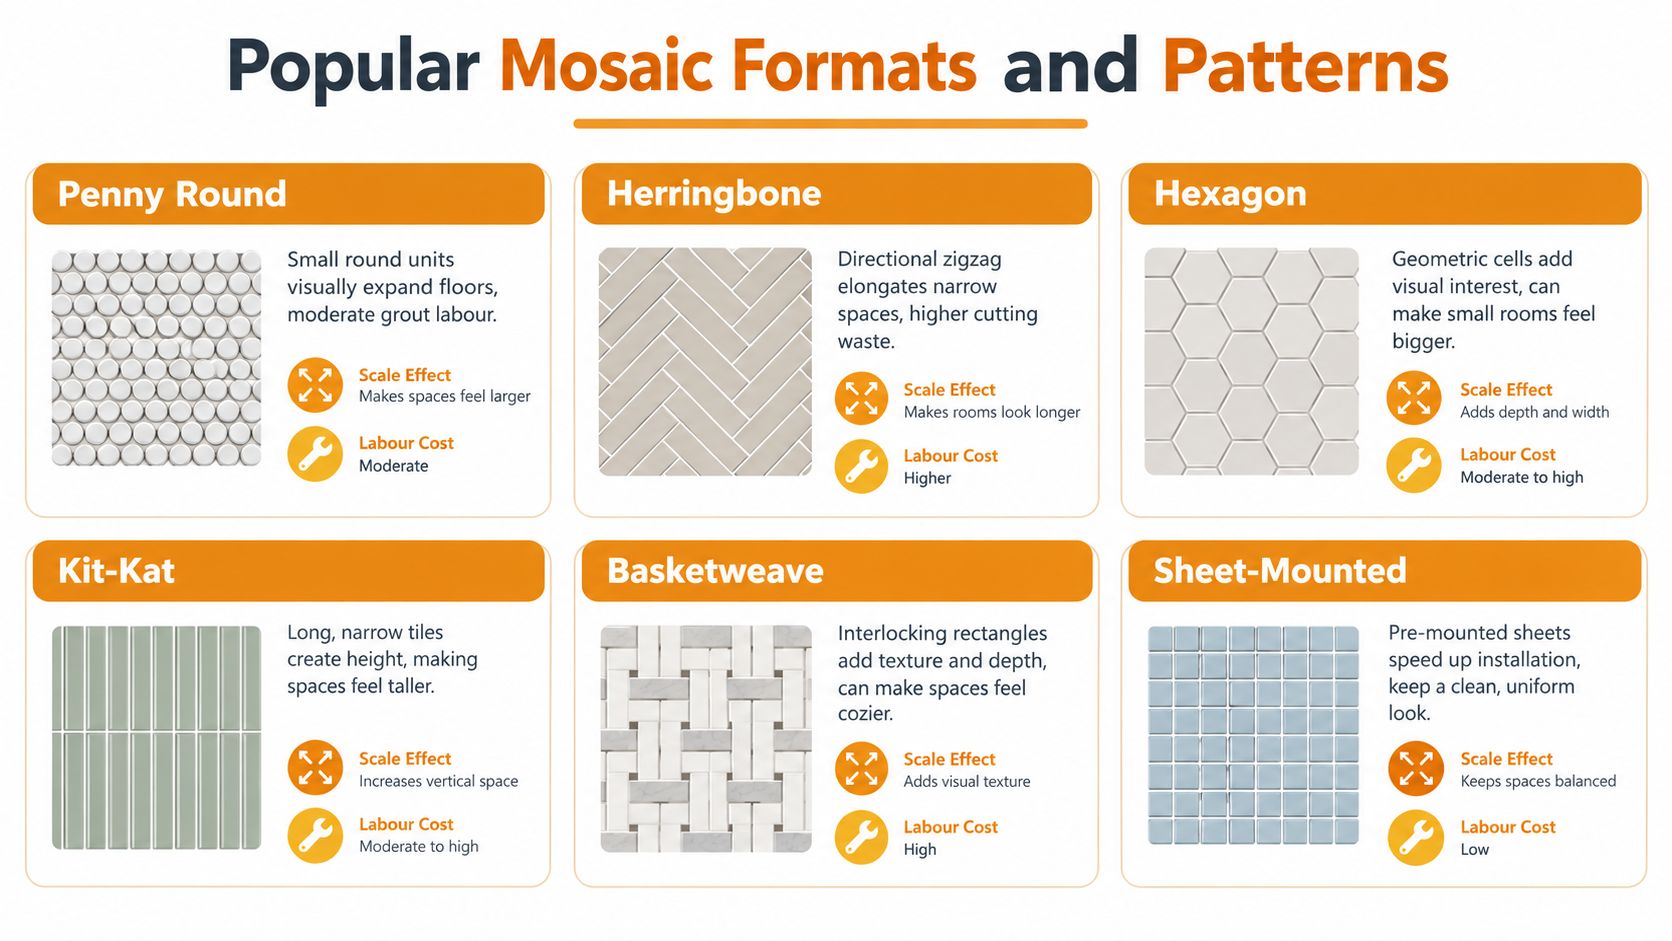
Pattern changes the room before the stone does. Small, repeated units create detail and more grout. Directional layouts can stretch a narrow wall, while compact geometric pieces can make a plain floor feel deliberately designed. The labour bill usually follows the number of cuts, alignments and edge treatments, not just the amount of stone.
Pick the format for the room
- Penny round: The small circular units soften a bathroom and create a lively, tactile floor. They can make a compact space feel more detailed, but every curve around a drain and wall edge needs careful cutting. Penny round stone mosaics suit renovators who want charm without a rigid grid.
- Herringbone: This zigzag pattern directs the eye along the wall or floor. Run it horizontally to broaden a narrow room or vertically to add height to a splashback. It's less forgiving than a straight grid because broken edges and misaligned sheets are easy to spot.
- Hexagon: Hexagons provide strong geometry without the directional pull of herringbone. Small hexagons add visual activity to a floor, while larger units produce a calmer result. The perimeter still requires careful cuts because the edge never finishes as a simple straight line.
- Kit-kat: Slim finger mosaics make a wall feel taller or longer depending on their orientation. They're effective on shower niches and splashbacks, but lippage control matters because narrow pieces expose uneven adhesive bedding.
- Basketweave: Basketweave brings a traditional, distinct character, especially in marble. It's visually substantial, so keep surrounding surfaces quiet and confirm that the pattern's border pieces align cleanly at corners.
- Sheet-mounted formats: Mesh backing speeds placement, but it doesn't remove layout work. Dry-lay sheets, stagger joins, blend boxes and check that the repeated mesh pattern doesn't create visible seams.
Practical rule: The more expressive the pattern, the quieter the surrounding tile should be. Let one surface carry the detail.
Where Natural Stone Mosaics Work Best
Room suitability depends on stone density, surface texture, cleaning exposure and slip resistance. Australian stone guidance commonly uses AS 4586 wet pendulum testing, with surfaces classified from P0 to P5. For practical wet-area selection, Australian usage commonly targets P3 to P4 for bathroom and laundry floors and P4 to P5 for pool surrounds and persistently wet exterior zones. The Australian Stone Advisory Association's standards guidance is the right reference point for checking the product certificate rather than relying on a showroom label.
| Room | Recommended Stone | Finish | Min P-Rating | Avoid |
|---|---|---|---|---|
| Bathroom floor | Travertine or marble | Honed or tumbled | P3 | Polished marble on shower floors |
| Bathroom wall | Marble or travertine | Honed, polished or tumbled | Not applicable | Unsealed porous stone near constant spray |
| Kitchen splashback | Quartzite, granite or marble | Honed or polished | Not applicable | Stone that reacts badly to the cleaning products you use |
| Kitchen floor | Granite, quartzite or honed travertine | Honed or textured | P3 | Highly polished surfaces near cooking and washing zones |
| Pool surround | Quartzite or granite | Textured or flamed | P4 | Smooth polished stone and dark surfaces that show deposits |
| Feature wall | Marble or travertine | Any suitable decorative finish | Not applicable | Choosing a slip rating when nobody walks on it |
Bathrooms
For a Melbourne bathroom, honed or tumbled travertine is the forgiving option when grip and warmth matter. Honed marble can work on a bathroom floor if the technical rating is suitable, but polished marble belongs on walls, not shower floors. More grout joints and a textured finish can improve heel-strike friction, but they don't replace certified testing.
Kitchens
Use dense quartzite or granite behind a cooktop when cooking splashes and repeated cleaning are likely. Marble can look exceptional as a splashback, but acidic ingredients and cleaners may etch the surface. On a kitchen floor, honed travertine can be attractive and grippy, provided you accept its pores and sealing needs.
Pools and feature walls
Pool surrounds need a textured, appropriately rated stone. Check the product's resistance to the local environment and expect salt or mineral deposits to demand attention. Feature walls are where softer marbles and travertines earn their place because slip performance is irrelevant and natural variation becomes the main design benefit.
Installation and Substrate Essentials
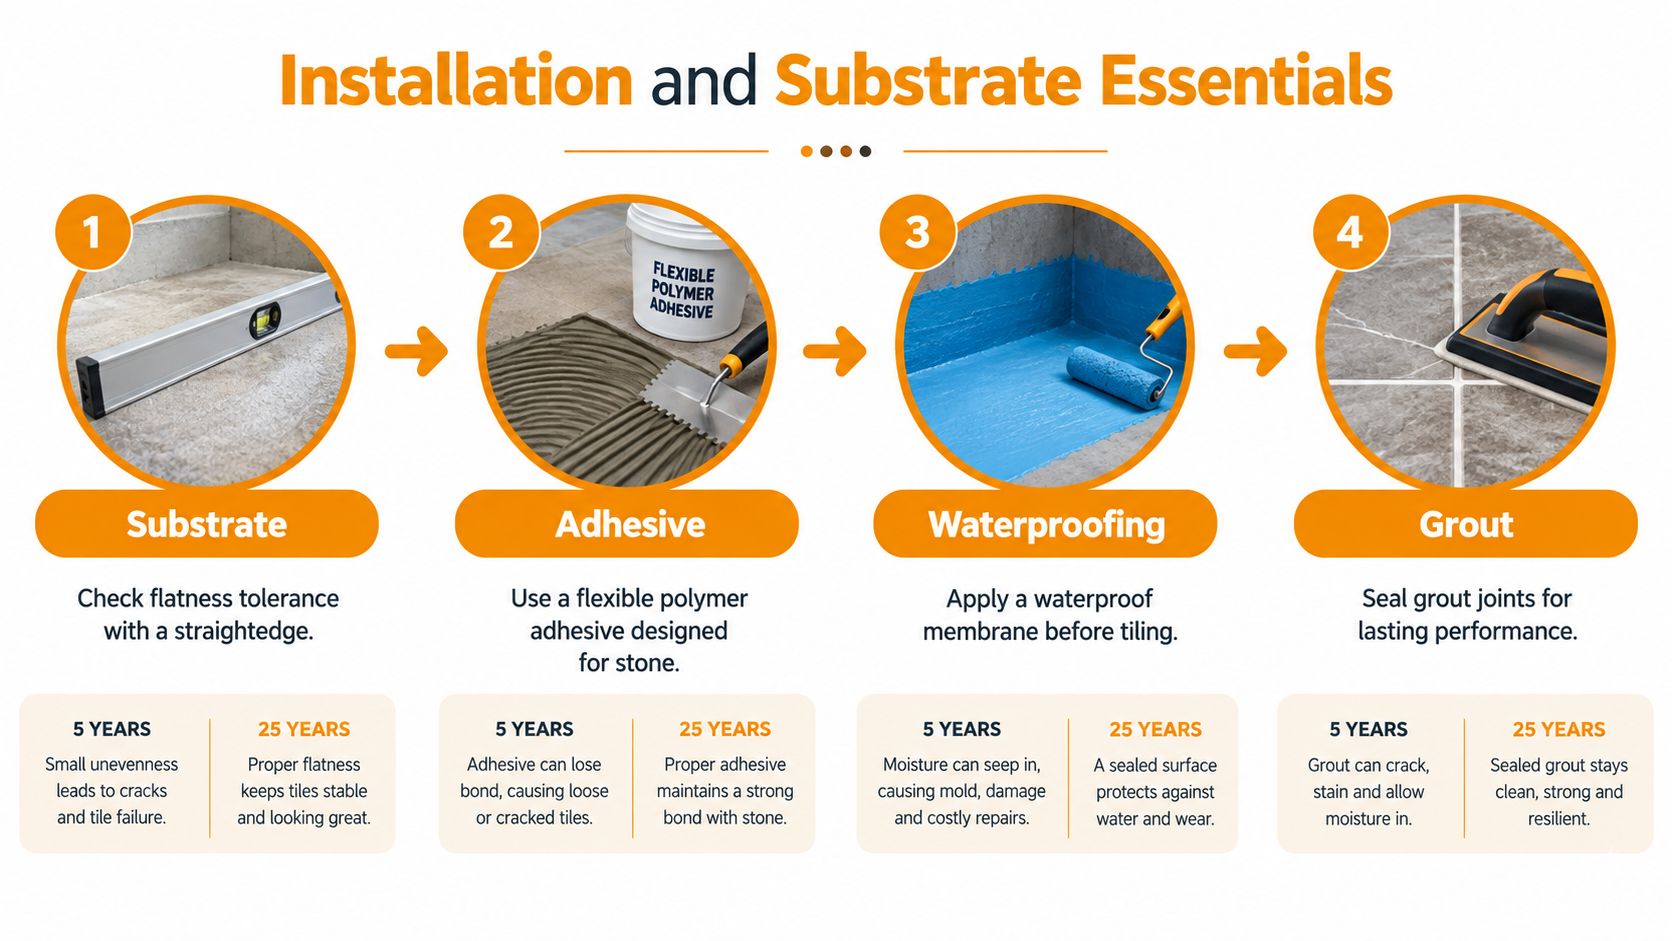
A mosaic doesn't hide poor preparation. Small pieces follow the substrate's shape, so a dip that might disappear beneath a larger tile can become a field of uneven edges. The installer needs a clean, rigid and flat base, whether that's approved cement sheet, structurally supported plywood with full bracing, or screeded concrete.
Check the substrate with a straightedge before adhesive arrives. Tileboard that flexes under load is not a sound foundation for a heavy stone installation. In a bathroom, waterproofing must comply with AS 3740, and the membrane, primer and adhesive need to be chemically compatible. A membrane isn't a substitute for correcting movement or poor falls.
Match adhesive to the stone
Use a white cement-based adhesive beneath light marble and travertine to reduce the risk of grey shadowing or bleed-through. Dense granite and quartzite may suit a modified polymer adhesive, but follow the adhesive manufacturer's approval for natural stone and the substrate. Don't spread more adhesive than you can cover while it remains workable.
A competent installation sequence looks like this:
- Confirm falls, flatness, rigidity and waterproofing.
- Dry-lay sheets from multiple boxes and blend tone and veining.
- Pre-seal porous stone if the sealer manufacturer permits installation use.
- Apply the approved adhesive with the correct trowel, then bed sheets evenly.
- Check joins, edges, lippage and drain alignment before the adhesive cures.
- Grout with a product suited to joint width and wet exposure.
- Remove haze promptly, then complete final sealing after the grout cures.
Use unsanded grout for tight joints where the stone could scratch, and consider epoxy grout in wet zones when the installer has experience with it. Match grout colour to the stone if you want the pattern to recede. Choose a contrasting grout only when you're prepared to make every alignment and cleaning mark more visible.
The installation sequence is also demonstrated in this natural stone mosaic installation video.
Sealing, Cleaning and Long-Term Care
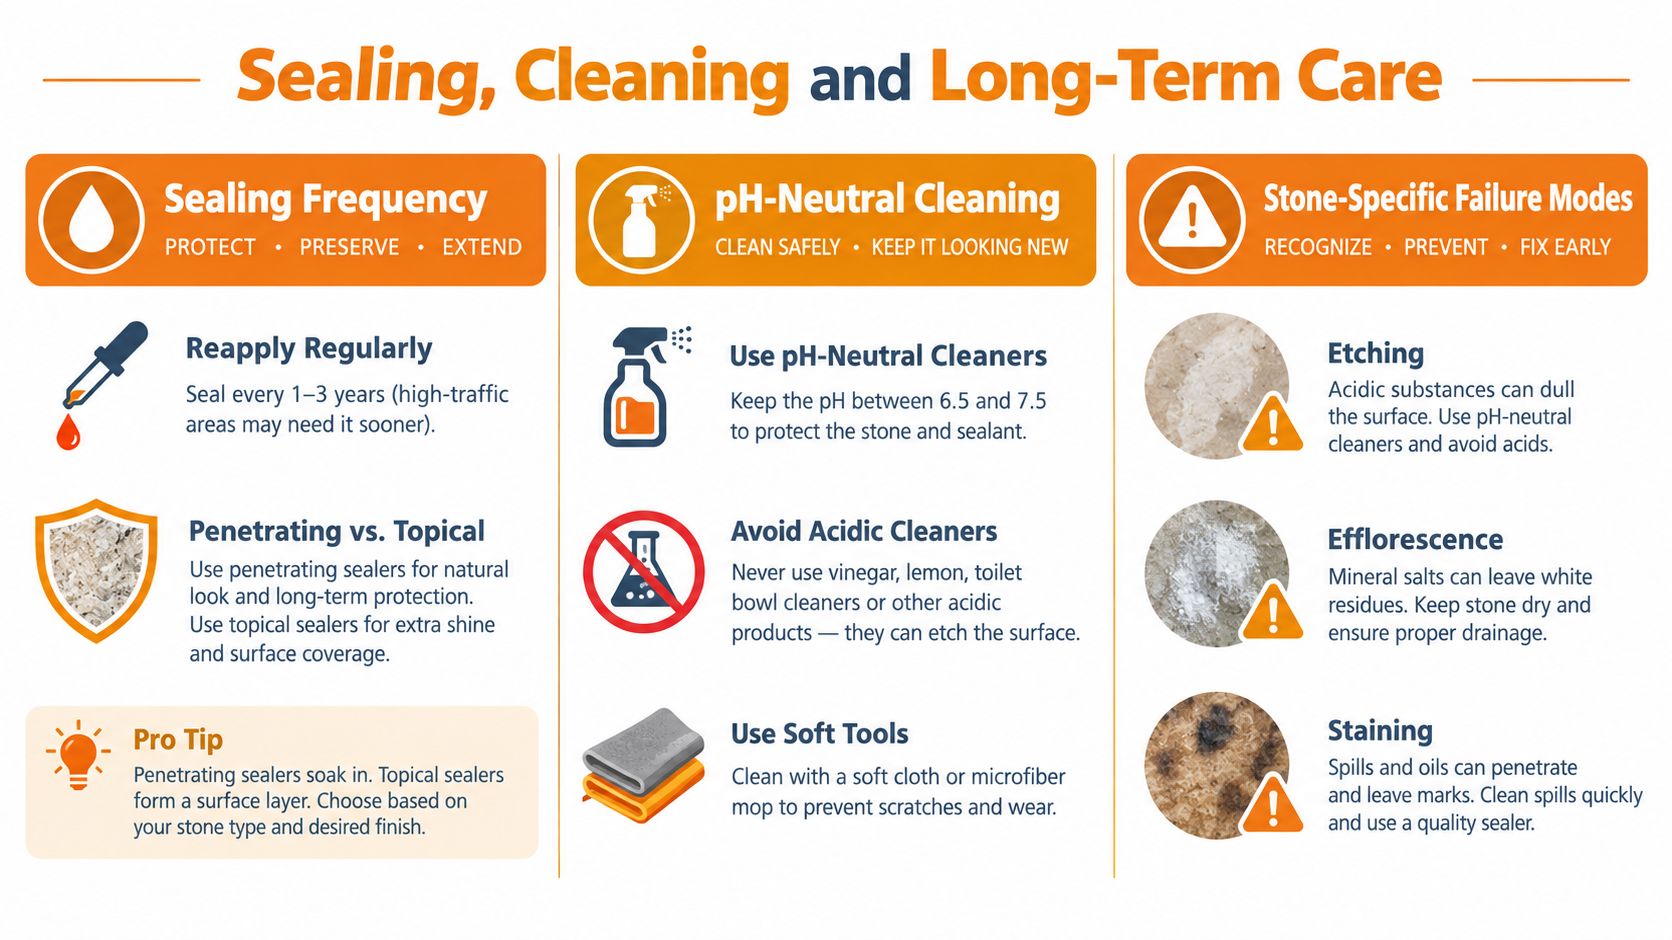
Natural stone needs a care plan that matches its type and location. A breathable penetrating sealer is generally the sensible choice for mosaic floors and wet-area walls because it helps reduce absorption without trapping moisture beneath a glossy surface. A topical coating can alter the finish and may wear unevenly, so don't use it merely to avoid routine maintenance.
Australian guidance notes that natural stone is porous, needs sealing, and may require resealing every 1 to 3 years depending on traffic. Stone and Tile Projects' maintenance guidance also warns that acidic cleaners and spills can etch marble and limestone. Use those points as a starting framework, then follow the sealer manufacturer's instructions and test the actual surface.
Match the routine to the failure risk
- Marble: Keep vinegar, lemon-based products and acidic bathroom cleaners away from the surface. They can etch the finish, leaving dull patches that sealing won't reverse.
- Travertine: Expect pores and possible pitting. Remove soap residue with a stone-safe cleaner and inspect filled areas for wear.
- Granite and quartzite: They're usually less demanding, but dense stone still needs testing rather than assumptions. Staining can occur around cooking zones or where water sits.
- Pool mosaics: Watch for mineral deposits and efflorescence. Regular rinsing and suitable cleaning matter more than applying a glossy coating.
Clean with a pH-neutral stone product and a soft mop or cloth. Avoid abrasive powders, harsh scourers, vinegar and citrus cleaners. In showers, remove standing water and soap film regularly, because grout and stone both look worse when residue is allowed to build up.
For practical application guidance, follow this natural stone tile sealing guide. A simple water test helps: place a few drops on a clean, dry area and observe whether the stone darkens or absorbs them. If water no longer beads as expected, investigate resealing rather than waiting for visible staining.
Inspect the floor, grout, corners and shower penetrations each quarter. Early attention to cracked grout, loose pieces, darkened joints or mineral deposits is cheaper than treating a saturated substrate.
Cost Per Square Metre and Budgeting
A natural stone mosaic quote should cover the complete installed system, not just the tile box. Stone type, sheet format, room conditions and site access all affect the final cost. Melbourne supply-and-fix rates can vary sharply, especially in bathrooms and other wet zones where substrate work, careful sheet handling and sealing add labour. Ask for a current, product-specific quote rather than relying on a generic square-metre allowance.
A lower-priced stone can also create a higher project cost if it needs more preparation, produces greater cutting waste or demands extra care during installation. Compare quotes line by line.
Build the quote line by line
| Budget line | What to confirm |
|---|---|
| Mosaic sheets | Stone type, finish, sheet size, coverage per box and current AUD price |
| Waste | Allowance for cuts, damaged pieces, pattern matching and future repairs |
| Adhesive and grout | Product compatibility, coverage and colour |
| Sealing | Pre-grout and post-grout requirements, labour and product |
| Substrate | Levelling, sheeting, screed repairs and movement treatment |
| Waterproofing | Existing membrane condition, compliance and any top-up work |
| Freight | Pallet handling, access, delivery timing and regional charges |
| Trims and edges | Corners, thresholds, niche returns and matching finishing pieces |
Ask the tiler to price the actual room drawings. A bathroom floor with a feature wall may use less stone than a full-room installation yet cost more to fit because corners, niches, penetrations and pattern joins take time. Herringbone, basketweave and irregular borders should never be priced from a basic square-metre assumption.
Budget warning: Do not compare marble mosaic with porcelain by tile price alone. Compare the complete installed system, including preparation, sealing and the care products required for that stone.
Allow for substrate surprises and delivery damage. Confirm whether the quote includes moving heavy pallets, cutting around wastes, cleaning grout haze and returning to seal after the grout cures. Put every inclusion in writing before approving the layout, particularly for a wet zone where the stone's behaviour affects both labour and future maintenance.
Sourcing Locally and Final Buying Checklist
Melbourne buyers should shop with samples, measurements and a room plan, not a phone photograph. Order several A4 samples from the short-listed stones and view them at home under bathroom, kitchen or outdoor lighting. Natural variation is part of the product, so inspect more than one piece and ask how the supplier blends batches.
Confirm the exact sheet dimensions, thickness, finish, coverage per box and batch information before paying a deposit. Ask whether the stock is current, whether future matching material is available, and what the return policy says about opened boxes. Imported stone may require a longer lead time than locally held stock, so tie the order to your tiler's programme rather than guessing.
Local warehouse collection can simplify inspection and reduce delivery handling, but check vehicle access and whether the supplier loads pallets. Metro and regional freight need similar care. Stone is heavy, and a delivery that arrives without a clear unloading plan can disrupt the renovation before a single sheet reaches the bathroom.
Tick these items before ordering
- Room suitability: Confirm the stone and finish match the room's water, heat and traffic exposure.
- Slip performance: Obtain the relevant AS 4586 test information for floors and pool surrounds.
- Stone variation: Approve samples from the actual batch where possible.
- Sheet size: Measure the physical sheet, not only the nominal product name.
- Thickness: Check transitions, drains, trims and adjoining tile levels.
- Adhesive: Confirm the adhesive is approved for the selected stone and substrate.
- Waterproofing: Verify bathroom membrane compliance and compatibility.
- Grout: Choose joint width, grout type and colour before installation.
- Pre-sealing: Confirm whether the stone must be sealed before grouting.
- Cleaning: Buy a pH-neutral stone cleaner and remove acidic products from the routine.
- Returns: Read the policy for excess boxes, opened cartons and shade variation.
- Delivery: Confirm freight timing, pallet access, unloading and damage reporting.
The strongest buying decision is usually a short list of two stones, two finishes and one or two patterns. If the room is a wet floor, let slip performance and maintenance eliminate options before aesthetics takes over. If it's a feature wall, you can be more adventurous because the surface doesn't face the same safety and cleaning demands.
Tiles Mate Pty Ltd offers natural marble mosaic collections, including feather and penny round formats, alongside quartzite, granite and other tile options for Melbourne projects. Visit Tiles Mate Pty Ltd with your room measurements and shortlist, then use its sample and design consultation options to check the stone, finish and format before ordering.