




Undermount Kitchen Sink Guide Melbourne 2026
by Shivam Tayal 26 Sep 2026 0 Comments
Yes, an undermount kitchen sink is a strong choice for solid stone and engineered stone benchtops in Melbourne homes, but only when the substrate is rigid, the fix is mechanical, and the plumbing is licensed. For a lot of renovations, the sink itself is the easy part, the risk sits in the cut-out, the support under it, and the seal that keeps water out for years.
You've probably seen the finish you want, a clean, rim-free basin that makes a stone counter look uninterrupted. What catches people out is that undermounts are not just a style decision, they're a fabrication decision, and the wrong bench material or rushed install can turn a nice kitchen into a repair job.
What an Undermount Kitchen Sink Actually Means for Your Renovation
A Melbourne renovation can start with a request for a cleaner benchtop and end with a fabrication problem. The cabinetmaker needs an accurate cut-out, the stone fabricator needs the sink specification, and the installer must provide support beneath the bowl before plumbing is connected.
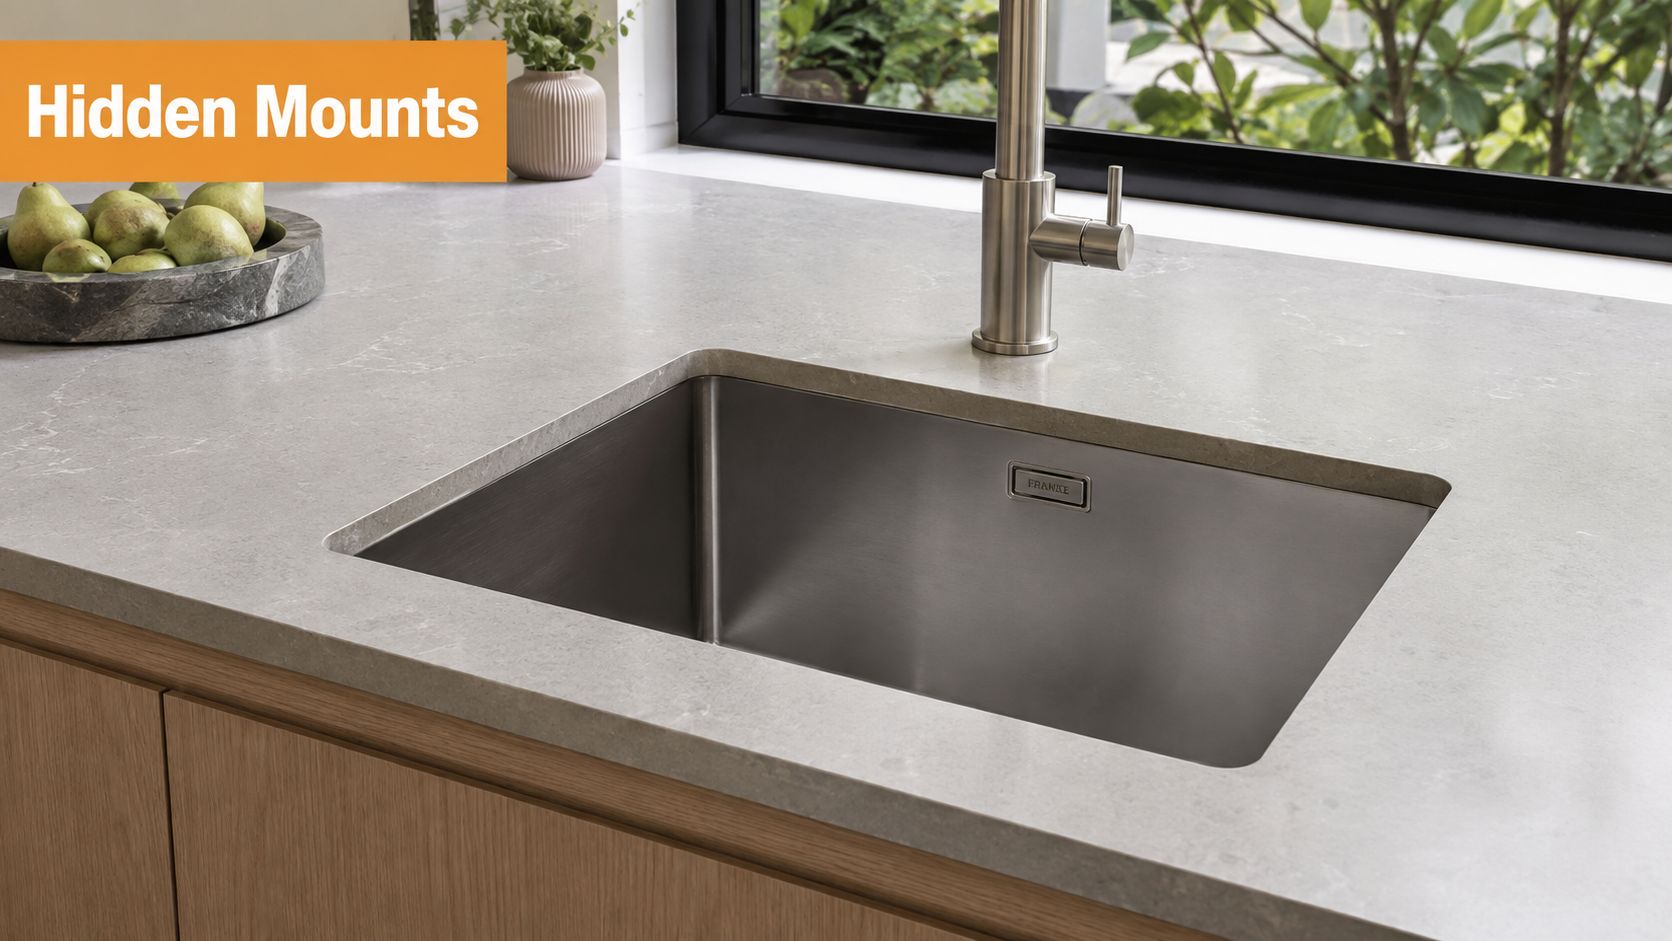
An undermount kitchen sink is fixed below the benchtop, leaving no exposed rim between the counter and basin. The result is easy to wipe into the bowl, but the clean appearance depends on the cut-out, the substrate and the fixing method. With a standard kitchen bench depth of 600 mm, a larger bowl can also restrict tap placement, front and rear clearances, and usable cabinet space (Buildmat).
Review the broader sink range and formats before ordering. Bowl size and configuration affect the benchtop opening, cabinet clearance and plumbing position, so the sink is part of the renovation specification rather than a late fixture purchase.
Undermount installations generally suit solid stone and other dense, rigid surfaces. Laminate and moisture-sensitive timber products can swell at an exposed cut edge, while a heavy bowl can strain a weak substrate or poorly fixed bracket. Confirm the material, mechanical support and sealant detail with the fabricator and installer, and use licensed plumbing work where required.
Practical rule: choose the sink only after confirming that the benchtop can resist water, weight and fixing loads for the life of the kitchen.
Understanding How Undermount Sinks Work
An undermount sink does its work from underneath the benchtop, not from above. The bowl is held in place by a fixing system, then the bench edge is finished to meet the sink cleanly, without a visible rim.
What the hidden structure has to do
The visible part of the sink looks simple, but the load path is not. The sink hangs from the underside of the benchtop, so the cabinet base, the benchtop substrate, the clips or brackets, and the sealant all need to work together. Australian product guidance warns that installers must verify cabinet and benchtop strength before any cut is made, especially with heavier materials like fireclay or stone composite (Nero Tapware).
That's why stone, marble, and engineered surfaces are so common with this format. They offer the rigidity needed for a supported underside fix, while laminate and timber-based products create a much higher risk of swelling or edge failure if water gets in. Once a weak substrate starts moving, the seal moves too, and the joint fails.
The sink is only as good as the support you don't see.
The clean look makes sense in a Melbourne kitchen, especially where bench continuity matters visually. But the success of the job depends on the hidden build-up, not the bowl finish. If the support is wrong, the sink can shift, the seal can crack, and the cut-out edge becomes the point of failure.
Comparing Undermount and Overmount Sinks in Australian Kitchens
A Melbourne renovation can look finished until the sink joint starts moving. The practical choice is between an overmount sink, which usually suits a simpler replacement, and an undermount sink, which demands accurate fabrication, mechanical support and disciplined sealing.
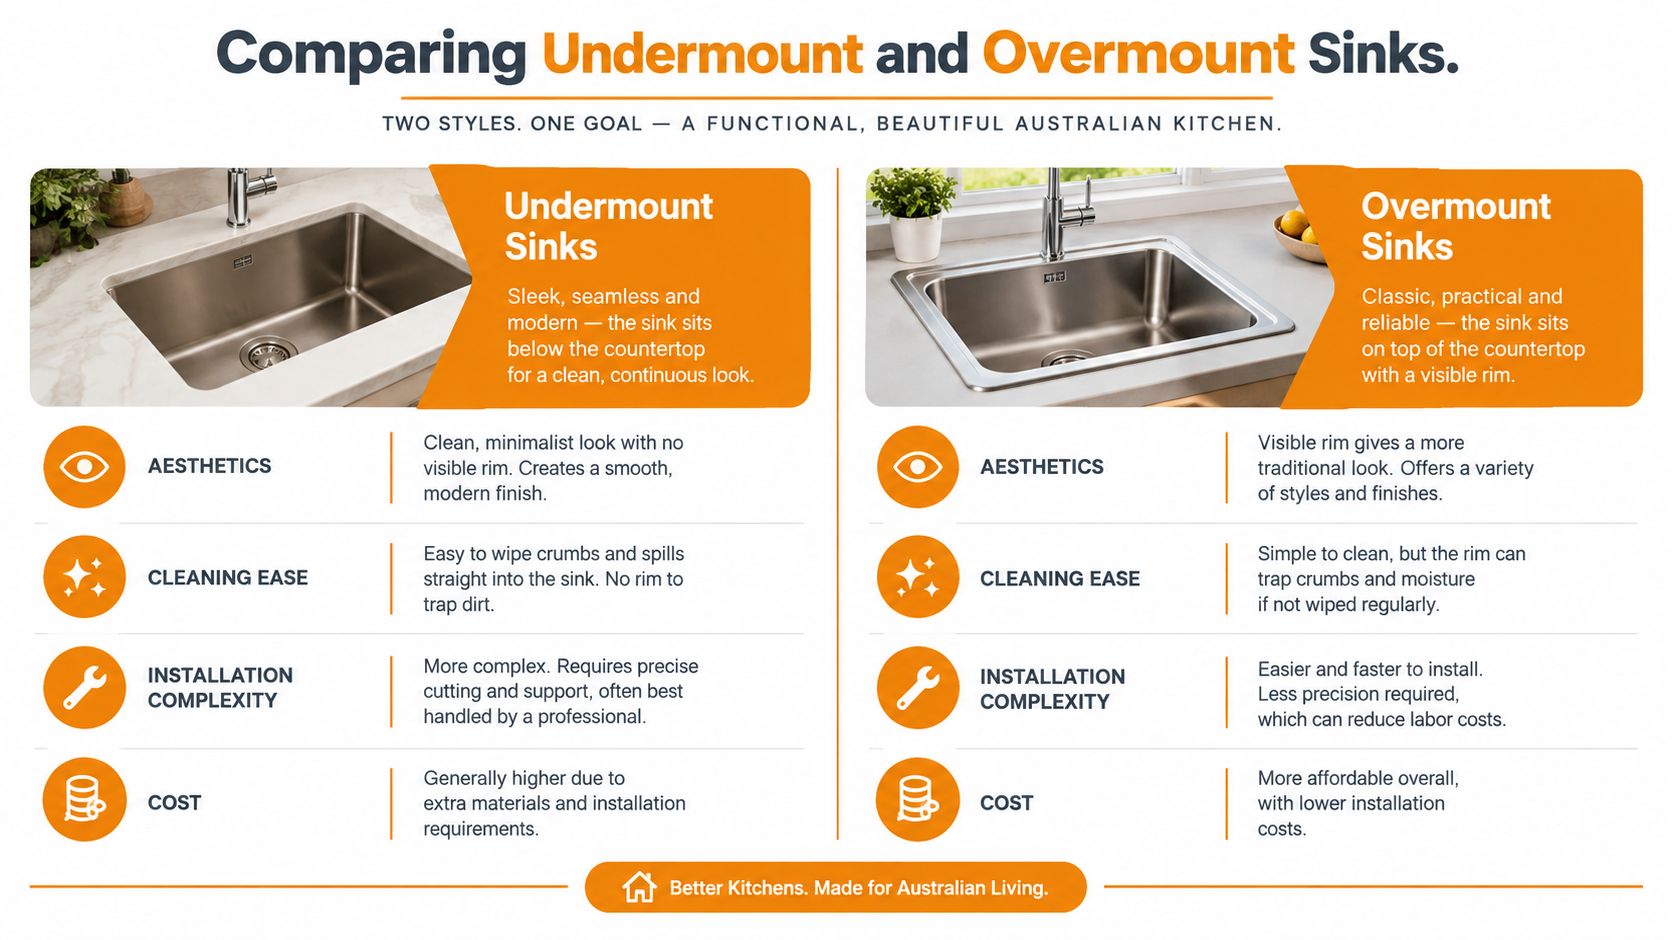
For a basic drop-in replacement, Australian installer and retailer guidance commonly places the job at AUD 200 to AUD 500. An undermount replacement is typically AUD 500 to AUD 1,000, reflecting the extra cutting, sealing and benchtop fabrication (Quintessential Plumbing). The difference pays for more than appearance. It covers tighter tolerances, preparation around the cut-out and a support system that cannot rely on sealant alone.
Where the money actually goes
An overmount sink is generally easier to swap because its rim carries part of the load and covers more of the cut edge. That makes it more forgiving during a refresh and easier to replace if the bench or bowl changes later.
An undermount sink gives a cleaner line and lets you wipe crumbs directly into the bowl. It also exposes the cut-out to water, impact and daily movement. The template must match the bowl, the edge needs a suitable finish, and brackets or rails must transfer the load into a stable cabinet and benchtop assembly. Sealant should close the joint, not act as the primary fixing.
The decision comes down to the existing bench, the installation standard and the renovation timeline. With compatible stone and careful fabrication, undermount is a strong long-term choice. With a moisture-sensitive substrate, limited access or a fast refresh, an overmount sink usually carries less repair risk and better value.
Choosing the Right Benchtop Material for an Undermount Installation
Most bad installs begin here. The sink choice is fine, but the bench material can't support the load or survive the moisture exposure at the cut-out.
The materials that make sense
Australian guidance consistently puts stone, quartz, concrete, and other dense continuous surfaces in the safe zone for undermount use, because they can be cut, finished, and supported in a way that handles the sink from below (Swan Online). That's also why a benchtop with proper substrate strength matters more than a pretty surface finish.
Laminate, wood, and wooden composites are a poor fit for long-term undermount use. Water ingress can swell the core or damage the edge, and once that happens, resealing the sink won't solve the substrate problem. The failure starts under the cut-out, not on the visible surface.
Why heavier sinks raise the stakes
Heavy bowls make the support question more important, not less. If you're looking at fireclay or granite-composite sinks, the fixing system has to do more work, and the bench has to stay stable under that load over time. That's why many installers keep coming back to the same practical test, does the top, the cabinet, and the support method work together without relying on sealant alone?
If you're comparing sink finish options alongside splashback and stone choices, Home Glass Solutions splashbacks is a useful reference point for seeing how a hard, moisture-resistant surface can complement a kitchen that already relies on dense materials. The idea is simple, choose surfaces that tolerate cleaning, heat, and moisture without compromising the edge details that keep the room intact.
Melbourne readers comparing stone options can also look at natural stone tiles, because the same logic applies, rigid materials perform better where water and fixings meet.
Installer's rule: if the bench can't tolerate a wet edge for the long term, don't force an undermount into it.
Sizing, Bowl Configurations and Cabinet Clearance Decisions
A sink can look right in a showroom and still fail the kitchen plan. Check the benchtop depth, cabinet width and daily washing habits before the cut-out is marked.
Common Australian kitchen sink sizes run from 600 mm to 800 mm, while compact options sit around 450 mm to 550 mm and larger double-bowl models can reach 900 mm (Buildmat). Treat those ranges as a starting point, not a specification. The selected bowl must leave enough benchtop around the cut-out and fit the cabinet without forcing the plumbing into a poor position.
A simple decision matrix
| Kitchen condition | Safer choice | Why it usually works better |
|---|---|---|
| Tight Melbourne apartment kitchen | Single bowl | Preserves bench space and reduces clearance pressure |
| Family kitchen with heavier washing load | Double bowl | Separates preparation and washing, if cabinet width allows |
| Shallow benchtop | Smaller undermount or overmount | Leaves more usable working room around the cut-out |
| Stone benchtop with generous span | Larger undermount | Provides a practical bowl size without crowding the surrounding top |
Measure the cabinet opening, not just the old sink. Allow for the bowl's external dimensions, the waste fitting, tap or filter plumbing, and the space needed to service the trap. A deep bowl can also reduce room for drawers or collide with rails beneath the benchtop.
Cabinet clearance should be confirmed before ordering. A slightly smaller sink that fits cleanly is safer than a larger model that leaves minimal room for plumbing, support or future maintenance. Mark the bowl and waste positions on site, then check doors, drawers and pipe runs before the stone is cut.
Installation Methods, Support Systems and Plumbing Requirements
A sink can look perfect on handover and still fail later. The usual causes are inadequate support beneath the cut-out and sealant applied before the surfaces are ready.
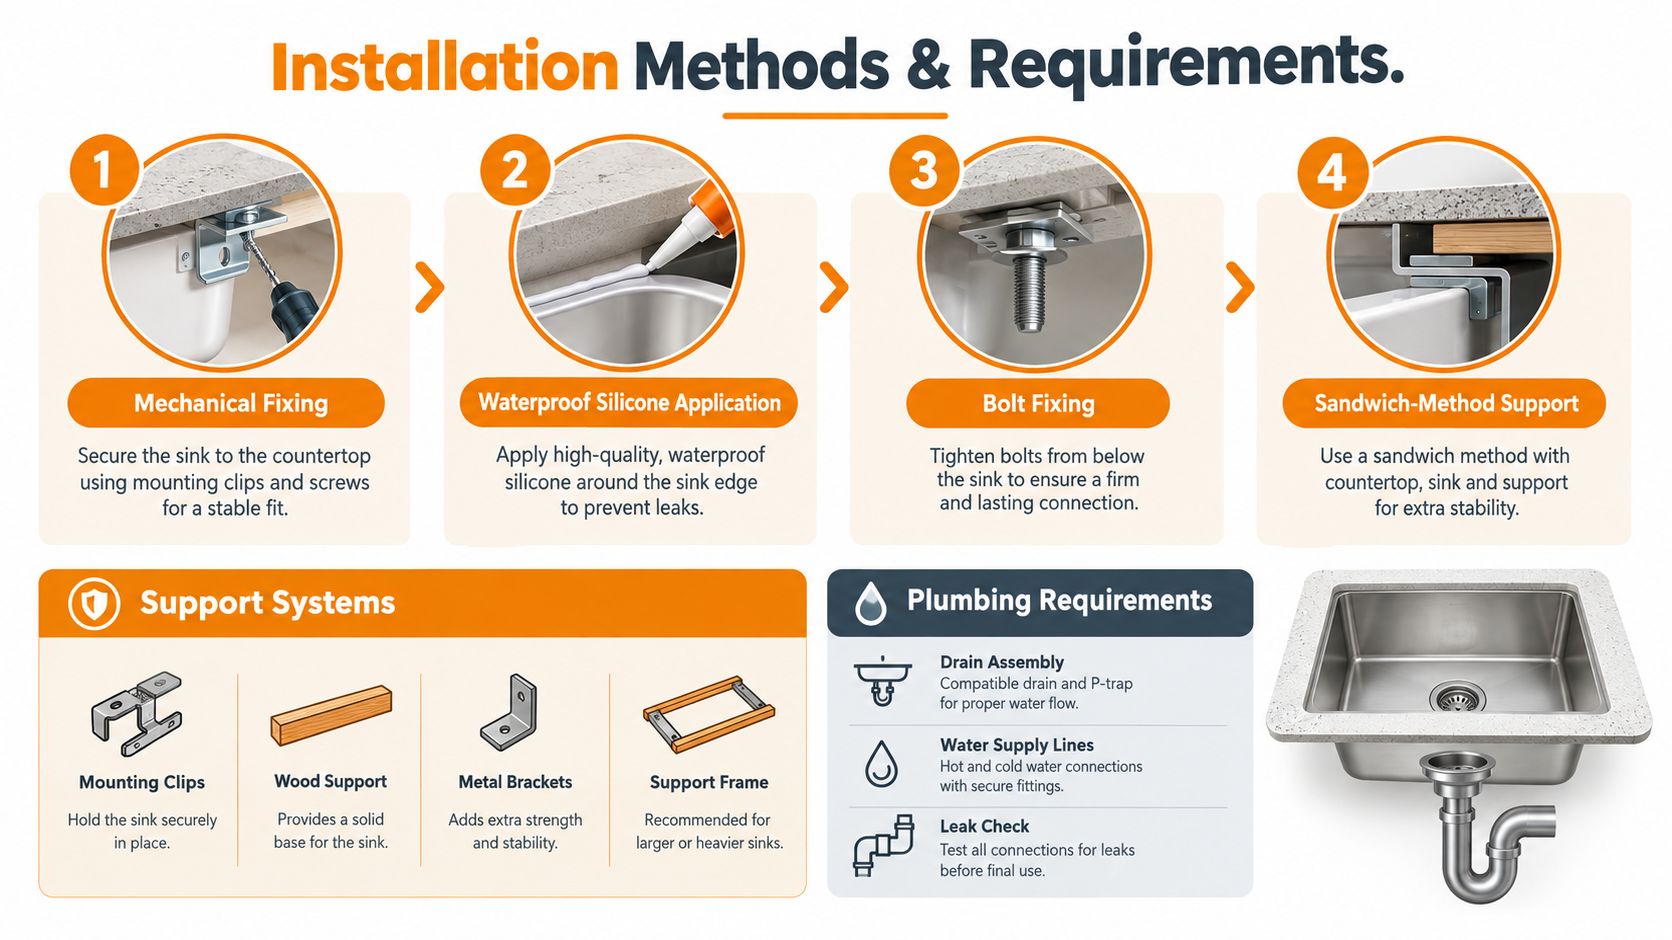
Australian product instructions favour a mechanically supported fix combined with waterproof silicone, rather than relying on epoxy alone. The support may be a shelf or beams set to the sink's full height, with a 5 mm internal overhang and a 24-hour cure before the sink is used. Another approved approach uses sandwich bolts with benchtops at least 25 mm thick (Signature Appliances installation guide, Oliveri installation and care instructions).
What good support looks like
Mechanical fixing distributes the bowl's weight and limits point loading around the cut edge. That protects stone and other rigid surfaces from cracking, while keeping the bowl aligned as the cabinet and benchtop carry daily loads. Silicone seals the joint. It should not be treated as the structure holding the sink up.
The counter supplier should confirm the support method for the selected benchtop material. A licensed plumber should complete the waste connections, with under-bench clearance and bowl spacing checked before the sink is fixed. Rushed planning can leave the trap inaccessible or force pipework against the cabinet (Oliveri installation and care instructions).
Tap position also belongs in the installation plan. Tapware planning ties into sink installation more than most people realise, because spout reach, bowl placement and splash control affect daily use. Confirm those positions before cutting the benchtop, not after the sink is installed.
Maintenance, Troubleshooting and a Practical Buyer Checklist for Melbourne Renovators
A well-installed undermount sink should disappear into daily life. The bowl stays secure, the seal remains intact, and the benchtop cut edge stays dry. Those results depend on hidden support and careful curing, not silicone alone.
Check the underside and cut edge during routine cleaning. Moisture, a darkened edge, a broken sealant line, or movement under a loaded bowl indicates a problem. A sink pulling away from the benchtop usually means the fixing system or substrate support has failed. Stop using it heavily and have the joint assessed before water reaches the cabinet or benchtop core.
What to check before you buy
- Benchtop material: confirm the surface is rigid, solid, and suitable for an undermount cut-out. Materials that swell, delaminate, or break down with repeated water exposure need a different installation approach.
- Support method: ask whether brackets, clips, support beams, or a sandwich-style fixing system will carry the bowl. Silicone should seal the joint, not carry the sink's weight.
- Thickness and clearance: verify the benchtop thickness, cabinet base strength, and space beneath the bowl before cutting. Allow room for the trap, waste connections, and future access.
- Sealant and cure time: specify waterproof silicone, prepare the surfaces properly, and keep the sink out of service until the manufacturer's cure period is complete.
- Plumbing compliance: have a licensed plumber complete the waste connection, particularly where bowl spacing and pipe alignment are tight.
Tapware planning ties into sink installation more than renovators expect, because spout reach and bowl position affect splash control. Confirm tap, bowl, and benchtop positions before fabrication.
After handover, keep cleaning water away from the underside and inspect the sealant line periodically. Re-sealing a small failure is cheaper than repairing swollen cabinetry or a damaged substrate.
For wider renovation budgeting, kitchen cabinet painting cost shows how visible finishes and hidden labour can affect the overall result. The same applies to an undermount sink: rushed support or sealing work can make an apparently economical installation expensive.
If you are renovating in Melbourne, Tiles Mate Pty Ltd can help compare practical surface options and finishes suited to real installation conditions.