




Pillar Tiles Explained for Australian Homes
by Shivam Tayal 16 Oct 2026 0 Comments
You can spot the problem from the driveway. The front column looks tired, the old tiles are lifting at the corners, and the replacement colours no longer match the rest of the façade. On a Melbourne home, that pillar isn't just a trim detail, it's the first surface people touch, lean against, and read against the rest of the build.
Why Pillar Tiles Deserve Their Own Specification
A Federation verandah column in Brunswick, or a new entry pier in a contemporary townhouse in the inner north, asks more from tile than a flat wall ever will. It has corners, returns, a top edge, and usually a base that copes with splash, dirt and impact. That is why pillar tiles need their own specification, not a recycled wall-tile decision.
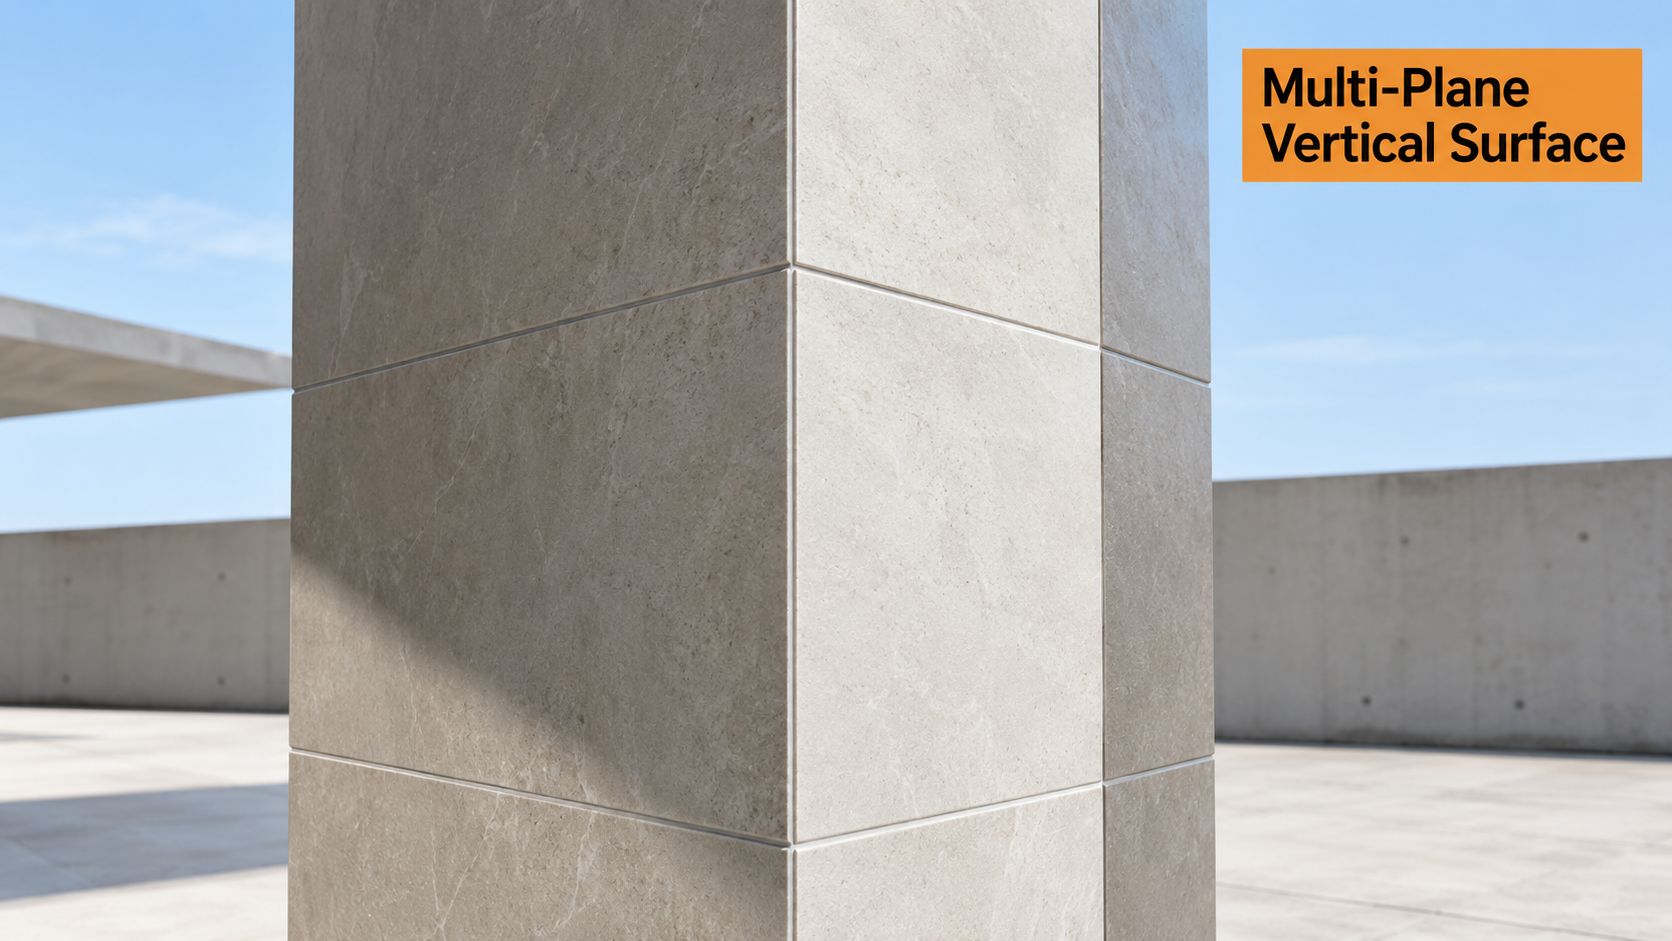
A pillar is a transition surface, not a backdrop
Australian architectural history gives a useful lens here. Decorative external and entryway tiling appears across colonial, Victorian, Federation and Art Deco buildings, and those styles still shape what reads correctly on homes across Victoria, New South Wales, South Australia and Tasmania in the historical record of Australian vernacular architecture. Victorian schemes often used two or three colours in geometric arrangements, Federation moved toward restrained earthy palettes, and Art Deco brought sharper geometry, contrast and angular motifs.
Practical rule: if a pillar is visible from the street, treat it like a façade element first and a decorative feature second.
That matters because tiled columns sit between public and private space. People see them before they reach the door, and weather reaches them before it reaches the entry hall. Pattern, proportion and durability all count, so a good pillar tile spec has to look right in profile, hold up on corners, and sit comfortably within the period language of the home.
A renovation in Melbourne can draw from several established Australian design periods, which gives you more than one visual path. A simple stone-look porcelain can suit a restrained contemporary entrance, while a tessellated or geometric treatment can feel native to a heritage porch. The right choice still depends on the material and fixing system, because the surface has to handle movement, exposure and the finish at every edge.
What Pillar Tiles Are and How They Work
Pillar tiles are a system, not a single product. The build usually includes a main face, return pieces, a cap or coping, and a base detail. Once you read the pillar as a set of joined planes, the specification becomes much easier to control.
Read the pillar as separate planes
A flat wall lets courses run long and uninterrupted. A pillar asks you to resolve corners, narrow returns and exposed edges, and that is where many jobs start to fail. Small misalignments show up quickly at corners, and movement in the substrate often appears as lippage or chipped edges.
Tile size changes the result. A 600 x 600 mm tile behaves very differently from a 75 x 300 mm strip on a corner. Larger formats cut down grout lines, but they need a flat, stable substrate and careful setting-out. Smaller formats wrap edges more easily, but they add more joints and more places for dirt to collect.
| Pillar feature | What it changes in the tile spec |
|---|---|
| Main face width | Tile format, cut plan, and visible joint rhythm |
| Corner returns | Need for accurate edge finishing and consistent wraparound layout |
| Cap or coping | Water shedding, edge protection, and finish continuity |
| Base detail | Splash resistance, cleanability, and movement tolerance |
| Substrate change | Movement-joint placement and adhesive choice |
Movement joints matter more on pillars than many homeowners expect. External tiling guidance requires expansion to carry through the tiled assembly at corners, abutments, penetrations, substrate changes and existing control joints, rather than being bridged with rigid grout as outlined in Australian tiling guidance. A tiled pillar that ignores those transitions puts stress into the weakest point.
The supporting masonry needs its own check. Tile does not replace structural design, and in a Class 1 or Class 10a context, confirm with your structural engineer whether AS 4773.1 applies. In practice, specify the pillar as a finish system sitting on a properly designed structure, not as a fix for one.
Comparing Pillar Tile Materials for Australian Conditions
The material choice decides how the pillar performs in wet weather, under UV, and under day-to-day abuse. On Melbourne projects, porcelain is usually the default because it gives you a predictable finish with low maintenance and strong weather performance. Natural stone can look superb on heritage entries, but it needs more care. Mosaics can solve complex curves and detail work, while pavers make sense on large outdoor piers and outdoor structures.
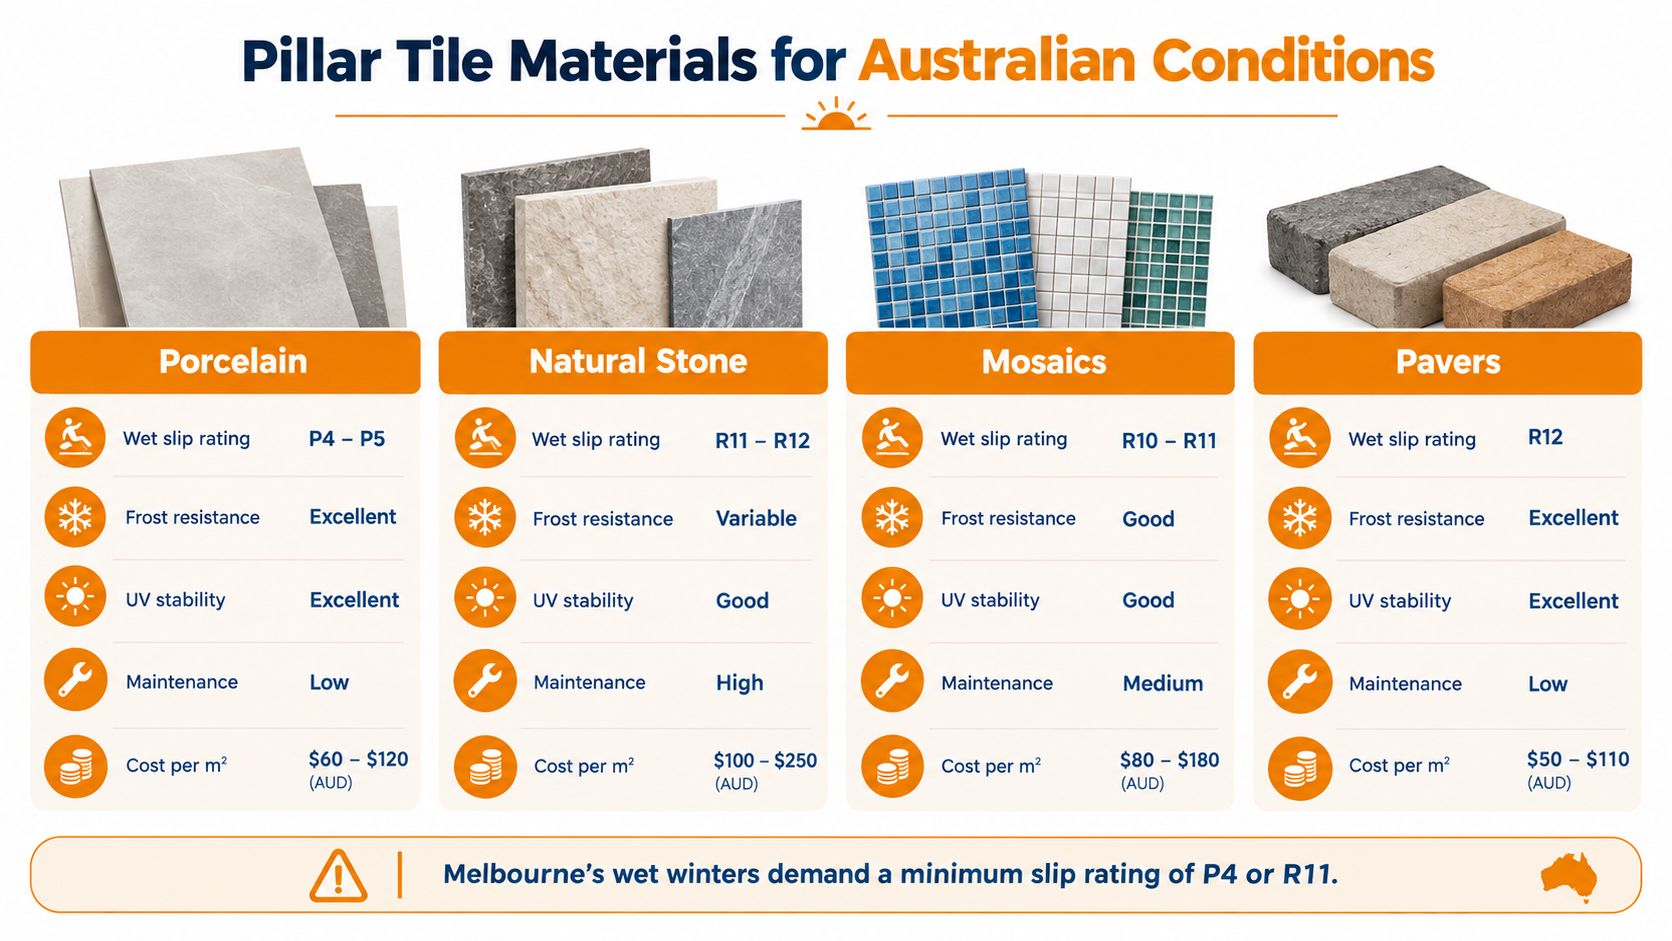
Porcelain, stone, mosaics and pavers each solve a different problem
For most external pillars, full-bodied or quality porcelain is the safest all-rounder. It handles weather well, it keeps maintenance low, and it can give you a stone look without the same sealing burden. If you're comparing ceramic families more broadly, a useful starting point is this porcelain overview, especially when you're matching a pillar to other exterior finishes.
Natural stone earns its place when the home calls for depth, movement and a more tactile surface. Honed stone can sit beautifully on a porch column, but the owner has to accept sealing and more careful cleaning. If that discipline won't happen, stone is a poor choice.
Mosaics are the best option when the column is curved, segmented, or full of detail. They bend around awkward geometry and can look superb in heritage work. The trade-off is obvious, more grout means more cleaning, more joints, and more chance of dirt build-up.
Pavers step in when the pillar is part of a broader design setting, such as a substantial driveway pier or a garden-wall entry. They feel grounded and sturdy, but they're not automatically the best fit for fine architectural detailing. For most suburban Melbourne homes, that makes porcelain the default, stone the premium character option, mosaics the specialist detail solution, and pavers the hardscape answer.
If you're comparing a pillar spec with a kitchen or bathroom spec, the same material logic often applies, but the exposure changes everything. The most useful consumer comparison I've seen outside this topic is which tile is better for kitchens, because it forces you to think about use case rather than just appearance.
Sizing and Finishes That Work on Pillar Tiles
A pillar with the wrong tile size looks awkward fast. Narrow formats suit slimmer columns and older details, while larger tiles give a cleaner face on broad entry piers. The problem usually appears at the cuts, not on the sample board.
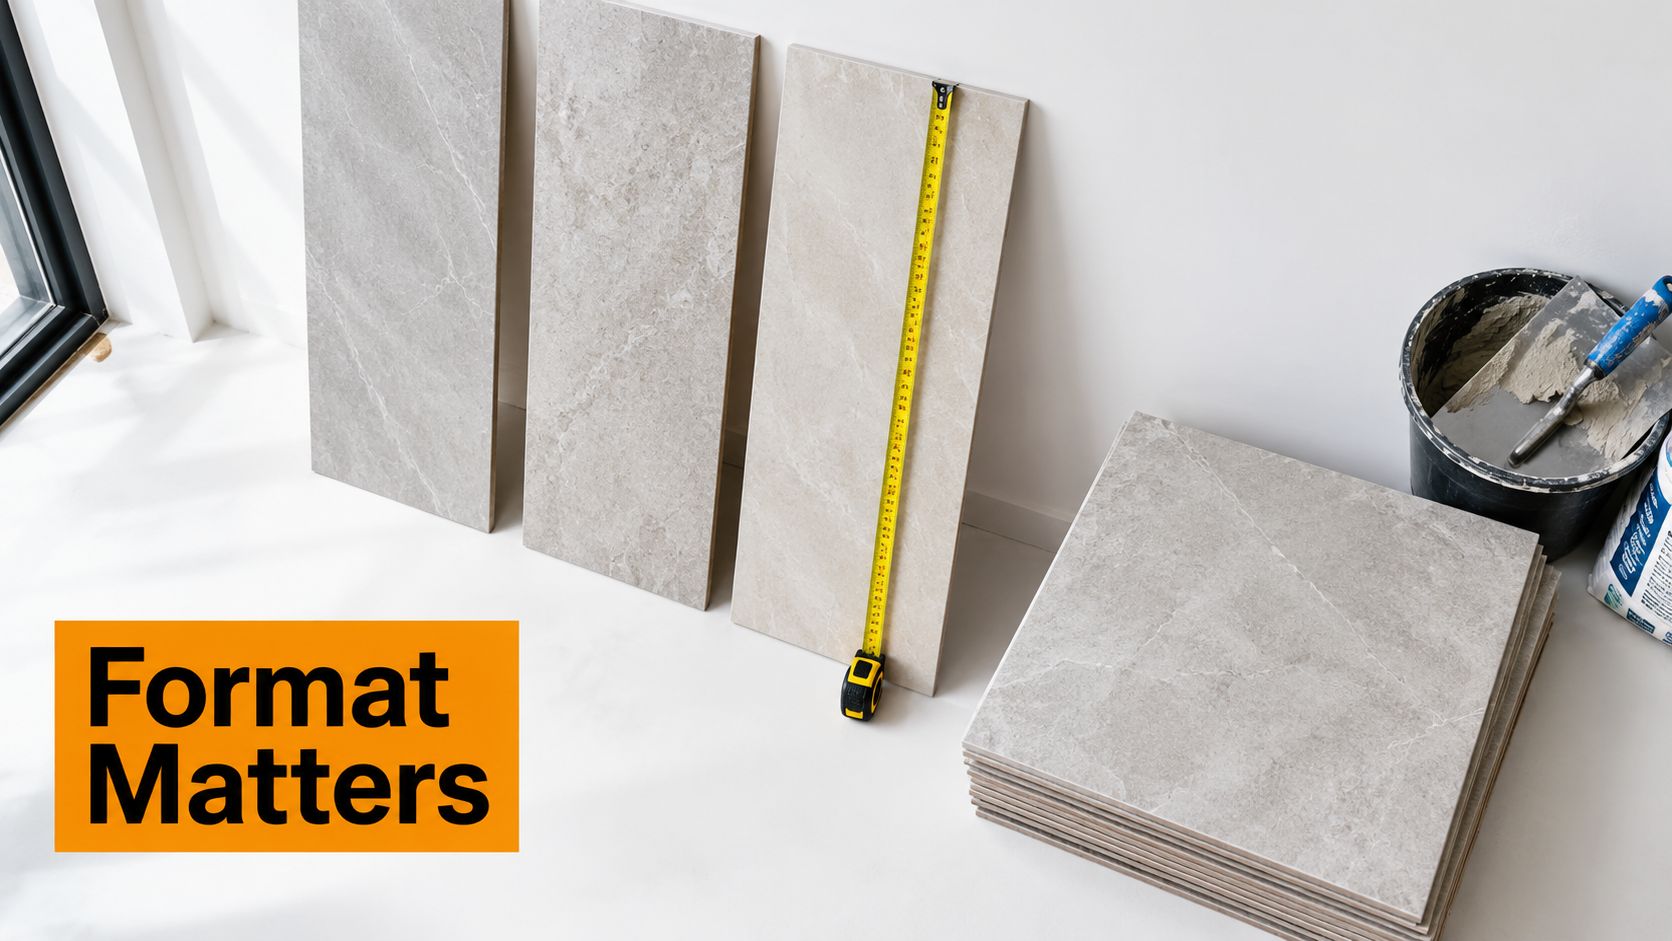
Format changes waste, joints and risk
Australia relies heavily on imported ceramic tiles, and that matters on pillar jobs because stock continuity can change the whole result. Industry reporting published in 2020 said Australia imported almost 90% of the ceramic tiles it consumed, China supplied 70.6% of total Australian ceramic-tile import quantity in 2019, and imports fell by 12.1% in volume and 9.6% in customs value that year while India increased its import quantity by 10% and customs value by 14% in the industry report.
That is why pillar work needs early checking of stock, batch continuity and replacement supply before the layout is locked in. A smaller format such as 50 x 200 or 75 x 300 can suit a slender column and reduce awkward cuts, but it also brings more joints and more labour. A 600 x 1200 tile can look sharp on a wide entry pier, yet it only works if the substrate is true and the setting-out is careful.
Finish choice should follow the use case
Gloss lifts light and can suit sheltered heritage details, though it shows water spotting and marks more readily. Matt and honed finishes are usually easier to live with on exterior pillars where there is weather and dust. Textured finishes add depth, but they also trap grime in the relief, so they suit sites where cleaning access is realistic.
Practical rule: the prettiest finish is not always the easiest pillar to maintain.
A buying checklist helps keep the job honest:
- Confirm the exact size and edge detail: ask for the precise dimensions, not just the marketing description.
- Check lot continuity: make sure the boxes come from the same production run wherever possible.
- Ask about replacement stock: pillar repairs are difficult when the original tile cannot be matched.
- Verify finish under daylight: a sample in the showroom and a sample against the actual façade can read very differently.
- Plan the cut pattern early: if the pillar has narrow returns, waste can rise quickly.
For layout thinking, size guides for tiles are useful because pillar work is really a cutting and proportion exercise as much as a finish choice. Smaller formats help with wrapping and proportion, while larger formats reward disciplined setting-out with a cleaner face.
Installation Standards and On-Site Controls
A pillar tile job can look right in the showroom and still fail on site if the substrate is wrong. The background needs to be structurally sound, rigid, dry, clean and stable before fixing starts, especially on exterior masonry columns where corners and plane changes load the surface unevenly as set out in Australian guidance. If the pillar moves, tiles crack. If the face is out of plane, edges lift.
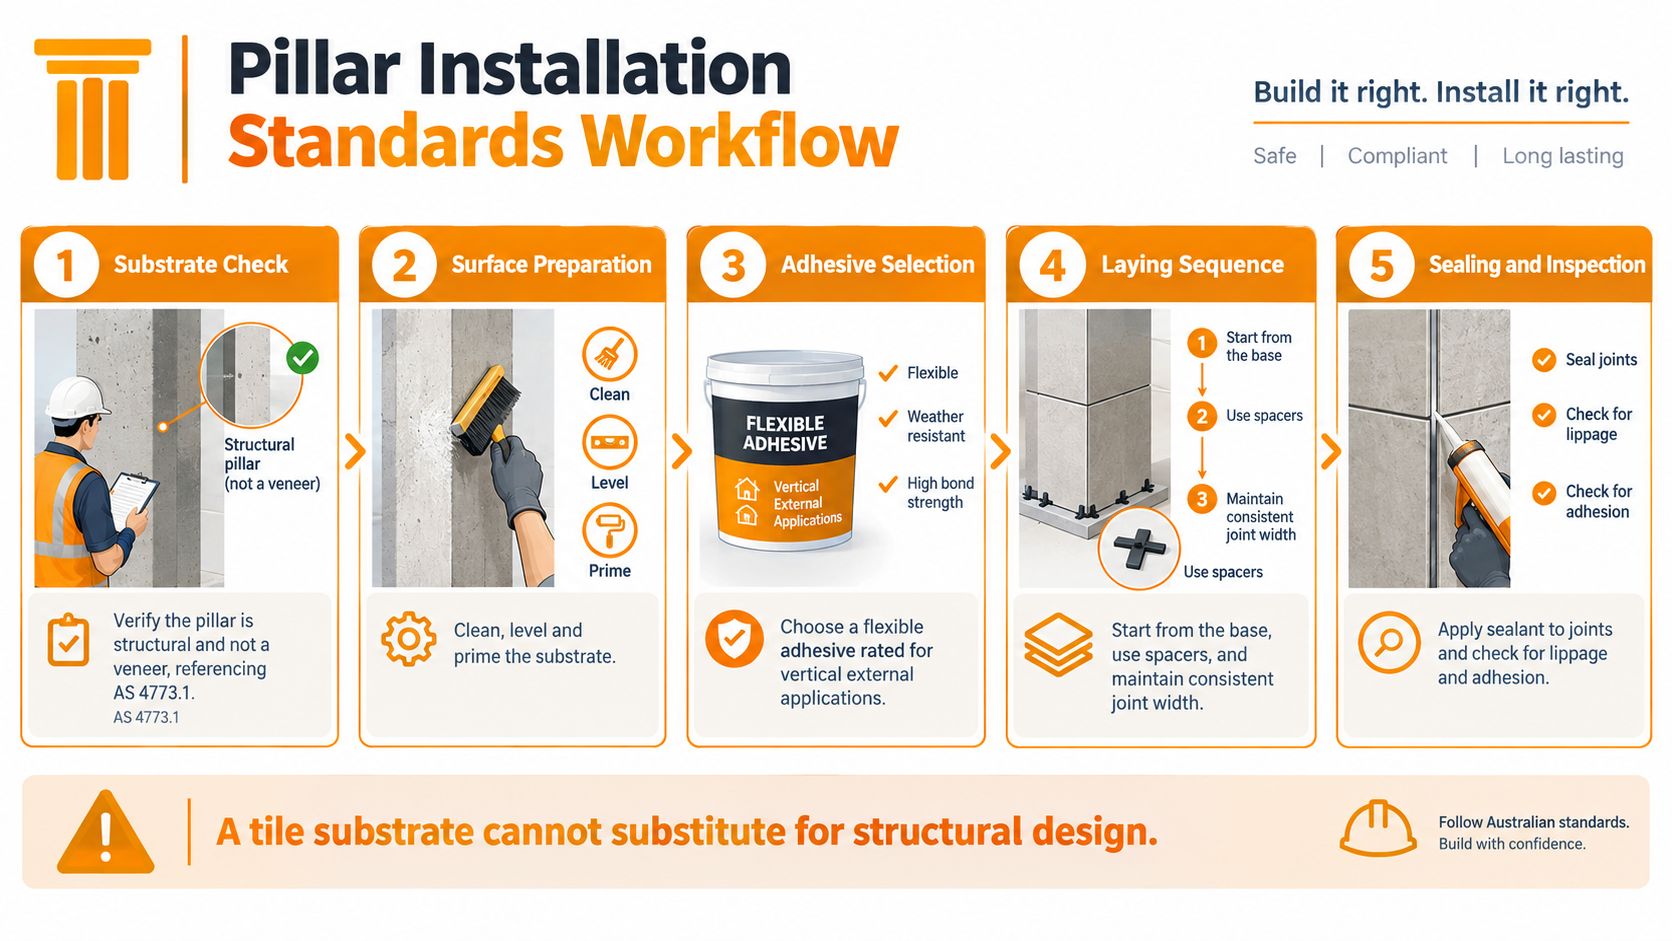
The five controls that matter on site
A tile substrate cannot substitute for structural design.
Australian installation guidance under AS 3958 requires external backgrounds to be weather-resistant and planned with room for expansion, so movement joints need to carry through the assembly at corners, abutments, penetrations, substrate changes and existing control joints. They are not something to grout over and hope for the best.
Adhesive choice needs the same discipline. Exterior vertical work needs a flexible system rated for the exposure, and the matching of adhesive type to site conditions is set out in wall tile adhesive guidance. For pillar cladding, bedding quality matters as much as product choice. A five-step infographic showing the professional installation workflow for pillar tiles according to Australian standards.
On site, the sequence should stay disciplined:
- Check the pillar structure. Make sure it is not being treated as a decorative skin over a moving or underspecified base.
- Prepare the surface. Clean, level and prime where required so the adhesive bonds to a stable face.
- Lay from the base up. Use spacers and hold the joint width consistent around returns and corners.
- Match the adhesive to the exposure. Exterior vertical work needs a flexible system rated for the job.
- Seal and inspect. Check lippage, edge support and continuous joints before sign-off.
Coverage is the other point installers cannot fake. Exterior and wet work requires 90% adhesive coverage, with 80% the minimum for interior non-wet applications in the same guidance set. On a pillar, I treat the exterior figure as the working standard, because corners and edges are where poor support shows first.
Slip, Safety and Wet-Area Reality Checks
A textured tile isn't automatically a safer tile. On wet-area pillars, the most decorative surface can be the hardest to clean and the least forgiving underfoot. That's especially true in aging-in-place bathrooms, where access, cleaning and drainage all have to work together.
Why finish choice has to follow the room, not just the mood board
Australian Government bathroom guidance recommends slip-resistant flooring with a minimum R10/P3 rating and refers to AS 1428.1 (2021) gradients of 1:60 to 1:80 for shower bases and 1:80 to 1:100 for entire bathroom floors in the DVA bathroom guidance. Those numbers matter because a ribbed or heavily profiled pillar tile changes how water moves, how grime sits in the joints, and how easy the surface is to keep clean.
A narrow or ribbed format can be attractive on a wall, but the extra grout joints create more maintenance and more dirt-catching recesses. In a shower zone, that can become a practical problem very quickly. If the surface is going to be stepped on, stood on, or cleaned daily with limited access, a finer-grained matt finish often makes more sense than an aggressively textured one.
For waterproofing detail around a wet-area pillar, it's worth reading a specialist note on waterproofing tape for Folkestone bathrooms, because the junction detail is where many bathroom failures start. The broader lesson is the same everywhere. The tile is only one part of the safety system.
A sensible rule set looks like this:
- Use wall-only pillar finishes where possible: don't force a decorative relief tile onto a floor just because it looks interesting.
- Match slip rating to exposure: outdoor and wet-area conditions need proper test results, not assumptions.
- Keep drainage simple: complicated grout grids slow cleaning and can trap residue around a drain.
- Check mobility-aid contact: relief that feels good to the eye can interfere with safe grip and clean contact in real use.
That's the contrarian point most showroom conversations skip. The safest pillar is often the one that looks a little quieter, because it's easier to clean, easier to seal and easier to keep performing after the renovation is finished.
Buying Pillar Tiles in Melbourne Without the Risk
Melbourne buyers have an advantage if they use it properly. You can sample at home, compare finishes against real light, and then lock in the right order before the tiler books in. That sequence matters because imported stock and batch continuity are real risks on pillar jobs, especially when the pillar needs a matching cap, trim or replacement allowance.
Start with the surface you actually have
A small sample pack is worth more than a glossy board when you're dealing with a street-facing column. A $15 pack of five samples and a short design consult can tell you far more about reflection, colour shift and edge treatment than a screen image can. Put the sample against the pillar in morning light and again at dusk, then check it beside the driveway, the fence and the front door.
Once the finish is chosen, translate the price into the actual job. Per-metre pricing is only the start, because pillar work absorbs extra cuts, returns and waste. If you're comparing trade and retail quotes, check whether the box count includes enough spare pieces for breakage and future repair, and make sure the delivery date lands before the installer is on site.
If you're a trade buyer, Tiles Mate Pro gives access to exclusive B2B pricing and personalised sourcing. That's useful on pillar jobs because matching caps, trims and replacement batches are often harder to source than the face tile itself. For homeowners, the main discipline is simpler. Order the sample first, confirm the batch, and only then commit to the full quantity.
A clean Melbourne workflow looks like this:
- Sample on the actual pillar.
- Confirm finish, size and lot continuity.
- Lock in the order with enough spare pieces.
- Schedule delivery against tiler availability.
- Store any leftover matching boxes in a dry, labelled place.
The last step gets overlooked all the time. If a corner chips two years later, the matching box in the garage can save the whole façade from a patchwork repair.
Locking In the Right Pillar Tile Spec This Week
The four checks that matter most are simple. Substrate condition, adhesive coverage, movement joints and slip rating all need to be verified before the first tile goes up. If one of those is vague, the spec isn't finished.
Keep a spare allowance for a complex pillar layout, and store the extra boxes with the project paperwork so the batch details don't get lost. Ask for the product code, the lot reference and the finish details in writing, then keep that record with the builder's file. That's how you protect the job when a repair is needed later.
Tiles Mate Pty Ltd helps Melbourne and Victorian buyers choose pillar tiles with practical advice, clear product options and sample-first ordering. If you're planning a heritage porch, a contemporary entry pier or an outdoor entertaining area, visit Tiles Mate Pty Ltd to check finishes, compare sizes and keep your specification on track.