




Tapware Buying Guide for Melbourne Renovations
by Shivam Tayal 17 Oct 2026 0 Comments
You're standing in a showroom with a vanity sample in one hand, tile chips in the other, and three taps that all look close enough to work. They don't. In a Melbourne renovation, tapware decides how the room functions, how hard it is to keep clean, and whether the plumber can install what the designer sketched.
The right call starts with usage, not colour. A basin mixer in a powder room, a kitchen mixer over a deep sink, and a wall mixer over a bath all solve different problems, and they need different rough-ins, spout geometry and compliance checks. If you treat tapware as a styling afterthought, you end up paying twice, once for the wrong product, then again to fix the wall or bench around it.
Starting a Tapware Decision in a Melbourne Renovation
A Melbourne couple walks into a trade counter with a set of tiles already approved, a vanity order pending, and a Pinterest board full of brushed brass. The first mistake is obvious. They're asking what looks good before they've worked out what each tap has to do in the room.
Start with use, then plumbing, then coordination
The first question is simple, where does the water need to land, and how often will the tap be used? A hand basin in a guest ensuite wants a different outlet feel to a kitchen sink that needs real working reach, and a laundry tub needs more practical clearance than visual finesse. If the basin is already chosen, the spout has to suit that bowl, not fight it.
The second question is what is already in the wall or under the bench. If the rough-in is fixed, that can remove entire tap styles from the shortlist before you've even looked at finish. Wall mixers, deck mixers and freestanding bath fillers all make different demands on set-out, and a tiler can't magically move a water point after stone and splashback work is done.
The third question is coordination. Tapware should be picked alongside the tile and vanity, not after them, because the spout opening, splash zone and visual centreline need to line up with the actual basin and benchtop. A good-looking tap on paper becomes a poor choice if it sprays past the bowl or lands too close to a raised edge.
Practical rule: lock the tap type before you finalise the splashback and stone cut-outs, otherwise the room starts dictating compromises you didn't budget for.
For people who want a broad overview of tap styles before getting technical, the Ring Hot Water tap guide is a useful cross-check against the usual residential categories. Use it as a reference, not as a substitute for your own set-out measurements.
A usable shortlist for a Melbourne showroom visit should include the exact room, the intended basin or sink, and the likely mounting position. That's enough to stop the conversation drifting into finish samples before the technical fit is solved.
Tap Types You Will See in Melbourne Showrooms
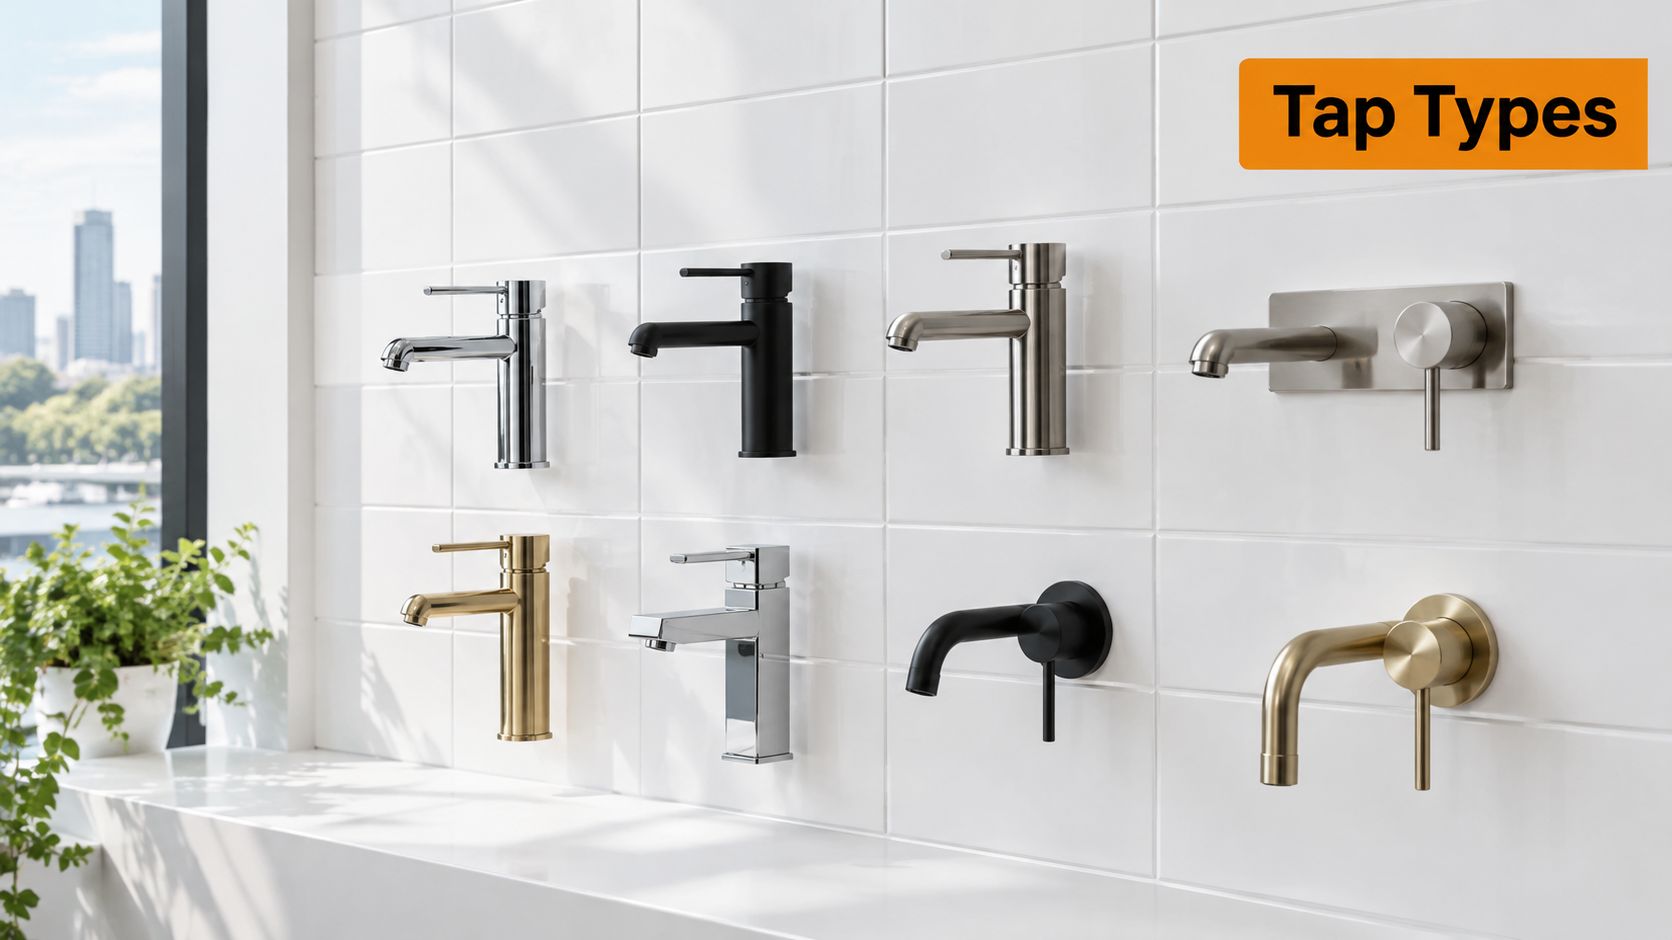
The common residential categories
A basin mixer is the default for most vanities. It mounts through the bench or basin, gives you one lever, and suits compact rooms where clean lines matter more than decorative drama. If the vanity is only 600 mm wide, a short-projection mixer is usually the safer look because it keeps the outlet centred over the bowl instead of drifting into the edge.
A wall-mount basin mixer hides the body in the wall and keeps the bench clear. That looks sharp, but it also locks you into the rough-in position, so it only works when the wall framing and plumbing already suit the set-out. If the wall is a finished masonry or a tight apartment wall, this choice can become an expensive exercise in chasing and patching.
A tall mixer for a freestanding basin is for vessel bowls that sit proud on the vanity. The height matters more than the finish here, because the spout has to clear the rim without blasting water across the bench. A beautiful mixer that sits too low is a bad mixer.
A bath spout and bath wall mixer are the usual pair for a bathtub. A back-to-wall bath often needs a long-reach spout or a wall-mounted set-up so the outlet lands inside the tub, not on the apron or the lip.
A shower mixer and diverter is about function first. The handle position, body depth and trim style matter, but the key issue is whether the rough-in matches the system already planned behind the tiles. If you're comparing shower mixer configurations, the Tiles Mate shower mixer guide is a practical place to sanity-check what style suits the room.
A kitchen mixer usually needs more reach and more working clearance. If you're considering a pull-out head, the extra flexibility is useful at a deep sink, but the body and hose need enough space behind the bench. For a quick product comparison, see the pull-out kitchen mixer overview.
A laundry set-out is usually the least glamorous and the least forgiving. It should prioritise easy fill, splash control and durability, because the room gets used roughly and often.
The diagnostic question is straightforward, are you buying for a basin, bath, shower, kitchen or laundry, and is the outlet meant to be seen or hidden? Once you answer that, the rest of the spec becomes much easier.
Matching Spout Reach, Height and Mounting to Your Layout
A tap can look perfect in a showroom and still fail in a real bathroom because the outlet sits too far forward, too high, or too close to the basin wall. That's why spout reach and mounting style are not styling details, they're usability decisions. If water lands on the wrong point, the room feels wrong every single day.
Measure the bowl, not the brochure
Start with basin width and bowl position. A narrow basin needs a tighter reach, while a wide vanity with a centred bowl can take more projection without looking awkward. If the tap lands too short, you'll be washing your hands at the back of the bowl and sending water toward the benchtop edge.
Height matters just as much. A vessel basin needs a taller mixer or a wall spout placed high enough to clear the rim. A drop-in or under-mount basin can use a lower profile, which usually makes cleaning easier and keeps the visual line calmer.
Wall-mounted fittings are the most unforgiving because the set-out is fixed in the wall. Once that opening is cut and tiled, the spout won't magically move closer to the bowl. That's why wall mixers make sense only when the basin and splashback are already locked in.
Measure the actual basin and the actual tile build-up, not the catalogue drawing. A few millimetres in set-out can change whether the outlet feels balanced or annoying.
For back-splash height, the issue is visual as much as practical. A 600 x 600 bench tile with a neat cut-out can make a wall spout look deliberate, but a busy splashback can make the same opening feel cluttered. Kit-kat splashbacks are especially sensitive because the fine joint pattern highlights every off-centre penetration.
Use these set-out notes before you order anything:
- Basin width: check how much bench is left on either side of the bowl.
- Bowl depth: confirm where the water will hit.
- Tap landing point: measure the centreline from the wall or back edge.
- Splashback height: make sure the outlet and lever won't clash with the tile line.
- Projection clearance: allow room for hands, soap and cleaning.
| Tap type | Typical spout reach | Best mounting style |
|---|---|---|
| Basin mixer | Short to medium | Bench or basin mount |
| Wall-mount basin mixer | Fixed by rough-in | Wall mount |
| Tall vessel mixer | Higher reach and height | Bench mount behind vessel basin |
| Bath spout | Long reach | Wall mount or bath deck mount |
| Shower mixer | No visible spout reach issue | In-wall trim kit |
| Kitchen mixer | Medium to long reach | Bench or sink mount |
| Laundry mixer | Practical, direct reach | Bench or wall mount |
WELS Ratings, Flow Rates and Real Victorian Savings
Read the label properly
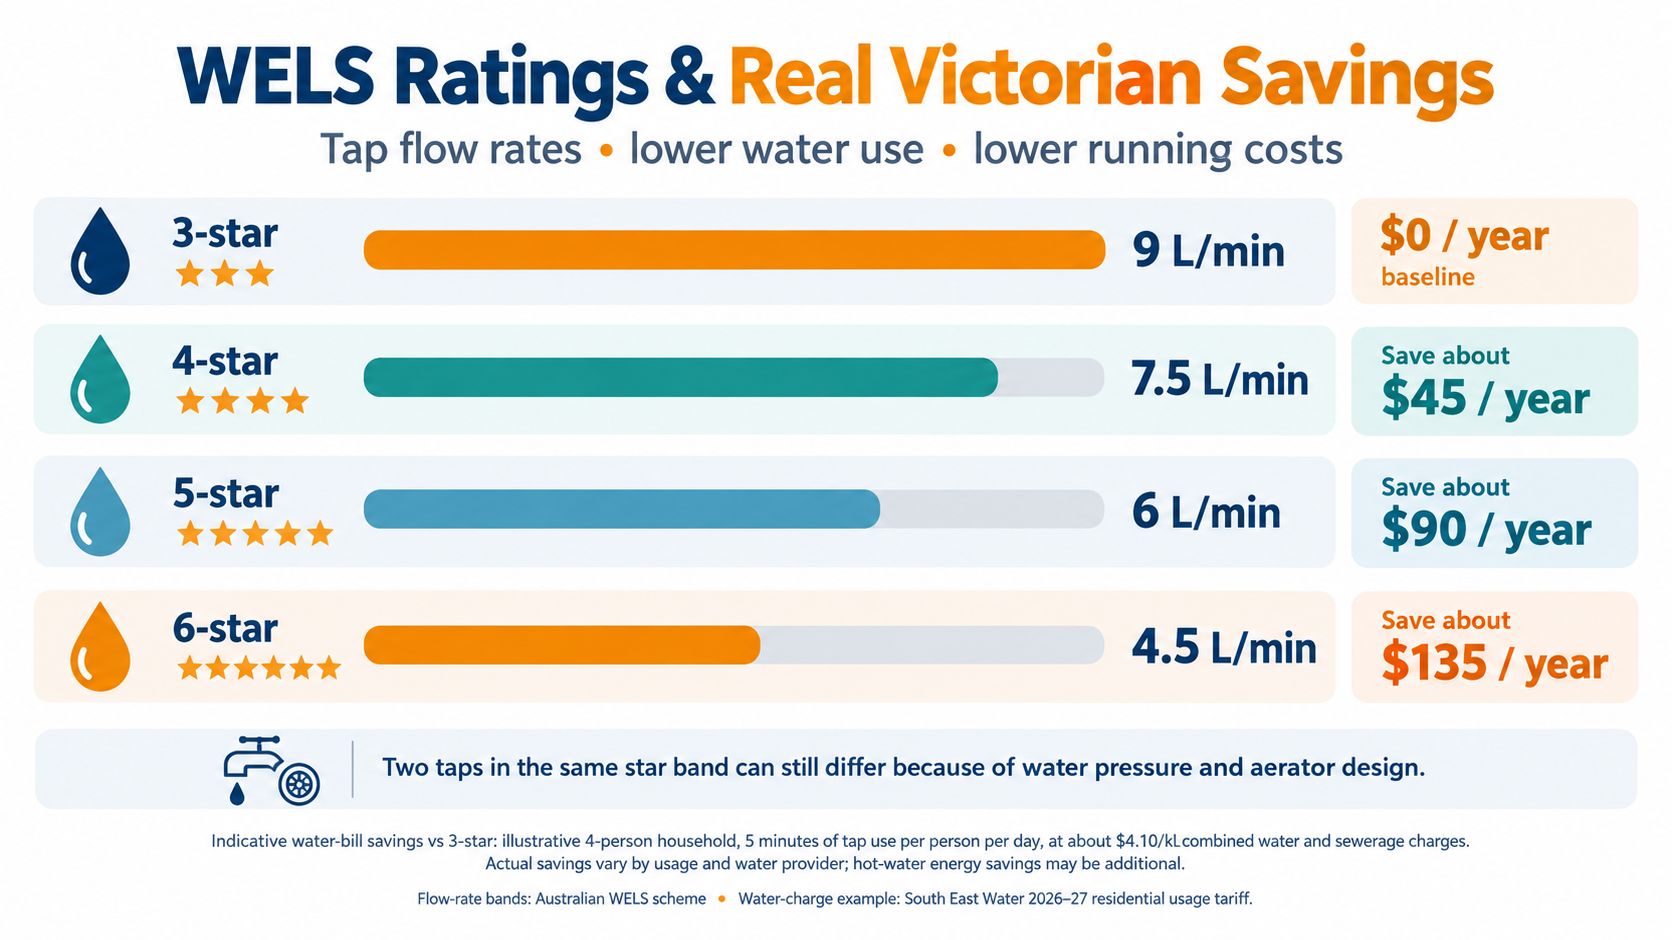
The WELS label is not decoration. It tells you the star rating and the flow range, and for residential tapware that matters more than the photo on the box. The national scheme uses standardised testing and rates taps across flow bands, with 3 stars at more than 7.5 to 9 L/min, 4 stars at more than 6 to 7.5 L/min, 5 stars at more than 4.5 to 6 L/min, and 6 stars at more than 1.1 to 4.5 L/min. The WELS star guide is the place to check the exact band, not guess from the product name.
Don't stop at the stars. Two taps in the same band can still behave differently because pressure and aerator design change the feel at the outlet. That's why the litres-per-minute figure belongs in your notes beside the model number, especially when you're choosing between a basin mixer and a kitchen mixer that look similar on paper.
The National Construction Code minimum for many taps is 3 stars, and the product data also caps key residential outlets at no more than 9 litres per minute. That gives you a compliance floor, not a comfort guarantee. A 3-star tap can satisfy the rule and still feel too strong or too weak for a particular basin at the property's pressure.
Turn the label into a renovation decision
The federal scheme's savings rule is simple, each 1 L/min reduction can save nearly 2 kL of water and $5.50 a year, according to the WELS consumer guidance at BuildPilot's tapware explainer. Use that as a rough comparison tool, not as a promise. If you replace a 15 L/min tap with a 3-star, 9 L/min model, the estimate is 11 kL and $33 a year. A 6-star, 4 L/min model is estimated to save 20 kL and $60 a year.
That changes the way you think about a renovation. One kitchen mixer may deliver a better payback than a cosmetic change across the whole room, but a house with several bathroom basins changes the maths. In a Melbourne home, the bigger win is often the places that get used all day, not the feature tap in the powder room.
If the reduced-flow outlet feels weak at your property pressure, occupants will remove the aerator and wipe out the saving. Comfort beats theory in a lived-in house.
Before you buy, check four things:
- Registration: confirm the exact model appears in the WELS register.
- Star rating: compare the band to your actual room use.
- Litres per minute: record the figure, not just the stars.
- Installation fit: make sure the outlet suits the basin, sink or bath layout.
Finishes, Coatings and What Actually Lasts in a Wet Room
Pick the finish for the room you actually live in
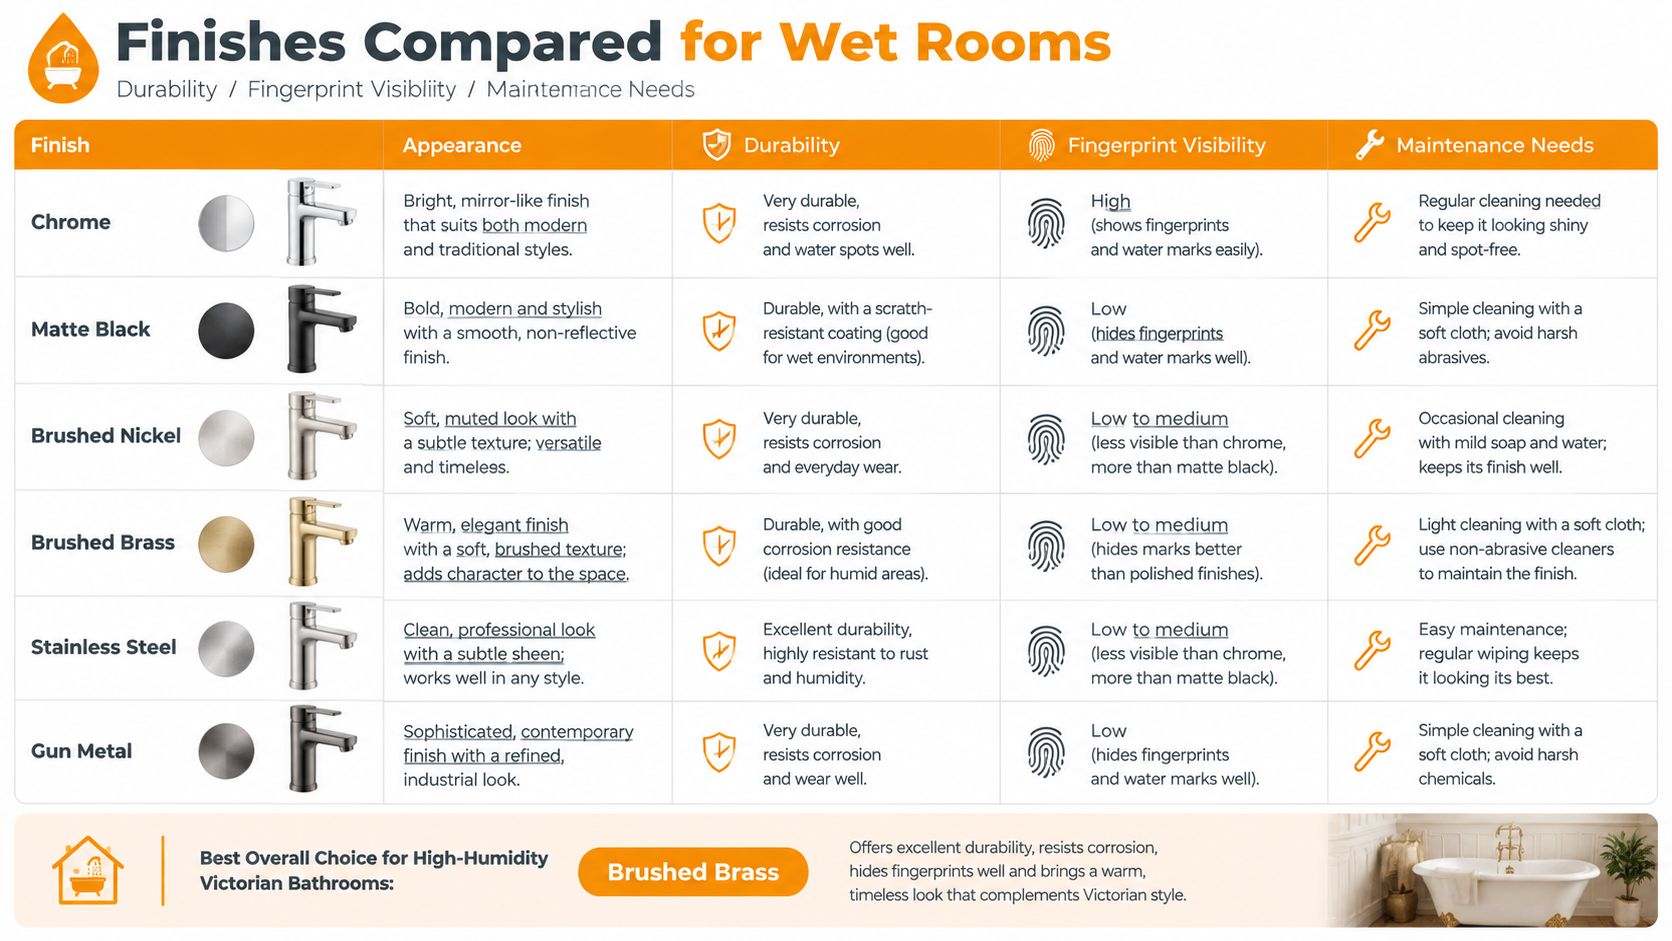
Chrome still wins for sheer practicality. It reads cleanly under most lighting, pairs with almost any tile palette, and doesn't fight the room when the rest of the finishes shift over time. If you want a low-risk choice that won't date the bathroom as quickly, chrome is the safest default.
Matte black looks sharp in photos and can anchor a modern palette, but it asks more from cleaning and water quality. Soap residue and marks show up faster on dark surfaces, so it suits households that are willing to wipe down tapware regularly. If the room already uses bold grout lines, dark trim or heavy timber, it can work, but it needs discipline.
Brushed nickel, brushed brass, stainless steel and gun metal sit in the middle ground. They soften reflections and can look warmer or more architectural than chrome, but consistency matters. A brushed brass mixer in a bathroom with a Calacatta-look porcelain tile reads very differently from the same finish beside a textured stone mosaic, so sample it against the actual tile, not a mood board.
Match the finish to the palette, not the trend
If the room is already carrying a lot of movement in the tile, the tap should calm it down. If the tile and vanity are restrained, the tap can take more visual weight. That's why coloured tapware often works best when the surrounding finishes are quiet and deliberate.
Tiles Mate carries tile finishes that can change how a tap finish reads in the room, especially with marble-look porcelain, textured mosaics and matt stone looks. That means the same mixer can appear sharper, warmer or more subdued depending on the wall and vanity around it. Choose the finish after you've confirmed the dominant surface tones.
Care rule: use a soft cloth, mild cleaner and regular drying. Harsh abrasive pads are the fastest way to dull a coated finish.
Watch for these warning signs that a finish is failing:
- Uneven sheen: the surface stops looking uniform under light.
- Visible edge wear: corners and lever tips start looking thin.
- Coating lift: the finish begins to flake or pit.
- Persistent spotting: marks stay behind even after routine cleaning.
The YouTube video below is useful if you want a visual sense of how finish choice changes the way tapware sits in a bathroom.
Valve Compatibility, Lead Rules and the Pre-Purchase Checklist
A tap that looks right but doesn't suit the valve body is a bad purchase. Once the wall is closed up, changing a concealed mixer is expensive, messy and often avoidable if the rough-in depth and trim kit are checked early. Top-mount bodies are easier to service; in-wall bodies are cleaner visually, but they demand more discipline during planning.
Check the hidden parts before you pay
The Australian Building Codes Board states that copper-alloy plumbing products in contact with drinking water, including taps and mixers, must have a weighted-average lead content of no more than 0.25% under NCC 2022 Volume Three requirements. That rule matters in the actual component materials, not just the visible finish. Chrome, matte black or brushed nickel can look identical from the outside while hiding very different internals.
Finish is not evidence of compliance. If you're specifying imported or private-label tapware for a Victorian project, verify the exact model, the material evidence and the relevant certification path, including WaterMark where required. Keep the paperwork with the quote, because substitutions during construction are where non-compliant products slip through.
For a broader renovation checklist that catches the usual scope gaps, the avoid bathroom remodel mistakes guide is worth a quick read before you sign off the final quote. It's especially useful for homeowners who are juggling several trades at once.
Use a single pre-purchase sheet
Before you buy, write these down:
- Model number: confirm the exact trim and body combination.
- Valve depth: check the body suits the wall build-up.
- Registration and certification: keep WELS and compliance evidence together.
- Pressure suitability: make sure the tap suits the house pressure.
- Set-out dimensions: lock in the centreline and projection before tile work starts.
If the tap is for a shower or wall mixer, the rough-in has to be right before the tiles go on. If it's for a basin or kitchen, the bench cut-out and underside clearance matter just as much. In both cases, the cheapest mistake is the one you stop at the showroom counter.
Installation, Maintenance and Budgeting for Homeowners and Trade
A good tap installation starts before the box is opened. In a Melbourne renovation, a licensed plumber is the right call for anything involving new water points, wall mixers, concealed bodies or final fit-off. The rough-in happens first, then the bench or wall finishes, then the tap is fitted and tested. Leave the final tightening and sealing to the tradesperson who knows the system, because a small leak behind tile is far more expensive than the labour you tried to save.
Keep the install simple and serviceable
The job usually runs in three stages, rough-in, fit-off and final test. During rough-in, the plumber sets the body depth and alignment. During fit-off, the trim, handles and outlets go on. During the final check, the plumber tests operation, seals any exposed penetrations and confirms the outlet behaves as expected.
For practical step-by-step context on fixture fitting, the perfect faucet installation tips are a useful external reference. They're not a substitute for a local plumber, but they do reinforce why alignment and sealing matter.
Maintenance is basic, but it has to happen. Clean aerators, check cartridges if the handle starts stiffening, and keep the silicone around tap penetrations tidy so water can't creep behind the finish. If you ignore those jobs, the tap won't usually fail all at once, it will degrade slowly and annoyingly.
Budget for the full job, not just the mixer
Tapware price is only part of the cost. You're also paying for the valve body, the plumber, the cut-out or wall work, and any tile repair if the location changes after the room is closed up. A bathroom tap that looks inexpensive at first can become costly once the hidden components and labour are added.
For trade buyers, TilesMate Pro is one way to keep finish selection, compliance paperwork and pricing visibility in one place across multiple bathrooms. That matters when the same project needs coordinated basin, shower and bath fittings, because consistency saves time on substitutions and rework.
If you want to cross-check the broader financial side of a renovation, the bathroom renovation cost breakdown gives a useful frame for where tapware sits in the total spend.
Before your next showroom visit or quote review, print this list:
- Confirm the room use, basin, bath, shower, kitchen or laundry.
- Check the rough-in, especially for any in-wall mixer.
- Verify WELS and lead compliance, not just the finish.
- Measure the basin and spout relationship, so the outlet lands correctly.
- Budget for labour and repairs, not only for the mixer itself.
Tiles Mate Pty Ltd can help you coordinate tapware with the tiles, finishes and layouts already locked into your renovation, so the room works as hard as it looks. If you're sorting basin, bath or shower selections for a Melbourne project, visit Tiles Mate Pty Ltd to compare finishes, request samples and line up the rest of the wet area with confidence.