




Shower Screens Guide for Stylish Melbourne Bathrooms
by Shivam Tayal 19 Sep 2026 0 Comments
You're standing in a half-finished bathroom. The tiles are either already chosen or still open in twelve browser tabs. The plumber wants final positions. The tiler wants to know where the waterstop runs. And someone asks, “Are you doing frameless?”
That's usually the moment shower screens stop being a simple style decision.
A screen changes how big the room feels, where water lands, how often you'll wipe glass, and whether the finished shower works with the waterproofing underneath. In Melbourne renovations, that matters more than expected. A beautiful panel of glass can still be the wrong choice if the door swing clips the vanity, the tile finish shows every splash, or the layout doesn't suit the way the screen needs to sit.
The confusion comes from how these products are sold. Showrooms often present shower screens as a look first. On site, they behave more like a system. The glass, the hardware, the tile layout, the floor fall, the shower entry, and the waterproofing line all have to agree with each other.
Introduction to Shower Screens and Why Choice Matters
A common renovation mistake goes like this. Someone falls in love with a frameless panel because it looks open and clean. The bathroom is compact, the wall tiles are glossy, and the shower sits close to the vanity. After installation, the room still looks good, but the glass shows every mark, the opening feels tighter than expected, and water escapes into the dry area more easily than anyone hoped.
That doesn't mean frameless was wrong. It means the decision was made too early, and without the rest of the room in view.
What a shower screen really affects
Think of a shower screen like the front door of the wet area. It doesn't just separate one zone from another. It controls movement, directs water, frames sightlines, and changes how the tile work reads across the room.
Three things usually matter most in real homes:
- Visual space: Clear glass can make a small ensuite feel wider because your eye travels through to the back wall tile.
- Cleaning effort: More exposed glass usually means more visible spotting, especially if your water leaves residue.
- Water control: The screen has to work with the floor shape, shower position, and entry opening, not just with the tapware finish.
On-site reality: The best-looking screen on paper can become the most annoying one to live with if it ignores cleaning habits, family use, or the bathroom's actual footprint.
Why Victorian renovators need to think beyond style
In Victoria and across Australia, shower screens sit inside a regulated wet-area system, not outside it as decoration. The Victorian Building Authority notes that shower areas must be designed with a floor fall of 1:80, and National Construction Code provisions set out different screen placement rules depending on whether the shower has a hob, a stepdown, or no hob or stepdown at all, as outlined in the Victorian wet-area waterproofing fact sheet.
That's why a good shower screen decision starts with layout, tile finish, and compliance. Style comes after those pieces line up. Once they do, choosing between framed, semi-frameless, pivot, sliding, frosted, fluted, or walk-in options gets much easier.
Understanding Shower Screen Types and How They Work
Most shower screens make sense once you stop thinking in brand names and start thinking in two categories. First, how the glass is supported. Second, how the entry moves.
The support side is easy to picture. A fully framed screen is like a picture in a solid border. A frameless screen is more like a floating panel fixed with discreet hardware. Semi-frameless sits in the middle, giving you structure without the full visual weight of a frame.
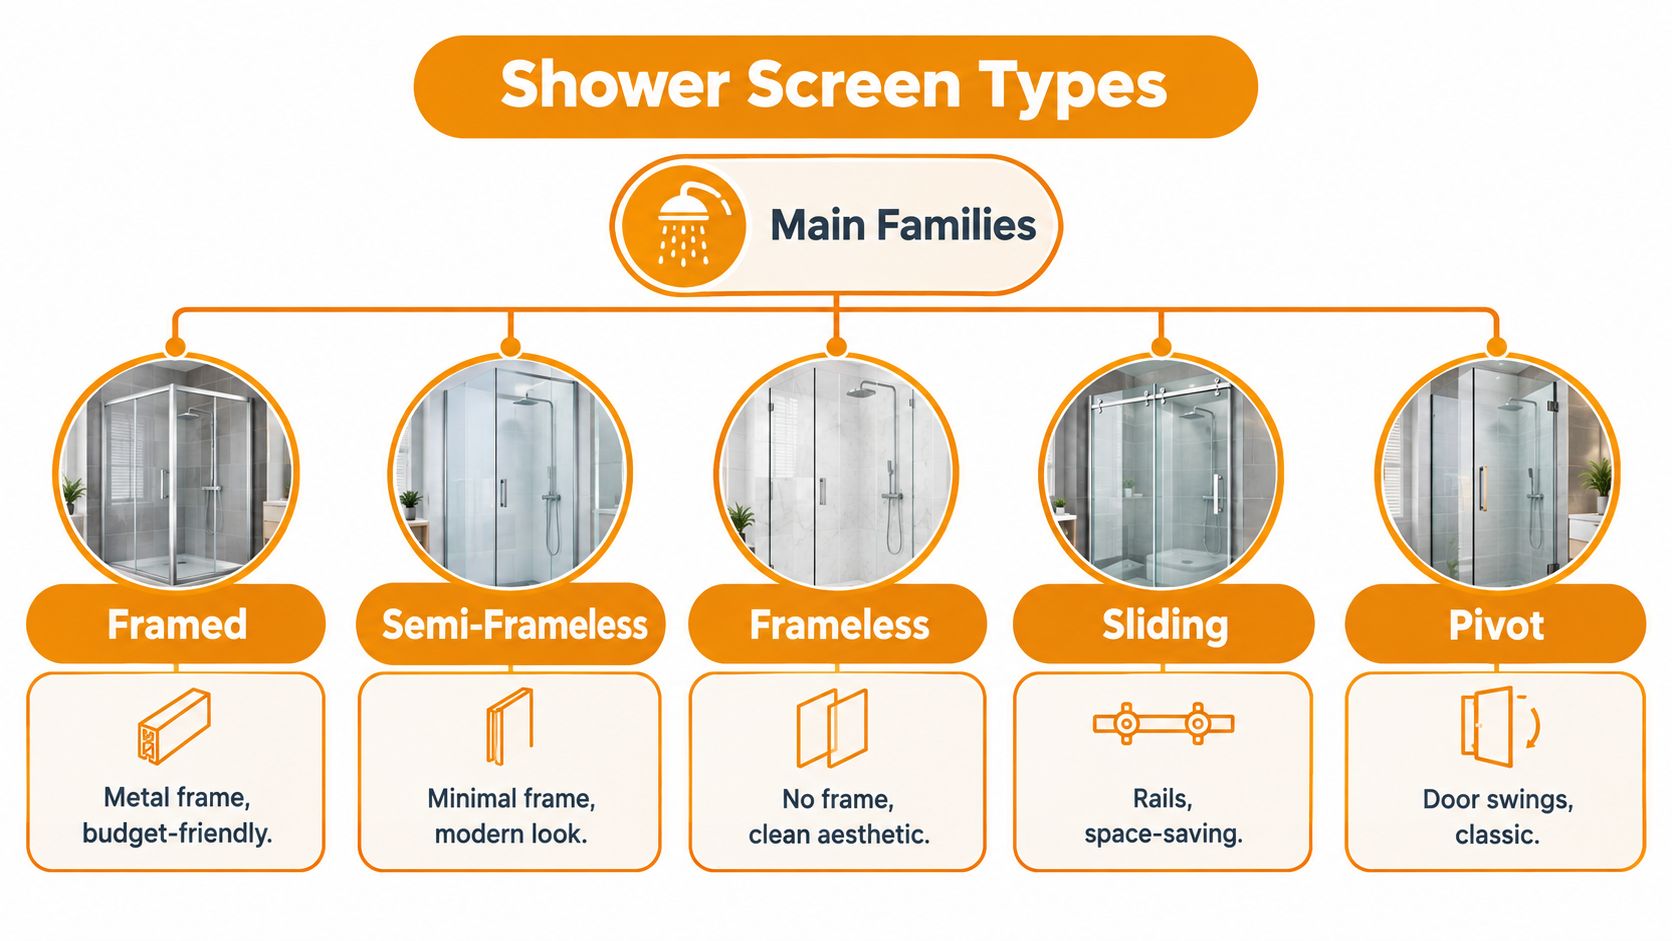
Framed, semi-frameless and frameless
A framed screen wraps the glass in metal around more edges. That often gives a practical, defined look and can feel forgiving in busy family bathrooms because the frame visually contains the panel and helps hide some edge detail.
A semi-frameless screen removes some of that bulk. You still get structure, but your eye sees more glass and less border. For many renovators, this is the compromise that balances modern style with everyday practicality.
A frameless screen strips things back to glass and hardware. It's the cleanest look, especially beside large-format tiles where you want the wall finish to stay visually uninterrupted. It also exposes more of the glass surface, which means more honesty. Beautiful tile work looks better. Water marks also show more clearly.
Sliding and pivot doors
Door action matters just as much as glass style.
- Sliding doors: These move along a track or guided path. They suit tighter bathrooms where a swinging door would clash with a vanity, toilet, towel rail, or bath edge.
- Pivot doors: These swing open like a standard door. They feel straightforward to use and can look more architectural, but they need clearance in front of the opening.
- Fixed walk-in panels: These remove the door altogether. They create a generous, open look, but they need the layout to do more of the work in containing water.
Here's a useful visual explainer before you compare layouts in detail:
Matching the type to the room
A compact ensuite often benefits from a sliding arrangement because every centimetre of swing space matters. A wider bathroom can carry a pivot door more comfortably. A hobless walk-in can look elegant, but only if the opening, shower position, and floor design all support it.
The simplest way to narrow the field is to ask two questions first. Do I have room for a door to swing, and do I want the screen to visually disappear or visibly frame the shower?
Once those answers are clear, you can rule out half the options quickly.
Glass Types Finishes and Hardware That Shape Daily Life
The showroom decision becomes personal. Two bathrooms can use the same screen shape and feel completely different because the glass finish and hardware finish change privacy, maintenance, and how your tiles read through the enclosure.
Australian guidance also makes safety part of this choice. The Building Code requirements described in NSW Government guidance and current industry installation guidance require shower screens and shower doors to comply with relevant glazing standards, with Grade A safety glass commonly used and current Australian installation guidance treating 10 mm as a common standard frameless option, as outlined in the AGWA shower screen installation guide.
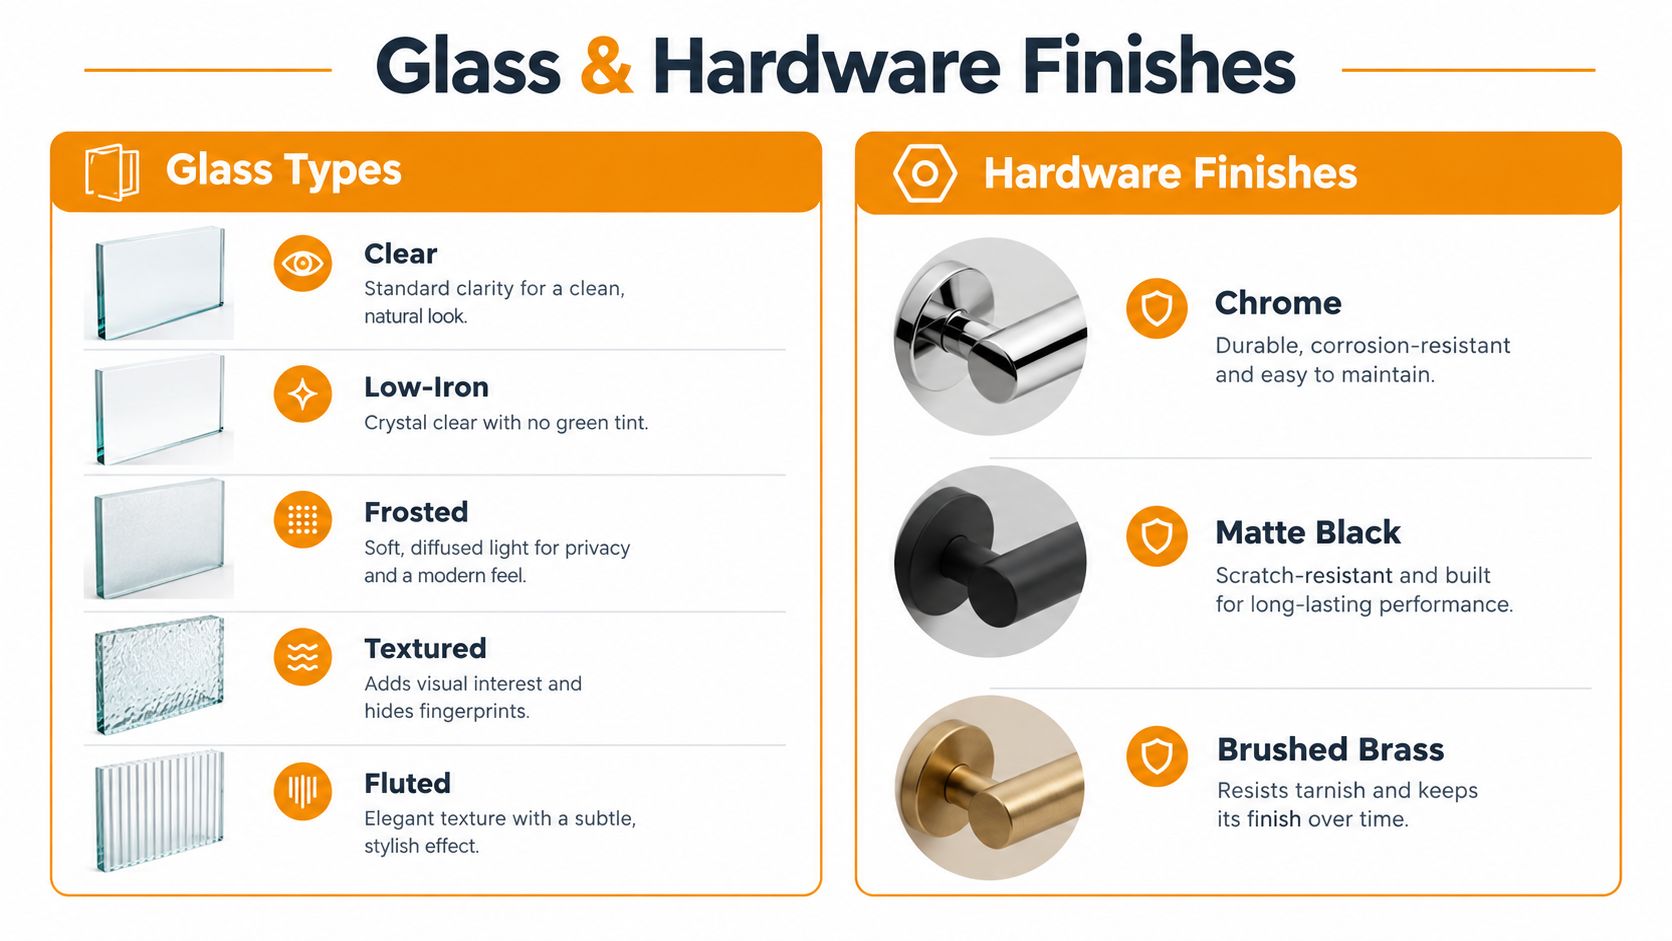
How glass choice changes the room
Clear glass is the default because it keeps the room open. It works especially well if you've invested in feature tiles inside the shower and want them visible from the doorway.
Low-iron glass is often worth considering when you've chosen crisp whites or light marble-look tiles. Standard clear glass can show a greenish edge, while low-iron reads cleaner and truer.
Frosted, textured, and fluted glass answer a different set of problems. They soften views into the shower, increase privacy, and can make day-to-day water spotting less obvious. Recent Australian trend coverage notes that frameless remains highly popular, while textured glass, fluted glass, curved panels, warmer hardware finishes, and easier-clean walk-in designs are gaining attention in projections for 2025–2026, as discussed in this Australian shower screen trend overview.
Glass and Finish Choices Compared for Real Homes
| Glass or Finish | Best For | Trade Off to Consider |
|---|---|---|
| Clear glass | Small bathrooms, feature tile walls, open visual flow | Shows spots and soap film more clearly |
| Low-iron glass | White tiles, marble-look finishes, brighter schemes | Usually a more selective design choice rather than the default |
| Frosted glass | Shared bathrooms, extra privacy | Reduces visual openness |
| Textured glass | Homes wanting privacy with a softer decorative effect | Changes how sharply you see tile detail behind it |
| Fluted or reeded glass | Warm contemporary bathrooms, easier day-to-day appearance | The texture becomes a design feature, so it needs to suit the tile style |
| Chrome hardware | Flexible with most tapware and tile schemes | Less distinctive if you want strong contrast |
| Matte black hardware | Defines the screen and suits graphic tile layouts | Visually heavier in very small rooms |
| Brushed brass hardware | Warmer palettes, stone-look or marble-look tiles | Needs coordination with tapware and lighting finishes |
If you're trying to reduce visible spotting on clear glass, a practical resource is this spotless shower glass guide, which explains why water residue becomes so noticeable on transparent panels.
For the shower fittings themselves, it also helps to compare finishes and forms alongside the glass so the full enclosure feels resolved, not pieced together. Browsing shower sets in different finishes can make that coordination step much easier.
Sizing Measuring and Layout Planning Made Simple
Measuring for shower screens sounds simple until tile thickness, wall variation, and waterproofing lines enter the conversation. This is why screens should be measured after the critical surfaces are finished, not while the room still exists only on plans.
What catches people out isn't the width of the opening. It's the assumption that a tiled wall is perfectly straight, the floor is uniform, and the visible tile edge is the line that matters most. Often, it isn't.
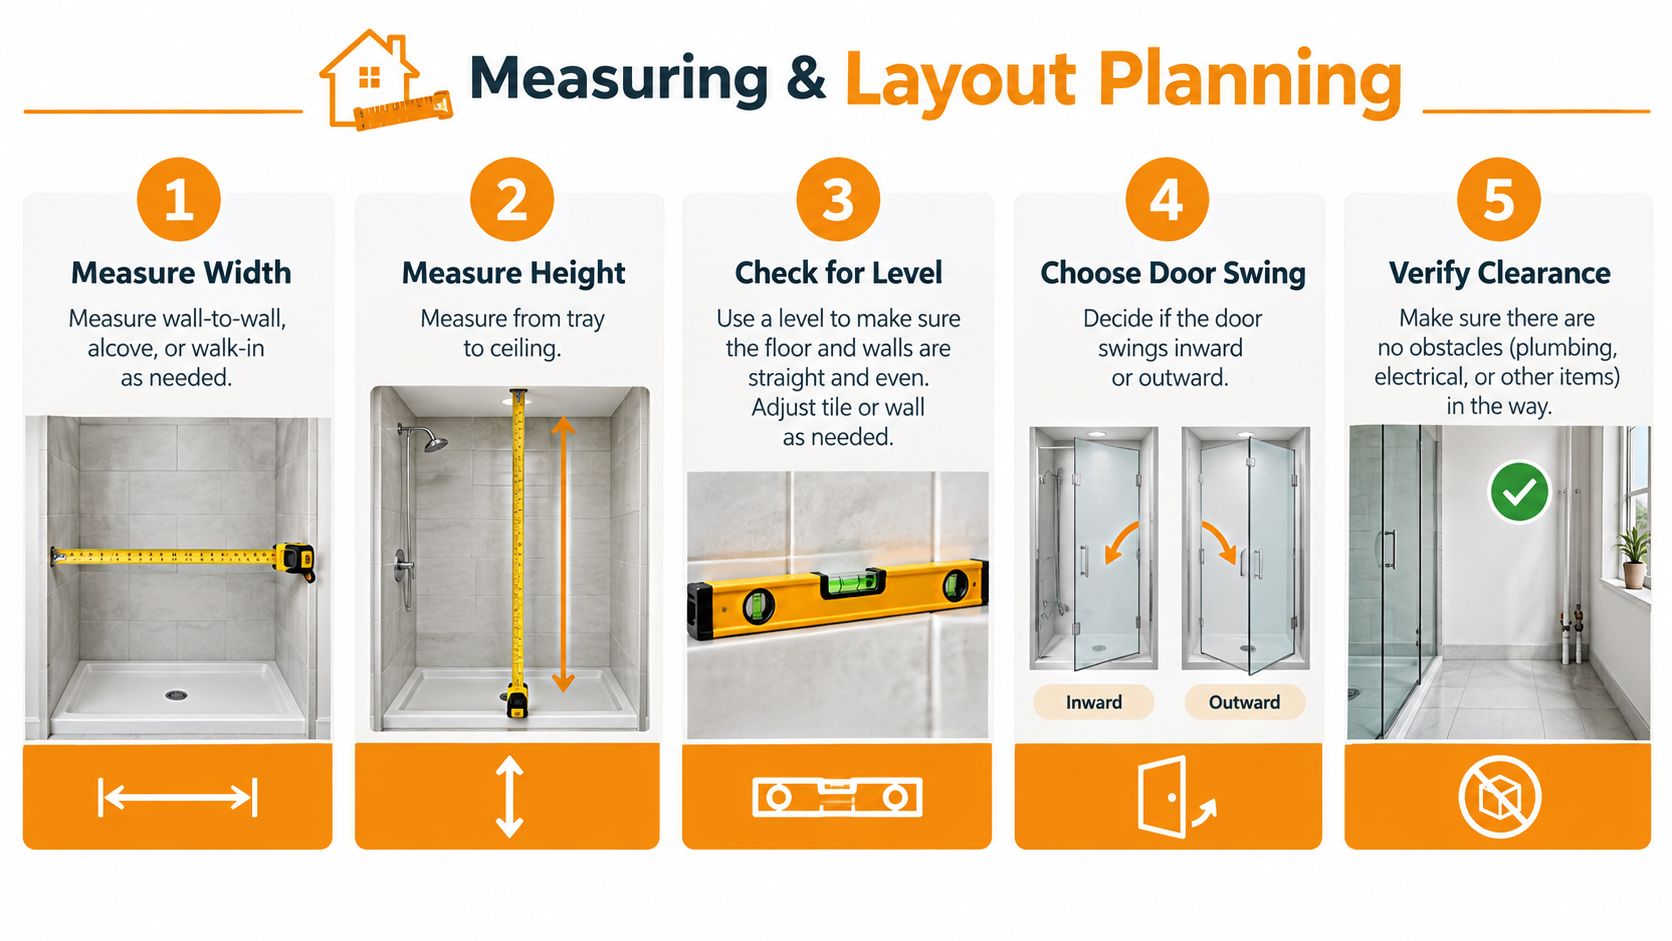
Measure the finished room, not the idea of the room
A screen is made to suit the built condition. That means the useful dimensions come after tiling, not before.
Use this sequence:
- Measure the opening type: Is it wall-to-wall, an alcove, a corner entry, or a walk-in panel with one free edge?
- Take width in more than one place: Top, middle, and bottom can differ if walls are out of plumb.
- Check the finished floor line: A sloping shower floor is normal. What matters is how the glass and channels will meet that slope.
- Confirm tile build-up: Large-format wall tiles, trims, and niches can affect where brackets and channels can sit.
- Test the door path: Open the door on paper and in the room. Make sure it won't foul a vanity, basin, towel rail, or toilet pan.
The waterstop line matters more than the tile edge
Many homeowners get confused. The visible tile joint might look like the obvious place to end the shower. But the screen needs to relate properly to the underlying wet-area design, not just to where the floor tiles visually change.
Practical rule: Don't order custom glass off a rough frame measure or off a tile plan alone. Wait until the waterproofed and tiled dimensions can be checked against the intended screen position.
Layout examples that usually work better
- Small ensuite: A sliding or fixed-plus-entry layout often avoids a door swing conflict.
- Family bathroom: A defined enclosure can help keep more water inside when different people use the shower differently.
- Walk-in design: A fixed panel can look calm and spacious, but only if the shower head location and entry opening cooperate.
If you're unsure whether a room should take one fixed panel or a fuller enclosure, mark the proposed glass line on the floor with painter's tape. Then stand at the vanity, sit on the toilet, and walk through the space. You'll spot circulation issues fast when the line is physically there.
Installation Compliance and Trade Versus DIY in Victoria
This is the point where many DIY plans should slow down. Installing shower screens isn't just about drilling brackets into tile and standing glass upright. The installation touches waterproofing, glazing safety, movement tolerances, and the exact point where the wet area is meant to stop.
A DIY kit can be suitable in some circumstances, especially when the opening is straightforward and the product is designed for standard conditions. But bathrooms rarely stay standard once older walls, uneven floors, and existing plumbing positions are involved.
DIY versus trade installation
A DIY approach can appeal for control and cost reasons. You can choose the product yourself, manage the timing, and avoid another trade visit. The risk is that a neat-looking result can still be technically wrong if the glass line, fixings, or channel position don't match the wet-area design.
A trade installer usually brings three things that matter more than speed. They check the finished opening for variation, understand how the hardware interacts with the tile and substrate, and can coordinate with the tiler or builder if the intended screen position doesn't suit the room.
Here's the practical comparison:
- DIY suits: Standard openings, confident renovators, and situations where the whole room has been carefully set up to receive the chosen kit.
- Trade suits: Custom glass, hobless showers, older homes, out-of-square walls, and any renovation where waterproofing and compliance need proper cross-checking.
- Trade becomes the safer call: When drilling locations, channels, and door action all need to align with membrane protection and the wet-area boundary.
What compliance changes in Victoria
In Victoria, the screen isn't independent from the waterproofing system. The Victorian Building Authority fact sheet sets out that shower areas require a 1:80 floor fall, and the placement rules differ depending on whether the shower includes a hob, a stepdown, or no hob or stepdown. For example, a screen in a shower with a hob must sit flush with the shower-area side of the hob or overhang into the shower area, while a shower without a hob uses an inverted channel mounted over the waterstop, as explained in this bathroom renovation planning guide and supported by the earlier Victorian compliance source.
The National Construction Code also treats shower screens and shower doors in bathrooms and similar rooms as hazardous glazing locations. Where the lowest sight line is below 2.0 m, framed panels must use Grade A or Grade B safety glazing, and if any edge is exposed, the requirement tightens to toughened safety glass with a minimum nominal thickness of 6 mm, under the NCC glazing provisions.
If the glass is compliant but the screen sits in the wrong place, the shower can still fail in practice because the water containment and waterproofing line no longer match.
Pairing Shower Screens With Tiles and Bathroom Layouts
Bathrooms start to feel intentional. A shower screen shouldn't be chosen after the tiles as if it's a separate purchase. The two should be read together, because glass either reveals, softens, or frames the tile work behind it.
A frameless panel in front of a calm wall of large-format porcelain behaves very differently from a black-framed screen set against kit-kat tiles. Neither is better in the abstract. Each creates a different visual rhythm.
Pairing by tile character
If your wall tile is doing the heavy lifting, keep the screen quiet.
Large-format matt or honed tiles often suit frameless or lightly detailed semi-frameless screens because the room feels less interrupted. The eye reads long surfaces, fewer lines, and more continuity. This is especially useful in compact bathrooms where every extra frame line can make the space feel busier.
More graphic tile patterns can carry stronger screen definition:
- Kit-kat or finger mosaics: Often pair well with black or darker hardware because the vertical repetition feels deliberate.
- Herringbone feature walls: Usually benefit from restraint in the screen. Too much visual detail in both can compete.
- Marble-look Calacatta or Statuario: Often looks elegant behind clear or softly textured glass, depending on whether you want full visibility or a gentler layered effect.
- Stone-look neutrals: Work well with warmer metals like brushed brass if the rest of the fittings support that tone.
Pairing by floor and wet-area function
Floor tile matters just as much as wall tile, especially in open or hobless showers. A walk-in screen can look beautifully minimal, but the floor finish needs to support grip, drainage, and visual control. Inside the shower zone, smaller-format mosaics often help where falls need to change direction cleanly.
For that reason, many renovators consider penny round, smaller mosaics, or other shower-floor-friendly formats inside the wet area, then step out to larger field tiles beyond it. If you're comparing options for that transition, this guide to shower floor tile choices is a useful reference point.
Three pairing ideas that usually read well
- Compact ensuite: Clear semi-frameless glass, light wall tiles, and restrained grout colour. This keeps the room open and avoids chopping up sightlines.
- Family bathroom: A more defined enclosure with practical tile finishes that hide everyday wear better. Slight texture in the glass can also soften maintenance demands.
- Luxury walk-in: A fixed frameless panel with a well-resolved floor tile transition and calm slab-look wall tile. The fewer visual interruptions, the more architectural the room feels.
A good pairing feels like the glass belongs to the tile scheme. A poor pairing looks like the screen was added after all the real decisions were already made.
Costs Cleaning and Long Term Care for Your Investment
The cost of shower screens isn't only what you pay at purchase. It's also what you live with over time. A screen that looked cheaper at the start can become the more expensive choice in effort if it's hard to clean, awkward to access, or fitted with hardware that doesn't suit the way the bathroom is used.
The main cost drivers are usually straightforward. Thicker glass, larger panels, custom sizes, more specialised hardware finishes, and more complex configurations tend to push the specification upward. Standard openings and simpler hardware usually keep things easier to source and install. The key is to judge value against the room, not in isolation.
What to budget attention for
Think beyond the panel itself.
- Glass thickness and type: Frameless systems often call for heavier-duty glass and hardware.
- Configuration: A fixed panel is different from a full door-and-return setup.
- Finish coordination: Matching hardware to tapware and tile tone can influence the final selection.
- Installation complexity: Hobless showers, custom angles, and old walls often require more care on site.
Australian wet-area rules also mean placement is not just aesthetic. The NCC requires shower floors to be waterproof, walls to be waterproof to at least 1800 mm above the floor substrate, and the screen to be installed flush with the hob or step-down, or in hobless showers on an inverted channel over the waterstop, as outlined in the NCC wet-area waterproofing provisions. That's why a lower installation price isn't automatically a better one if the installer isn't protecting the wet-area system.
Cleaning habits that make a difference
Frameless clear glass rewards consistency. Textured or fluted glass tends to be more forgiving in day-to-day appearance, but it still needs regular care around edges, seals, and hardware.
A realistic maintenance routine looks like this:
- After showers: A quick squeegee pass or wipe-down reduces residue before it dries.
- Weekly: Clean the glass, check channels or hinges, and wipe hardware dry.
- Periodically: Inspect seals, look for grime around brackets, and check whether doors still move cleanly.
- As needed: Replace tired seals or service hinges before minor wear turns into movement or leakage.
If hard-water marks are a recurring issue, this Cultivate House Detailing window care guide gives practical habits that also apply well to shower glass.
The best long-term choice
The best screen is rarely the most minimal or the most enclosed. It's the one that fits the household.
Choose clear frameless glass if openness and tile visibility matter most, and you're happy to maintain it. Choose a more defined or textured option if privacy, easier day-to-day appearance, or family practicality sit higher on the list. Choose the layout that respects the wet area first, then refine the finish so the bathroom still feels like the room you wanted.
If you're weighing shower screens against tile size, finish, and bathroom layout, Tiles Mate Pty Ltd can help you make those decisions in a way that feels coordinated, not piecemeal. From samples to design guidance for wet-area tile pairings, they make it easier to compare what will work in a Melbourne renovation. Visit Tiles Mate Pty Ltd to explore tile options and plan a bathroom that looks right and functions properly.