




Tiles Melbourne: A Practical Buyer's Guide
by Shivam Tayal 30 Sep 2026 0 Comments
You're standing in a half-demolished Melbourne bathroom with old tiles stacked against the wall, dust in the grout lines and a tiler booked to start soon. The colour has been chosen, perhaps, but the important questions are still open. Is the tile suitable for a wet floor? Is it in Melbourne stock? Can you collect it from Truganina, or will delivery arrive after the installer has moved on to another job?
Buying tiles in Melbourne is a design decision, but it's also a supply, compliance and installation decision. The right tile needs to suit the room, the substrate, the slip risk, the cleaning routine and the delivery window. A beautiful tile that arrives late, lacks the required rating or runs short halfway through the job is an expensive mistake.
Starting Your Tile Search in Melbourne
The first choice is where you'll shop. A trade-focused warehouse in Truganina can suit a buyer who already knows the required size, finish and quantity. A suburban showroom in Cheltenham or Moorabbin may be more useful if you need to compare colours under proper lighting. Large chains such as Beaumont Tiles and National Tiles offer broad ranges, while independent suppliers can provide more targeted advice and sourcing.
The same style can move through different supply channels before it reaches your renovation. Stock may be held locally, stored by an interstate importer or ordered from an overseas mill. That affects availability, shade continuity and delivery timing. Melbourne Metro freight also isn't a single uniform service. A pallet going to an accessible site in the inner suburbs has different handling requirements from a narrow laneway, a steep driveway or a property outside the metropolitan delivery zone.
Australia's dependence on imported tile supply is clear in the available trade data. In 2024, Australia imported 53,023,100 kilograms of tiles, flagstones and similar cement or concrete articles, with an import value of $45,885.51K. China supplied 46,022,500 kilograms, while Italy supplied 3,770,640 kilograms, showing why stock availability and lead times can vary between ranges. The figures are reported in the Australian Bureau of Statistics building approvals data.
Practical rule: Don't choose a tile until you know whether it's local stock, a scheduled incoming shipment or an indent order.
For a useful Melbourne-specific starting point, compare the buying considerations in this guide to choosing a tile shop in Melbourne. Then ask every supplier the same questions: What is available now? Can the full order come from one batch? What are the delivery conditions? Can you inspect a full-size sample?
The rest of your decision comes down to a few practical checks. Choose the material by room, verify the slip rating rather than trusting the word “outdoor”, order physical samples, calculate box coverage and confirm the delivery zone before paying. The showroom display is only the beginning.
Choosing the Right Tile Material for Australian Conditions
Choose the material by the work the room demands. Melbourne homes combine wet bathrooms, cold winters, strong summer sun, busy hallways and outdoor areas exposed to weather. A tile that performs well on a feature wall may be a poor choice for a shower floor or alfresco.
Porcelain is the workhorse
Porcelain is the workhorse ute of the tile world. It's dense, hard-wearing and suited to floors, bathrooms, laundries and outdoor areas when the product has the correct technical rating. In the Australian market, a useful porcelain threshold is water absorption below 0.5%, an impervious classification under AS/NZS 13006. The technical distinction is explained in this guide to quality porcelain tile characteristics.
Low absorption limits moisture ingress and helps the tile remain stable in damp conditions. That makes porcelain my default recommendation for Melbourne bathroom floors, laundry floors and indoor-to-outdoor transitions. It still needs an appropriate slip rating, correct adhesive and a properly prepared substrate. Dense doesn't automatically mean safe underfoot.
Ceramic suits walls and lighter duties
Ceramic is the lighter hatchback. It's often easier to cut and handle, making it practical for splashbacks, bathroom walls and decorative areas that don't receive demanding foot traffic. A glazed ceramic tile can deliver colour, shine and pattern without the weight and cost of a floor-grade porcelain product.
I wouldn't use a wall-focused ceramic tile on a shower base just because the colour matches. Check the technical sheet for floor suitability, water absorption and slip performance. If the tile is exposed to regular water and foot traffic, move your shortlist towards a floor-rated porcelain option.
Natural stone needs a maintenance plan
Natural stone is the classic car. Bluestone, travertine and marble can give a Melbourne renovation depth that printed surfaces struggle to reproduce, but the owner needs to accept ongoing care. Stone can react to moisture, staining substances and cleaning products, and the correct sealer depends on the stone and installation location.
A Port Melbourne courtyard, a bayside entry or a kitchen with heavy use deserves a realistic maintenance conversation before the order is placed. Ask how the stone should be sealed, which cleaner is approved and how spills should be handled. Don't select stone for a low-maintenance project unless you're prepared to follow the maintenance instructions.
Concrete-look tiles sit between appearance and practicality. A porcelain concrete-look tile can provide the industrial character of concrete with a more predictable surface, while genuine concrete products may require a different sealing and care routine. Match the finish to the room instead of assuming every grey tile behaves the same way.
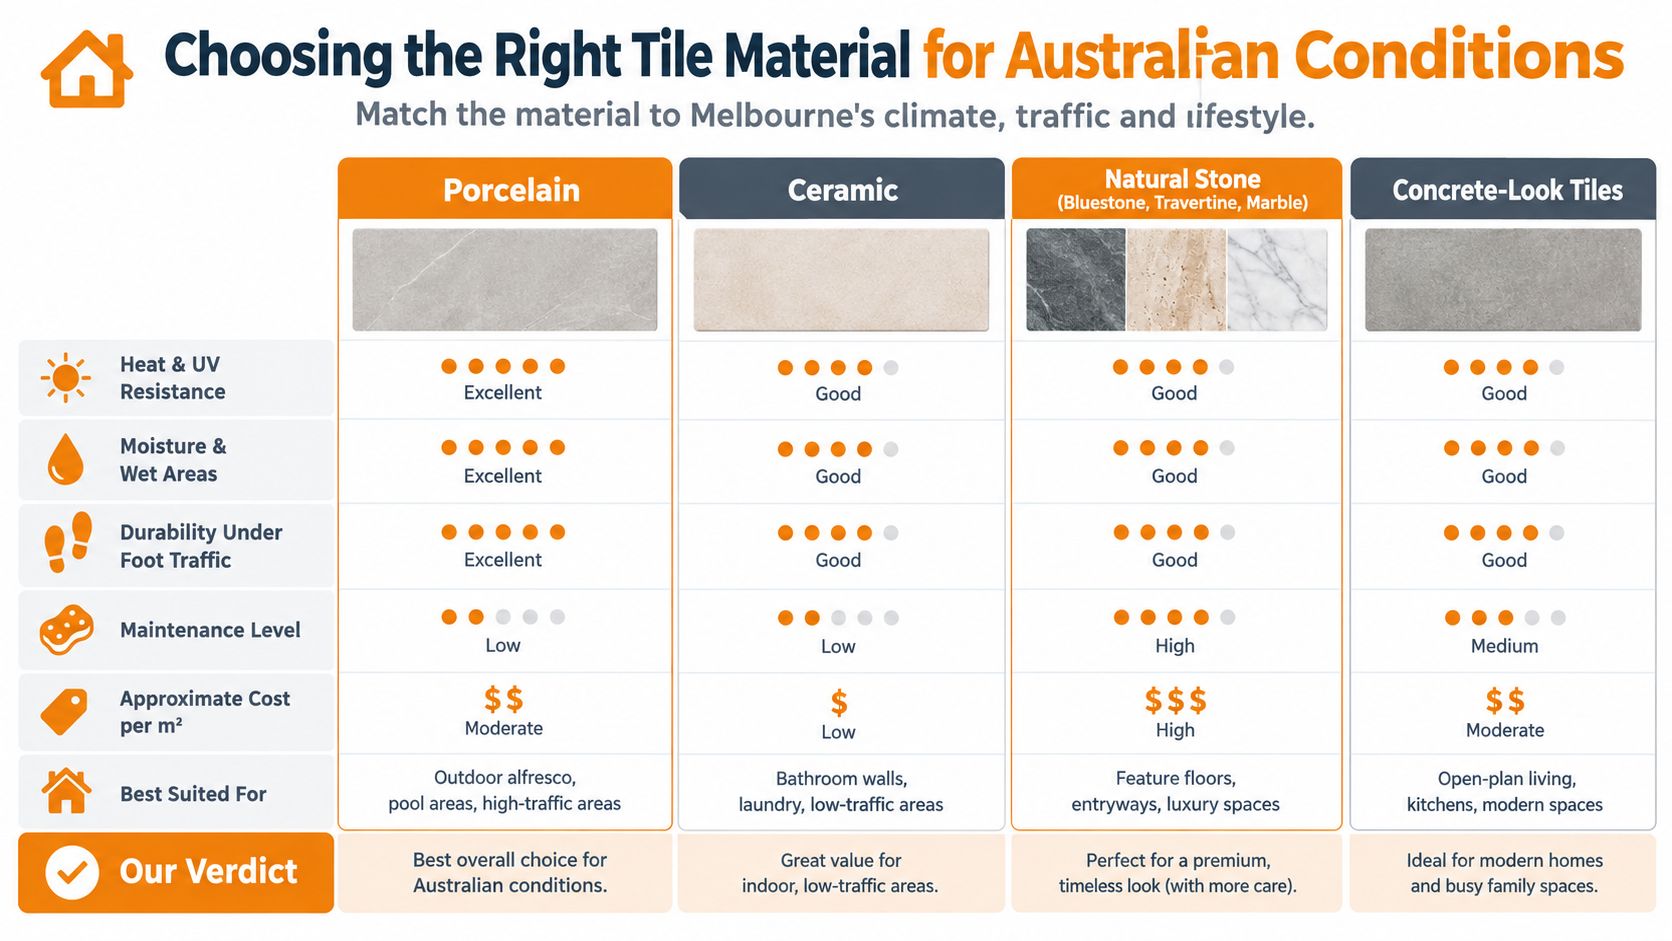
For a room-by-room porcelain shortlist, see this Melbourne porcelain tile buying guide. Bring the room conditions to the decision. A north-facing living room needs a different conversation from a shower recess, and a bayside outdoor area deserves more scrutiny than a dry powder-room wall.
Finishes, Sizes, and Shapes That Work in Melbourne Homes
The finish changes how a room feels, how much maintenance it needs and how it behaves when wet. Don't start with the pattern board. Start with the floor, the light and the likely cleaning routine.
A matte or textured finish is the sensible starting point for bathroom and laundry floors, provided the product has the required slip rating and can be cleaned without trapping excessive residue. Semi-gloss works well on kitchen splashbacks, where it reflects light and usually wipes clean easily. Polished porcelain can look excellent in a north-facing living room, but it isn't my first choice for a wet floor because a smooth polished surface can become slippery when contaminated with water.
Large-format tiles, including 600x600mm and 600x1200mm, can make a compact Melbourne bathroom feel calmer because there are fewer grout lines. They also expose poor substrate preparation. If the wall or floor isn't flat, large tiles can create lippage, rocking edges and visible installation problems. Your tiler should assess the surface before you commit to a large format.
Mosaics remain the practical choice for shower bases, curved niches and detailed transitions. Smaller pieces follow falls and curves more easily, but more grout means more joints to clean. Rectangular subway tiles suit heritage terraces in Fitzroy and Brunswick, while square formats often work neatly in new-build layouts in Melbourne's outer west. Chevron and herringbone are effective feature-wall choices, but they demand careful setting-out and extra cutting.
The tiles by size guide can help narrow the format before you visit a showroom. For broader planning around how dimensions affect an online product experience and customer decision-making, Dotstore's custom eCommerce size guide is also a useful reference.
| Room | Recommended Finish | Recommended Size | Recommended Shape |
|---|---|---|---|
| Bathroom floor | Matte or textured, with verified slip performance | Small to medium format, depending on falls | Square, mosaic or compact rectangle |
| Shower base | Textured, easy to clean and suitable for wet barefoot use | Mosaic or smaller format | Square mosaic or small rectangle |
| Bathroom wall | Matte, satin or glazed ceramic | Medium or large format | Subway, rectangle or square |
| Kitchen splashback | Semi-gloss or glazed | Compact rectangle or standard wall format | Subway, kit-kat or herringbone |
| Living area | Matte porcelain or carefully selected polished porcelain | Large format where the substrate allows | Square or rectangle |
| Alfresco | Textured exterior-rated surface | Medium or large format | Square, rectangle or paver format |
The practical rule is simple. Pick the finish by slip rating, cleaning routine and location, then use colour and shape to achieve the look. A display board shows you the style. It doesn't show you how the tile behaves under wet feet, grout haze or years of daily cleaning.
Slip Ratings and Standards Every Buyer Should Understand
The carton label matters more than the sales description. “Bathroom tile”, “pool tile” and “outdoor tile” are useful search terms, but they aren't substitutes for a technical slip-resistance result.
Under AS 4586, the wet pendulum test classifies surfaces from P0 to P5. A higher P-rating indicates better wet-grip performance. The test is relevant to Melbourne projects because Australian construction requirements use slip-resistance classifications when assessing areas such as stair nosings, landings and ramps. The wet pendulum method and its P-rating system are outlined in this Australian tile slip-rating explanation.
Read the rating against the location
A bathroom floor, shower floor, external path and ramp don't face the same risk. A tile can be attractive and durable yet unsuitable for the area where you intend to install it.
| Room / Area | Minimum P-Rating | Barefoot Ramp | Notes |
|---|---|---|---|
| General dry living area | P3 as a practical starting point | Not usually the deciding test | Confirm the product's intended floor use |
| Bathroom floor | Around P3+ | Ask for barefoot suitability where regular water is present | Consider falls, drainage and cleaning residue |
| Shower floor | P4 or P5 is commonly specified | Barefoot performance matters | Avoid glossy, smooth products unless the technical data supports them |
| External path or alfresco | At least P3 in common guidance | Check the relevant barefoot result for wet use | Exposure, slope and drainage affect the decision |
| Pool surround or ramp | Higher rating may be required, often P4 or P5 | Essential for wet barefoot traffic | Confirm project and accessibility requirements |
The P-rating isn't the same as the R classification used in ramp testing. Product documents may also show barefoot ramp results using A, B or C classifications, particularly for pool surrounds. Ask the supplier to explain which test applies to your location instead of comparing labels as if they measure the same thing.
Water absorption is a separate check
AS/NZS 13006 absorption classes describe how much water a tile can take in. Porcelain is commonly associated with the B Ia impervious classification, while more porous ceramic categories are not automatically suitable for wet floors. Absorption tells you about moisture performance. It doesn't tell you whether the surface provides enough grip.
A porcelain tile can be technically excellent and still be the wrong shower tile if its wet slip result doesn't match the installation.
The National Construction Code also affects bathroom construction details such as gradients and thresholds. Your tiler or building professional should coordinate the tile selection with drainage falls, doorway transitions and accessibility requirements. Don't wait until the tile has arrived to discover that the chosen format can't be installed cleanly to the required fall.
Samples, Showroom Visits, and Trade Pricing
Guessing a tile colour from a phone screen is one of the costliest shortcuts in a renovation. Screens alter warmth and contrast, while showroom lighting can hide how a surface responds to daylight, cabinetry and grout.
Tiles Mate offers a $15 pack of five samples and a free 15-minute design consultation, according to the publisher information supplied for this guide. Use that process properly. Put the samples beside the vanity, cabinetry, benchtop and paint at different times of day. A warm white tile can look clean beside one benchtop and yellow beside another.
Order samples for your finalists rather than relying on a tiny colour chip. Check the actual face, edge, texture, shade variation and printed technical information. If the final order is large or visually prominent, inspect a full-size piece before approving the range.
Make the showroom visit count
Bring three things:
- Room measurements: Include wall lengths, floor dimensions, niches, door openings and any areas that won't receive tile.
- Site photographs: Show existing cabinetry, tapware, windows and the direction of natural light.
- A question list: Ask for the P-rating, barefoot ramp result where relevant, rectified-edge status, shade variation and batch continuity.
A productive consultation should end with a written product code, finish, size, batch information, box coverage and availability status. Ask whether the supplier can reserve the same batch for the full order. This matters especially when a tile has noticeable variation or when the installation will run across separate deliveries.
Builders, designers and architects should ask about TilesMate Pro before placing a volume order. The trade portal is intended for licensed builders, designers and architects, with trade rates, account support for repeat commercial work and an efficient re-order process when another box is needed during a project.
Don't treat trade pricing as a discount hunt alone. The useful question is whether the supplier can quote the complete requirement, identify available stock and support a consistent re-order. That reduces the risk of mixing products or discovering that the replacement carton has a different shade.
Pricing, Box Coverage, and Budgeting the Job
A tile quote only becomes useful when it shows the full material requirement. The sticker price is one line. You also need box coverage, wastage, adhesive, grout, trims and delivery.
The brief for this guide doesn't provide verified Melbourne retail rates for those items, so I won't invent a per-square-metre range or pretend that one bathroom has a universal materials total. Suppliers price porcelain, stone, mosaics and trim differently, and a showroom quote can change with format, finish, batch and stock location.
Build the quote from the carton upward
Tile warehouses sell by the box, not by the exact area on your plan. Start with the net area, add a layout-appropriate allowance, then round up to complete cartons. A straight square layout usually creates less cutting waste than herringbone, chevron or a large plank format. Keep the final calculation separate for floors, walls, niches and feature sections.
Request these lines in writing:
| Cost Component | Rate / Quantity | Estimated Cost |
|---|---|---|
| Main floor tile | Net measured area plus layout allowance, rounded to full cartons | Supplier quotation |
| Wall tile | Measured wall area, less confirmed exclusions | Supplier quotation |
| Feature or mosaic tile | Exact feature area plus cutting allowance | Supplier quotation |
| Adhesive | Product and coverage confirmed by tiler | Supplier quotation |
| Grout | Colour, joint width and coverage confirmed | Supplier quotation |
| Trim profiles | Number, finish and length required | Supplier quotation |
| Delivery or pickup | Melbourne zone and access conditions | Supplier quotation |
| Spare cartons | Held for future repairs where storage allows | Supplier quotation |
Don't compare two tile prices until you know whether both quotes use the same box coverage, finish and wastage assumption. A cheaper square-metre figure can disappear when the carton layout creates more offcuts or when a special trim is required.
The cleanest budget has a product subtotal, installation consumables, delivery and a clearly stated allowance for breakage or future repairs. Ask the tiler to check the quantity before ordering. A supplier can sell the correct number of cartons for your stated area, but only the installer can confirm whether the proposed layout is realistic for the actual room.
Delivery, Logistics, and Installation Preparation
Treat delivery as part of the tile specification. A range that looks perfect online is not a practical choice if the stock cannot reach the site in time or the truck cannot access the property.
Start by confirming whether warehouse pickup at Truganina is available and when the order will be ready. If you're using Melbourne Metro delivery, ask for the delivery window, unloading method and whether the driver can place the pallet where you need it. Regional runs can involve different transit windows and freight conditions. Narrow streets, apartment access, steep driveways and limited turning space should be disclosed before the order leaves the warehouse.
Stocked ranges usually have a simpler path than indent orders from Italian or Spanish mills. For an indent, get the estimated arrival window in writing and don't book the tiler against an optimistic verbal promise. Batch, shade and calibre information should be checked before installation, not after the first wall is complete.
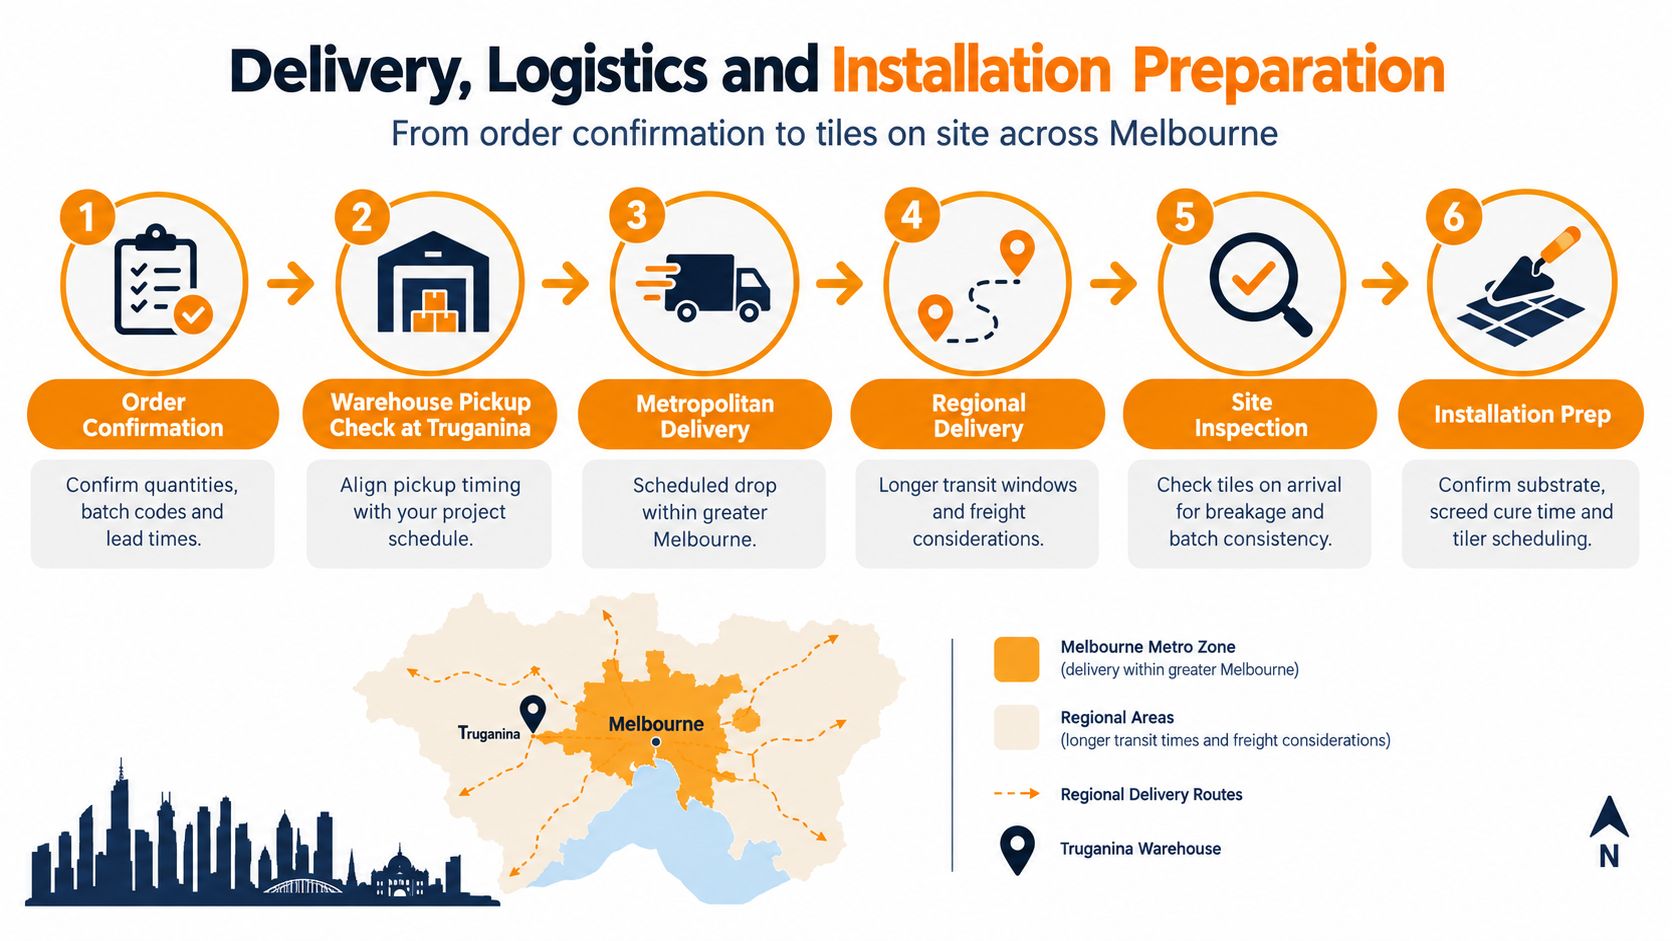
Prepare the site before the cartons arrive
Your tiler needs a sound starting point. Confirm the substrate condition, floor falls, waterproofing status and the curing requirements for any screed or patching compound. The exact cure time depends on the product used, so follow the manufacturer's instructions rather than relying on a generic deadline.
Before installation day, agree on:
- Layout origin: Mark where the first tile will start and where cuts will finish.
- Joint direction: Confirm how the grout lines align with doors, vanities and cabinetry.
- Batch inspection: Open and inspect cartons for breakage, shade variation and incorrect items.
- Storage: Keep cartons dry, supported and protected from damage on site.
- Quantity: Match the delivered cartons against the order and the installer's approved calculation.
Store spare tiles after the job if you have room. Future repairs are much easier when the replacement comes from the original batch and matches the installed surface.
The handover should be clear. The homeowner confirms access and storage. The supplier confirms product, batch and delivery details. The tiler confirms substrate readiness, layout and installation requirements. Put those decisions in writing before the first adhesive is mixed.
Your Melbourne Tile Buying Checklist
Save this checklist before you request samples or visit a Melbourne showroom. It turns a vague style search into an order that your supplier and tiler can actually use.
Before you buy
- Measure every surface: Record floor and wall areas separately, including niches, steps and areas excluded from tiling.
- Check the substrate: Ask the tiler to assess flatness, waterproofing, drainage falls and the condition of any screed or patching.
- Choose the material by room: Use porcelain for demanding wet or high-traffic applications where the technical data supports it. Reserve wall-focused ceramic for appropriate low-traffic areas.
- Match the rating: Confirm the AS 4586 P-rating and any relevant barefoot ramp classification for wet, outdoor or accessible areas.
- Shortlist the finish: Compare matte, textured, satin and polished options against cleaning needs and water exposure.
At the showroom
- Order physical samples: Use full-size pieces where possible and view them beside cabinetry, paint, benchtops and tapware.
- Check shade variation: Ask whether the product is uniform, lightly varied or deliberately varied, and confirm batch continuity.
- Confirm the technical sheet: Record water absorption, slip results, floor suitability, calibre and rectified-edge status.
- Compare carton pricing: Capture the square-metre price, box coverage, number of cartons and any required trims.
- Ask about trade rates: Builders and designers should request a TilesMate Pro quote before retail checkout, especially where repeat orders or project sourcing are involved.
Before delivery
- Confirm the delivery zone: Check the address, access, unloading point, booking window and any site restrictions.
- Align the schedule: Don't accept delivery until the storage area and installation plan are ready.
- Inspect on arrival: Count cartons, photograph damage and check product codes, batch details and shade.
- Protect the stock: Keep cartons dry, stable and accessible to the tiler.
- File the paperwork: Store the invoice, technical sheet, cleaning instructions and warranty documents with the renovation record.
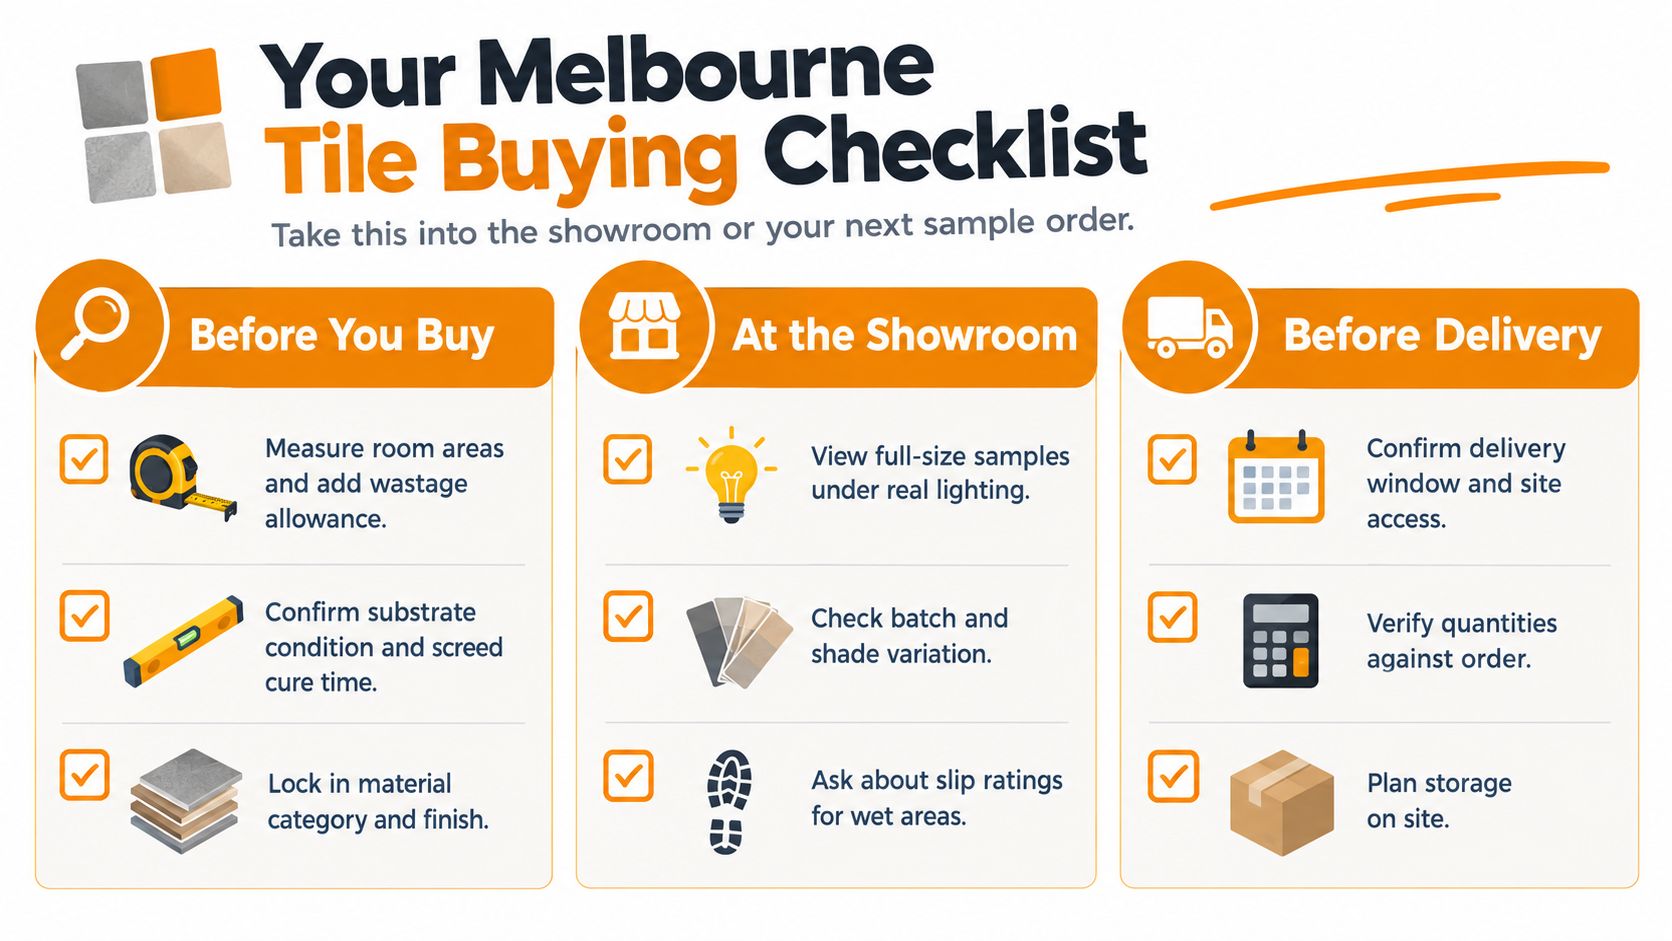
Use the checklist while comparing samples, not after the order is placed. The strongest choice is the tile that satisfies the room's technical demands, works with the home's lighting and can arrive in a controlled, inspectable delivery.
If you're still deciding between a decorative finish and a more durable floor option, ask the supplier to show the technical sheet beside the sample. That one comparison usually exposes whether the tile is suitable for the room or merely attractive on the display wall.
Tiles Mate Pty Ltd offers Melbourne online and local tile shopping through its Truganina location, with porcelain, natural stone, mosaics and outdoor options alongside physical samples, design guidance and delivery support. Visit Tiles Mate Pty Ltd with your room measurements and tiler's requirements, then confirm the material, slip rating, batch and delivery plan before you order.