



Recessed LED Shaving Cabinet Guide for Melbourne Bathrooms
by Shivam Tayal 30 Oct 2026 0 Comments
You've chosen the vanity, found tiles you like and spotted a mirrored cabinet that promises hidden storage, clear lighting and a fog-free reflection. Then the installer asks where the driver will go, whether the wall has enough depth and how the recess will meet the waterproofing.
Those questions should come before the purchase. A recessed LED shaving cabinet is part furniture, part electrical equipment and part of the bathroom wall. Getting those parts to work together matters more than finding the cheapest cabinet.
Recessed LED Shaving Cabinet Specs to Check
A recessed LED shaving cabinet sits inside the wall cavity to bring its door close to the finished tiles, while a surface-mounted cabinet hangs in front of the wall.
Recessed doesn't always mean perfectly flush. Hinges, mirror edges and illuminated frames can still project. Check the installation drawing rather than judging the finished position from a product photograph.
Start with fit, then compare features
The following specifications are buying checks, not universal installation dimensions. Where there's no reliable typical value, use the exact model's drawing or the rule governing its location.
Recessed LED shaving cabinet specs and typical values
| Spec | What to check | Typical value | Why it matters |
|---|---|---|---|
| Depth | Clearance behind the finished tile face | Manufacturer's required recess depth | Decides whether the wall cavity can take it |
| Width | Fit within the tile set-out and vanity | Model-specific overall and cut-out widths | Wider cabinets need more blocking |
| Colour temperature | Light tone for shaving and makeup | Neutral for detail; warm for atmosphere | The light tone changes how your reflection looks |
| Colour rendering (CRI) | Accuracy of skin tones | High colour rendering, documented on the datasheet | Poor colour rendering can make skin look dull |
| Lumen output | Brightness for task lighting | No fixed standard | Compare only between cabinets of the same width |
| IP rating | Protection for the intended location | Electrician-confirmed zone requirement | Must match the zone |
| Demister pad | Anti-fog operation after showers | Integrated; check its rating | Confirm suitability for bathroom use |
| Driver access | Replacement without removing tiles | Front access or a service panel | Avoids cutting tiles to repair a fault |
| Circuit protection | RCD on the supplying circuit | Electrician-confirmed protection | Protects the circuit serving the cabinet |
Depth comes first because an apparently empty wall may contain a basin waste pipe, water supply or cable. Measure available space from the proposed finished tile face, allowing for the wall lining, adhesive and tiles. Don't confuse overall cabinet depth with the depth of its recessed body.
Width comes next. Match the cabinet opening to the framing and tile layout, not just the vanity's appearance. Our bathroom cabinet guide can help you compare storage arrangements before committing to the opening.
Read lighting specifications together
Colour temperature describes the light's tone; colour rendering describes how faithfully it reveals colours. Neither tells you how much useful light reaches your face. Lumen output also needs context because a larger cabinet may spread its output across a broader area.
Ceiling lighting needs separate consideration. AdVoltage Electrical's guide to choosing downlights for your Brisbane renovation is useful background when coordinating general lighting with mirror lighting, although your Melbourne installation needs its own assessment.
Request the datasheet showing the cabinet's IP rating, driver location and demister details before shortlisting it. The electrical-zone assessment determines whether those features are suitable for your proposed position.
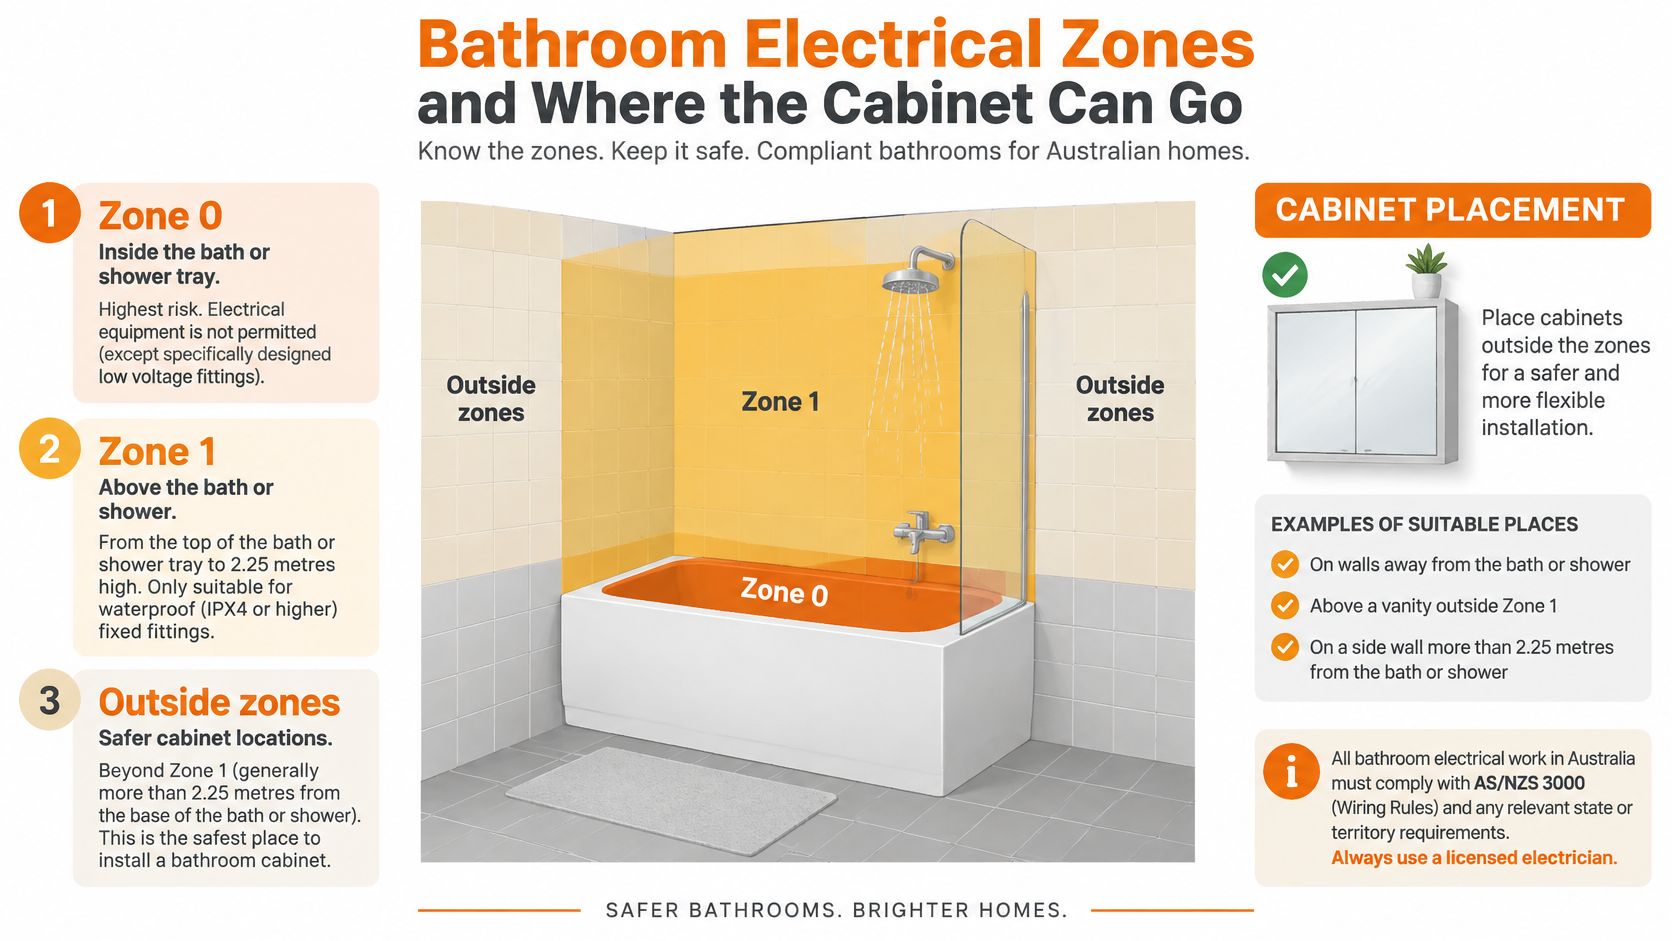
Bathroom Electrical Zones and Where the Cabinet Can Go
Can the cabinet go beside the shower? Sometimes, but “beside” isn't a precise enough measurement to make an electrical decision.
Bathroom zones describe areas around the bath or shower where electrical equipment faces particular exposure to water. Think of them as nested boundaries, rather than permission to install any bathroom-labelled product wherever it fits.
Map the water exposure before the cabinet
The following table summarises the bathroom-zone dimensions, ingress-protection ratings and circuit-protection thresholds described in MyHomeware's bathroom lighting guide, including Zone 1 extending to approximately 2.5 metres, Zone 2 extending a further 0.6 metres, and residual-current protection rated at no more than 30 milliamperes.
Bathroom electrical zones and minimum IP ratings
| Zone | Extent from bath or shower | Minimum IP rating | Equipment rules |
|---|---|---|---|
| Zone 0 | Inside the bath or shower receptacle | IPX7 | Safety extra-low voltage, generally 12 V or less |
| Zone 1 | Above the bath or shower up to about 2.5 m | IPX4 in the guide's summary | Equipment must be specifically permitted for the location |
| Zone 2 | Further 0.6 m horizontally from Zone 1 | IPX4 | Fittings and outlets need suitable protection and permitted positioning |
| Outside the zones | Beyond the assessed zone boundaries | Select for actual environmental exposure | RCD protection still applies to the bathroom circuit |
These are planning summaries, not a substitute for an electrician assessing the room's actual geometry. Shower configuration, screens and the equipment's position all need consideration.
This diagram provides a visual starting point for discussing the layout.
Resolve conflicting ratings before ordering
Published summaries aren't identical: Plumbline's bathroom electrical guidance specifies at least IPX5 for Zone 1, rather than the lower rating in the other guide. Where guidance differs, shortlist the higher protection level and have the electrician confirm both the required rating and whether that equipment is permitted there.
A higher IP rating isn't blanket approval. It describes resistance to ingress, not every aspect of electrical suitability.
Practical rule: Ask whether the complete cabinet assembly is suitable for the proposed position, not whether its LED strip is waterproof.
Consider a vanity on the wall adjoining a shower. If the electrician classifies the proposed cabinet position within the adjoining splash zone, the driver, switches, demister and any internal outlet need assessment along with the light.
Now consider a cabinet on a wall well away from the shower. It may sit outside the classified zones, but condensation, circuit protection and the manufacturer's restrictions still matter. Outside a zone doesn't mean outside bathroom electrical planning.
Mark the cabinet footprint and proposed wiring entry on the wall plan. Have the electrician annotate the zone boundaries before you order, rather than trying to resolve a location problem after delivery.
Judging Light Quality for Shaving and Makeup
LED lighting isn't automatically good grooming lighting. A cabinet can use little electricity and still leave your chin in shadow or make foundation look different from daylight.
The Australian Government's household lighting guidance says lighting represents roughly 5–10% of an average household's electricity budget. That explains why efficiency matters, but it doesn't tell you whether a particular mirror light will help you shave accurately.
Apply three practical tests
- Assess the light tone. Compare warm and neutral settings while looking at your face, not just the illuminated cabinet edge. Neutral light is a useful starting point for detail work; warmer light may suit the room's evening atmosphere.
- Check colour rendering. Ask for the actual CRI specification rather than accepting a description such as premium lighting. Look for skin, lip and hair colours that remain recognisable rather than washed out or oddly tinted.
- Watch the shadows. Light from above alone can darken the eye sockets and underside of the chin. Even side lighting or a well-designed illuminated perimeter generally gives more balanced facial illumination.
A colour-changing function isn't the same thing as good colour rendering. Likewise, a bright halo behind a cabinet may illuminate the wall beautifully without putting enough light onto your face.
Our LED mirror guide can help you distinguish decorative illumination from features that support daily use.
Look at the diffuser, not just the glow
Exposed points of light can produce glare, particularly when you're close to the mirror. A diffuser should soften those points without leaving obvious bright patches and dark gaps. Check the reflection with the rest of the bathroom lighting switched on, because mixed light tones can make an otherwise suitable cabinet feel uncomfortable.
Don't assume that a box claim describes performance in your room. Ask for documented lumen output, colour information and dimming compatibility, then compare cabinets of similar width and lighting arrangement.
A cabinet can be an attractive source of ambient light without being a good task light.
For a showroom check, stand at your normal grooming distance and turn your head as you would while shaving. Look beneath your chin and around your eyes, rather than staring only at the lit border.
At home, compare your reflection under the cabinet lighting with daylight at the same position, where practical. Finish by asking whether the light is dimmable and whether its module or driver can be replaced through a designed service opening.
Pre-Purchase Checks and DIY vs Licensed Electrician
Put the datasheet beside the wall plan before anyone reaches for a drill. The purpose is to settle the electrical location, installation scope and maintenance route while changes are still straightforward.
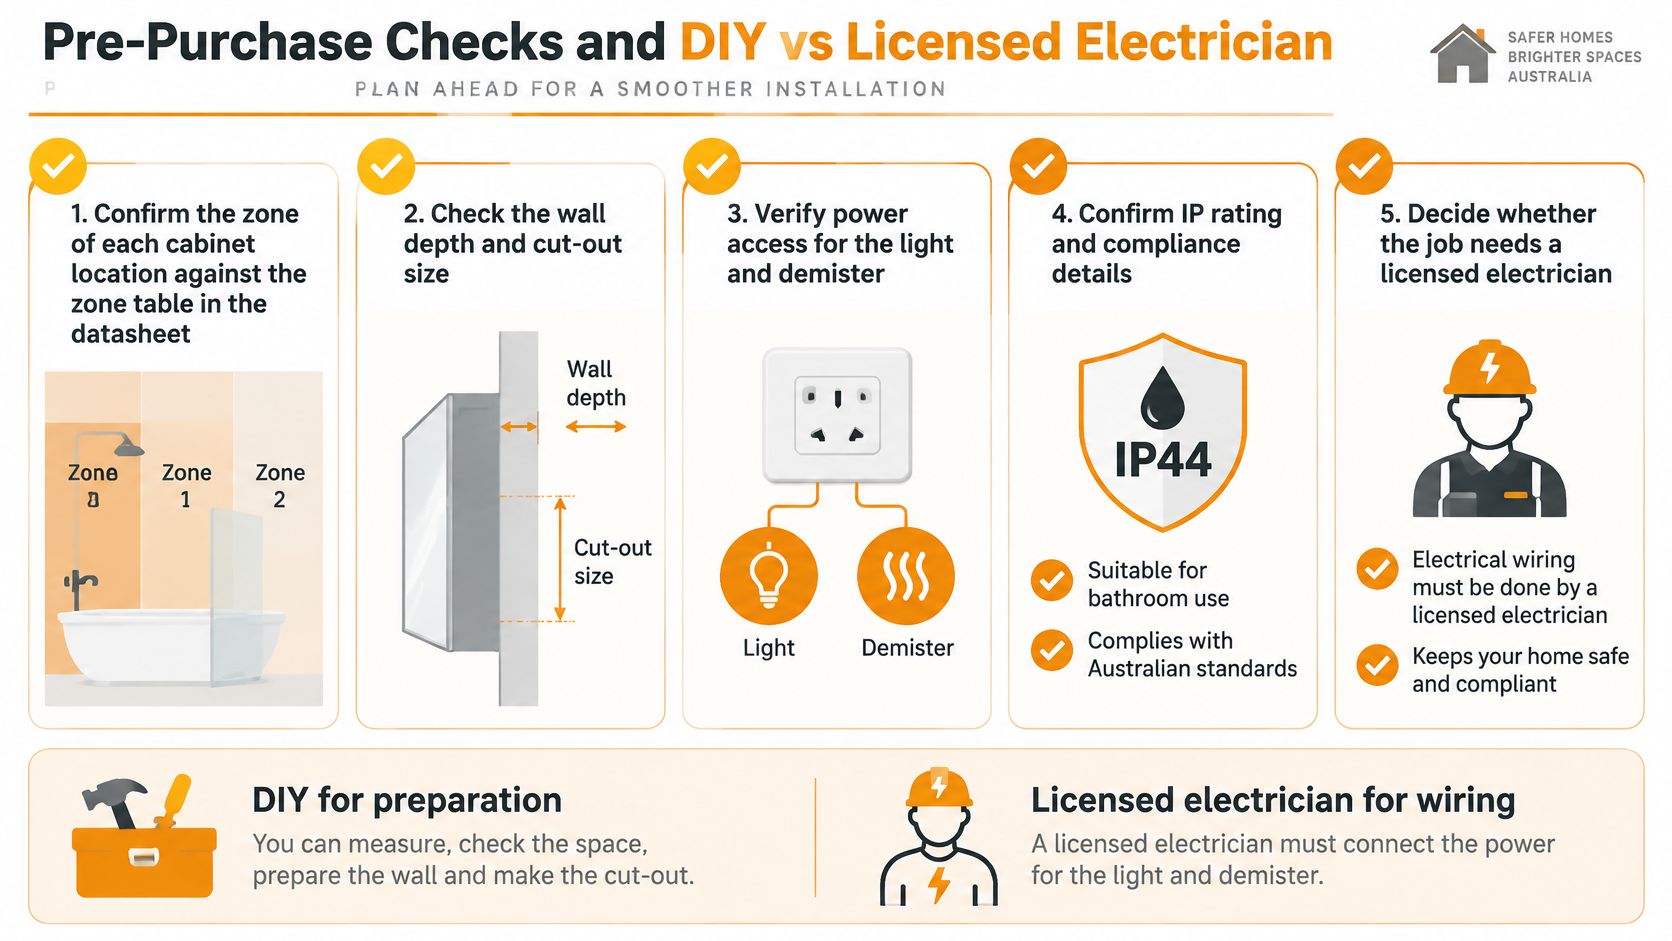
Run the pre-purchase checks
- Confirm the location. Have the electrician classify each proposed cabinet position, including the wiring entry and any controls. Moving the cabinet slightly may be simpler than specifying equipment for a more exposed position.
- Check the complete assembly. The documentation should cover the LED module, driver, switch, demister and any socket. A rating printed beside an LED component doesn't establish the suitability of everything else.
- Confirm circuit protection and compatibility. The Home Modification Information Clearinghouse guidance summarises 30 mA residual-current protection for new bathroom lighting and power circuits and notes that Type AC RCDs aren't permitted for new Australian electrical work, with Type A or Type B selection requiring assessment for the circuit and connected equipment.
- Keep compliance documentation. Ask the electrician to verify the product's compliance markings, including the Regulatory Compliance Mark, and retain the installation manual. Save the model reference somewhere accessible after installation.
- Define the electrical work. Identify whether the cabinet needs a new outlet, altered cable route, hardwired connection or circuit changes. Those decisions affect the trade booking and wall preparation.
Use this checklist as a discussion aid, not as approval to carry out electrical work yourself.
Separate preparation from licensed work
A capable DIYer can record measurements, tape the cabinet outline onto the wall and compare the installation drawing with the proposed layout. Dry-fitting or mechanical mounting may also be possible when the builder and electrician have confirmed the scope and there's no interference with services, structure or waterproofing.
An existing circuit isn't permission to connect the cabinet yourself. Leave hardwiring, altered outlets, switches and electrical testing to the licensed electrician. Have a suitably qualified waterproofing trade detail any membrane changes rather than asking the electrician to improvise a seal.
We provide personalised advice from initial inspiration through to final installation. Our LED mirror offering includes shaving cabinets and wall mirrors, with arch, pill and rectangular shapes listed, so distinguish the storage function from the mirror shape when comparing options.
For a visual supplement to the written installation instructions, the following video can support your discussion with the installer.
Request the IP rating, colour temperature, CRI, lumen output, driver position and demister specifications for the exact model. If essential documentation can't be supplied, choose a cabinet whose installation requirements can be checked before purchase.
How to Install a Recessed Cabinet Without Damaging Waterproofing
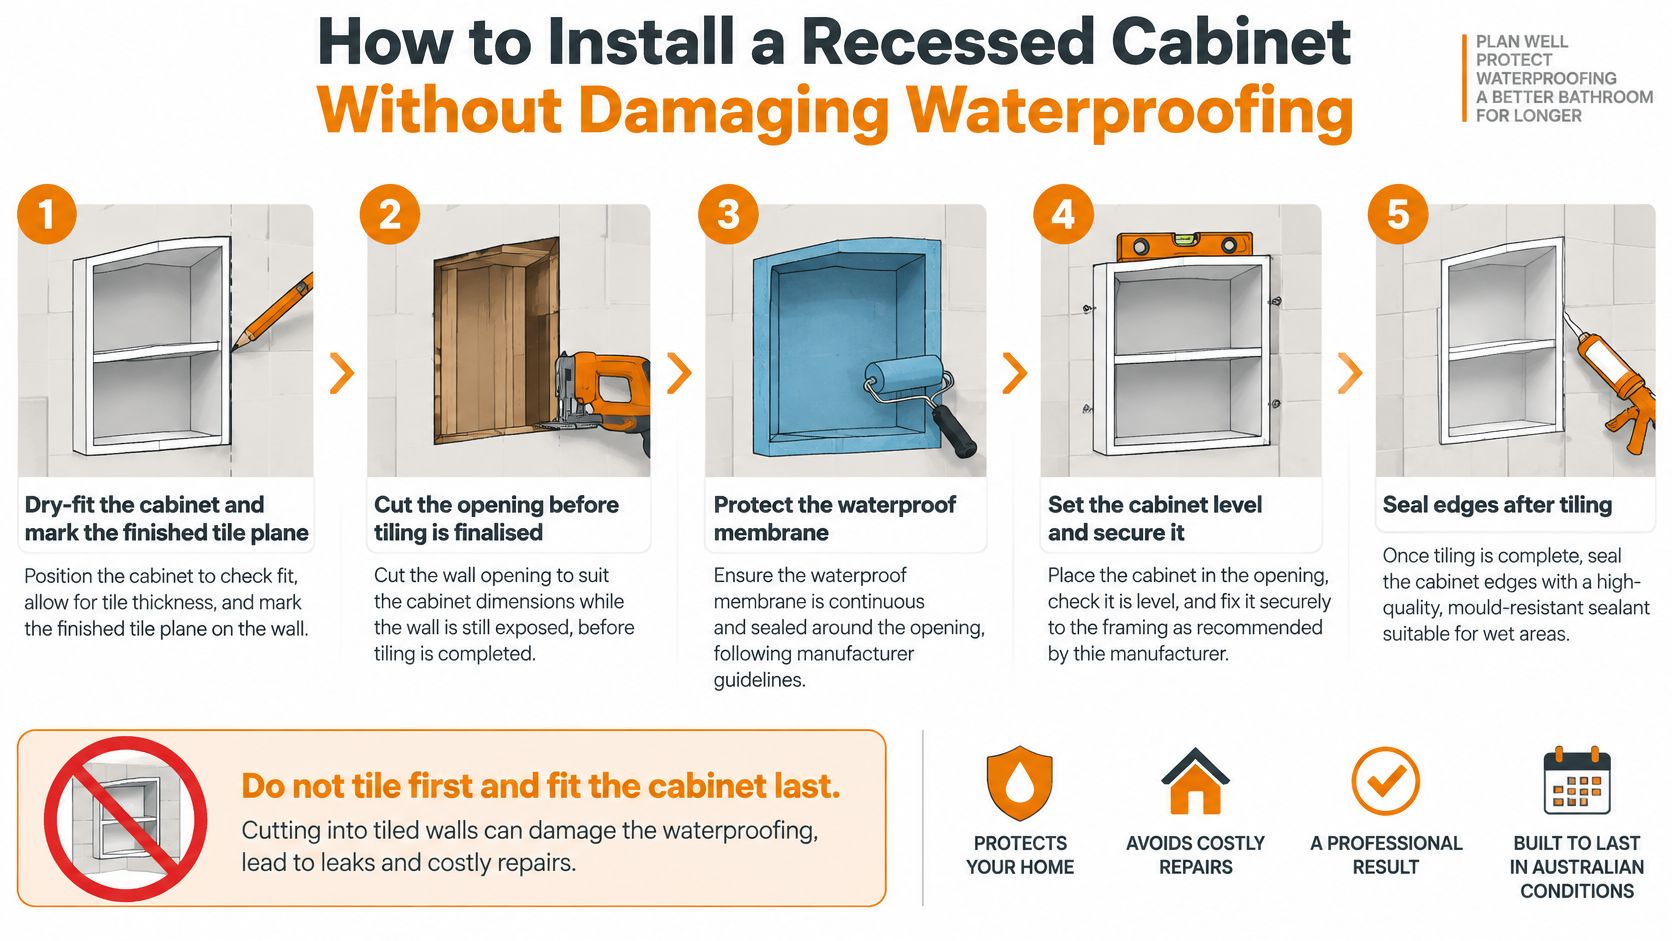
Tiling first and deciding how to fit the cabinet afterwards leaves little room to correct a poor opening. The cabinet should be selected and dry-fitted early, even though final mounting and finishing happen later.
The Australian Government's Your Home lighting guidance supports coordinating lighting with the building fabric and installation clearances. For a recessed cabinet, that means planning the wall opening, electrical access and waterproofing together.
Set out the recess before closing the wall
- Dry-fit and mark the finished tile plane. Use a straightedge and a sample of the proposed wall build-up to establish where the finished face will sit. A common mistake is setting the cabinet against bare framing and forgetting the thickness of the completed wall.
- Locate framing and services. Check the installation drawing against stud positions, cavity width and known pipe routes, then have uncertain areas investigated before cutting. A wall scanner is a useful aid, but it isn't proof that the proposed opening is clear.
- Install solid backing. Have the builder provide blocking at the cabinet's fixing points so fasteners engage suitable support. Avoid cutting structural framing just because the cabinet body nearly fits between the studs.
- Coordinate cabling and service access. The electrician should establish cable entry, driver position and any required clearances before the wall closes. Photograph the completed arrangement so future trades can identify the service route without exploratory cutting.
The process below highlights the relationship between early set-out and the finished seal.
Protect the junctions and finish in sequence
- Complete the documented waterproofing detail. The waterproofer should treat the recess edges, substrate junctions and penetrations using a compatible system. Don't treat a bead of silicone around the finished mirror as a replacement for the membrane detail behind it.
- Arrange electrical connection and testing. The licensed electrician should connect and test the equipment at the stage allowed by the cabinet's installation method. If final connection requires the cabinet to be mounted, schedule a return visit rather than connecting it prematurely.
- Tile, mount and seal the perimeter. Maintain the specified opening and clearances, secure the cabinet level, and use a compatible flexible perimeter joint where the installation detail requires it. Rigid grout against a cabinet edge can crack when adjacent materials move.
For a broader example of coordinating built-in elements with surrounding finishes, Emery Lane Homes' approach to custom renovations in Paradise Valley offers useful design context. It doesn't replace the Australian product instructions or the local waterproofing detail.
Before handover: Ask who owns the seal between the cabinet and the tiled wall, and record the agreed detail.
Operate the light, demister and controls according to the manufacturer's commissioning instructions. The installer should check for abnormal heat, electrical faults and moisture around the opening; don't cover a concern with extra sealant and assume it's resolved.
Common Pitfalls and Long-Term Maintenance
A cabinet may look sound while a hidden fault develops. Condensation inside it, a flickering light or a demister that no longer clears the mirror calls for investigation, not an assumption that the product is ageing.
A rated light strip cannot compensate for an unsuitable driver, switch or socket. If moisture appears near electrical components, stop using the affected equipment and ask an electrician to assess it.
Judge repairability before appearance
The market offers LED shaving cabinets in a wide range of sizes and finishes. Those choices can narrow a shortlist, but they don't show how the cabinet will be repaired.
Compare designs against likely failure scenarios:
- An inaccessible driver fails. Replacing the component may require removing the cabinet and disturbing the surrounding finish. Confirm the service route, not just whether a replacement part exists.
- An oversized opening leaves poor support. Gaps after tiling can hide inadequate fixing or an incomplete membrane junction. Follow the manufacturer's cut-out drawing, which specifies the opening rather than the mirror's overall dimensions.
- The cabinet fits, but the light misses your face. Changing its mounting height later may expose unfinished wall areas. Check the proposed position with the people who will use it.
- Water collects around a damaged joint. Adding silicone over an old bead rarely fixes the underlying problem. Have the cause and concealed junction assessed.
The purchase price is only one part of the cost. Include installation, replacement-part availability, access labour and possible tile repairs when comparing models. A higher price doesn't guarantee easier repairs, but a clear service route can reduce the work required if a component fails.
Keep a simple care routine
Follow the manufacturer's cleaning instructions and keep moisture away from electrical openings. A soft cloth and compatible mild cleaner are generally safer than abrasive pads or strong chemicals.
Check for damaged perimeter sealant, persistent moisture, loose hinges and changes in light or demister performance. Gently clean the diffuser if dust or residue affects its appearance.
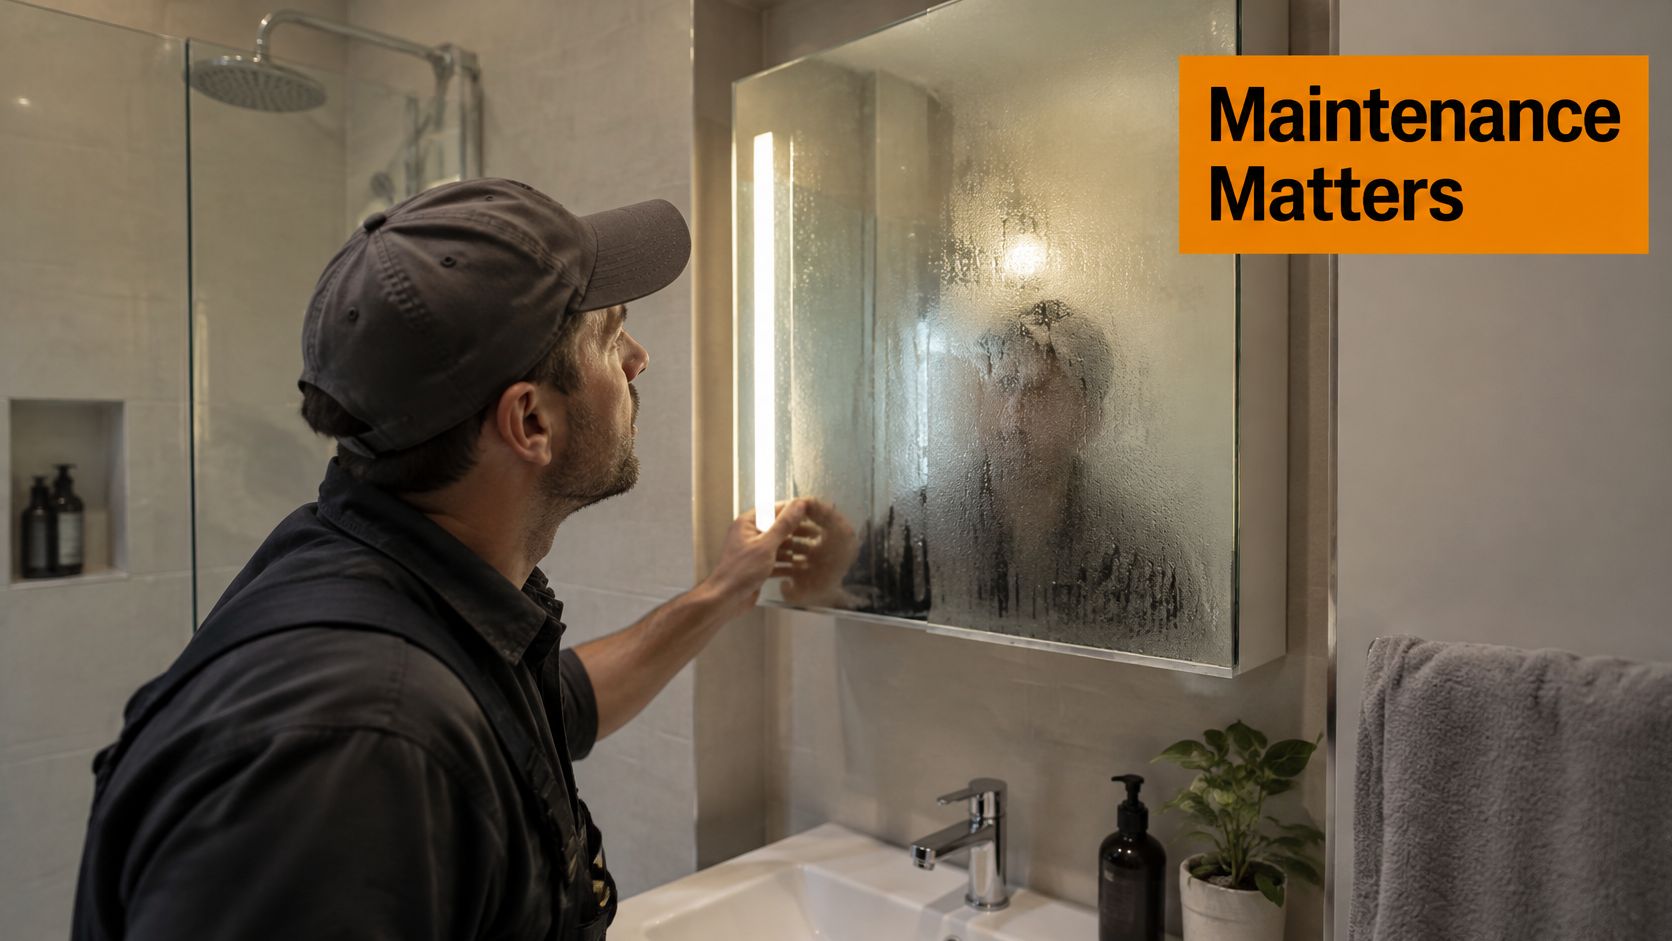
If the light flickers, don't open a sealed electrical compartment. Note what happens and which controls are active, then pass those details to an electrician.
Victorian Sign-Off and Ordering Sequence
For a Melbourne renovation, agree on the electrical handover documents with the licensed electrician before work starts. Ask them to confirm the applicable Victorian certification requirements and provide the completed safety documentation with the test results relevant to the work.
Keep those records with the cabinet manual, warranty information, product identification and photographs taken before the wall was closed. The waterproofing detail should also be retained so a future repairer knows how the recess was constructed.
Order only after the installation is resolved
- Measure the proposed opening. Record usable cavity depth, required width and height, rather than copying the dimensions of the visible mirror. Confirm the builder can provide the necessary support without compromising the wall.
- Mark the complete footprint. Include door swing, wiring entry, controls and nearby shower fittings on the plan. Check that the cabinet remains usable when doors and shower screens are open.
- Book the electrician's assessment. Resolve circuit suitability, protection type, permitted location and access before tiling begins. Ask the builder and waterproofer to agree on the wall junction at the same time.
- Confirm the exact model before ordering. Match the product code to its current datasheet and installation instructions. Don't assume another size in the same range has an identical fixing or service arrangement.
- Schedule the finishing trades. Allow for dry-fitting, backing, cabling, waterproofing, tiling and final fitting in the agreed order. Include any electrician return visit in the programme.
Our bathroom renovation planning guide can help you organise these decisions alongside the rest of the room.
The aim is a cabinet that can be installed safely, used comfortably and repaired without unnecessary demolition. Settle those conditions before treating the remaining choice as a question of style.
Tiles Mate Pty Ltd offers tiles, bathroom fittings and LED mirrors, with personalised guidance from initial inspiration to final installation. Bring your cabinet drawing, vanity dimensions and tile ideas when you visit Tiles Mate Pty Ltd, so we can help coordinate your selections while your licensed trades confirm the electrical and waterproofing details.