




Showers Design Guide for Melbourne Renovations
by Shivam Tayal 18 Oct 2026 0 Comments
You've chosen the marble-look tiles, saved a photo of a frameless screen and started comparing rainheads. Then your tiler asks where the waste is going, your plumber asks about water pressure, and suddenly the shower you thought you'd settled on needs another drawing. That's the point to stop shopping and get the whole bathroom working on paper.
Why the Whole Shower Matters Before Any Tile Is Chosen
Consider a typical renovation dilemma, not a completed case study. A Melbourne couple wants to replace an old bath with a generous shower, use large-format tiles and keep the entry flush. They've chosen each item separately, but nobody has checked whether those choices work together.
The tile layout might require awkward cuts around the proposed waste. The screen might leave the vanity exposed to spray. The mixer might end up somewhere inconvenient to reach without getting wet. None of these decisions is disastrous on its own, but resolving them after installation is the wrong way to spend a renovation budget.
Start with the daily routine
My recommendation is to write a shower brief before a shopping list. Describe who uses it, whether someone needs a hand shower, where towels should sit and how much cleaning the household will realistically tolerate.
Water consumption belongs in that conversation. In 2007, at least 55.1% of Australian households had water-efficient shower heads, according to the Australian Bureau of Statistics household water-use release. Efficiency isn't a new styling preference. It's an established consideration that deserves attention alongside appearance.
Use a renovation-stage image to focus on what sits behind the finished surfaces, rather than just the final colour scheme.
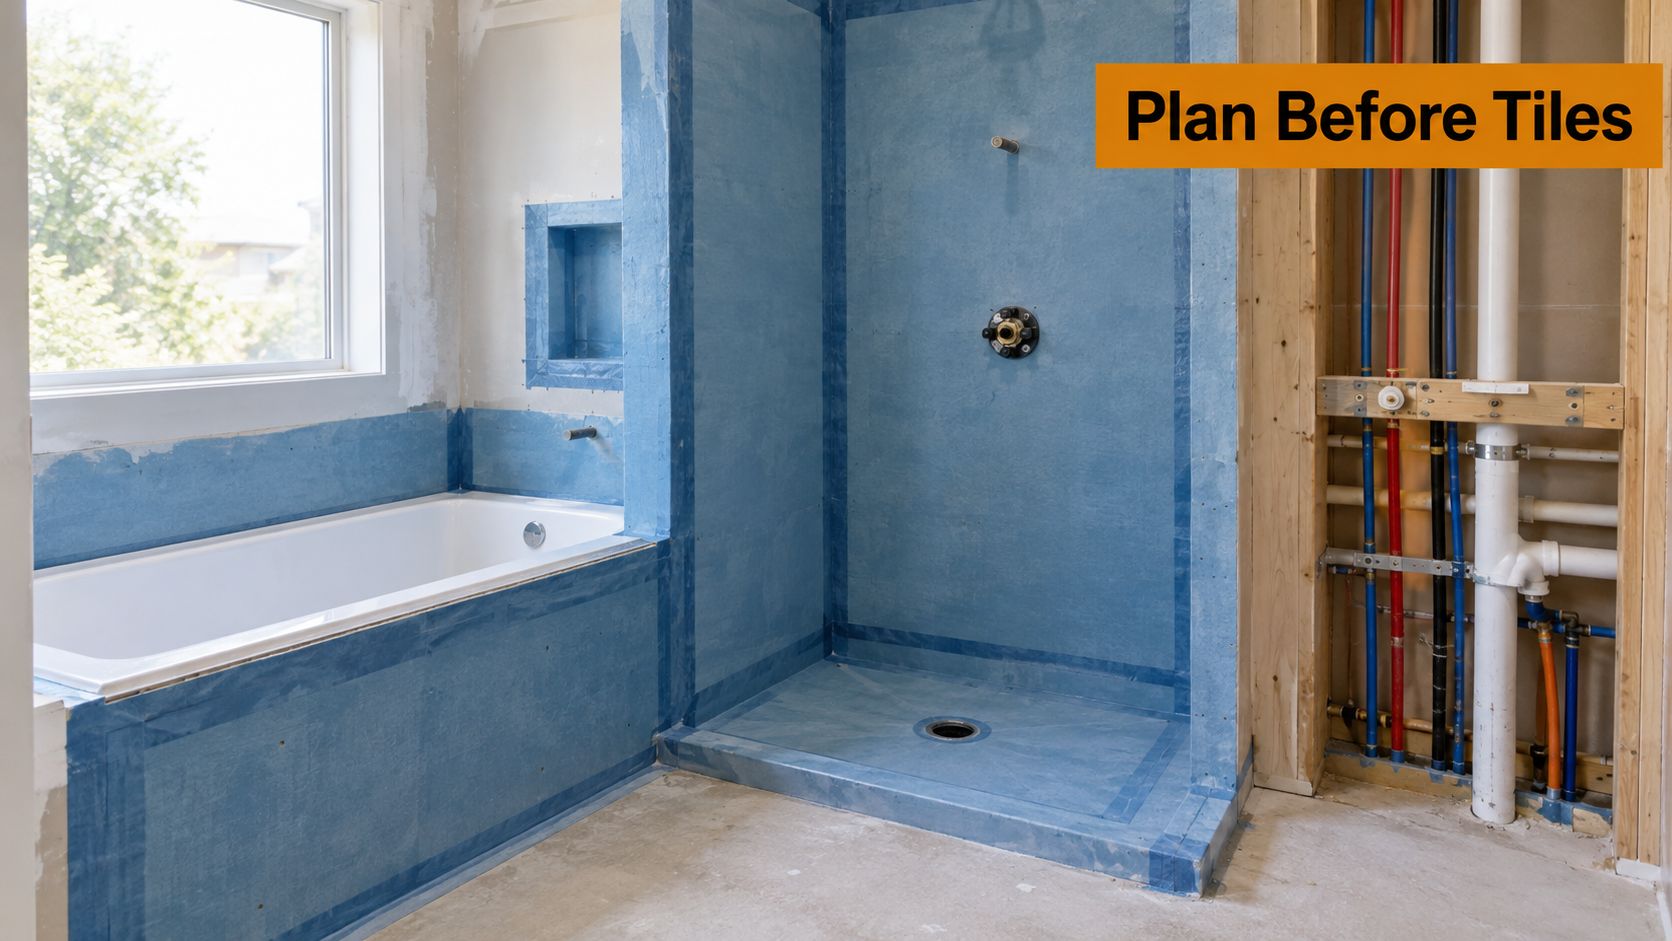
Make the trades agree before ordering
Ask the plumber, tiler and screen supplier to work from the same plan. For local context before that discussion, Melbourne Tiling Services P/L's resource on waterproofing compliance for tiling is a useful starting point, not a substitute for project-specific advice.
- Draw the complete assembly: Include the waste, screen, outlets, mixer, niche and entry.
- Separate appearance from performance: Approve the floor's suitability independently of whether it matches the wall.
- Record unresolved details: Don't let an allowance or a showroom conversation become an assumed specification.
- Nominate responsibility: Someone needs to coordinate the interfaces between trades, not merely book their arrival dates.
Practical rule: Don't approve the tile order until the people installing the shower agree on how the room will work.
A successful shower isn't a collection of expensive products. It's a coordinated design that suits the household and can be built without improvisation.
Choosing the Right Shower Layout for Your Space
A shower that looks spacious on a floor plan can still make a Melbourne bathroom awkward to use. Check the door swing, window, existing plumbing and route past the vanity before settling on a layout. In a newer ensuite, spare floor area alone is no reason to build a larger shower. The layout has to work with the room and the plumbing, drainage and screen it requires.
The comparison below shows several enclosure and outlet arrangements. Use it to start a discussion, then test your preferred option against the actual bathroom plan.
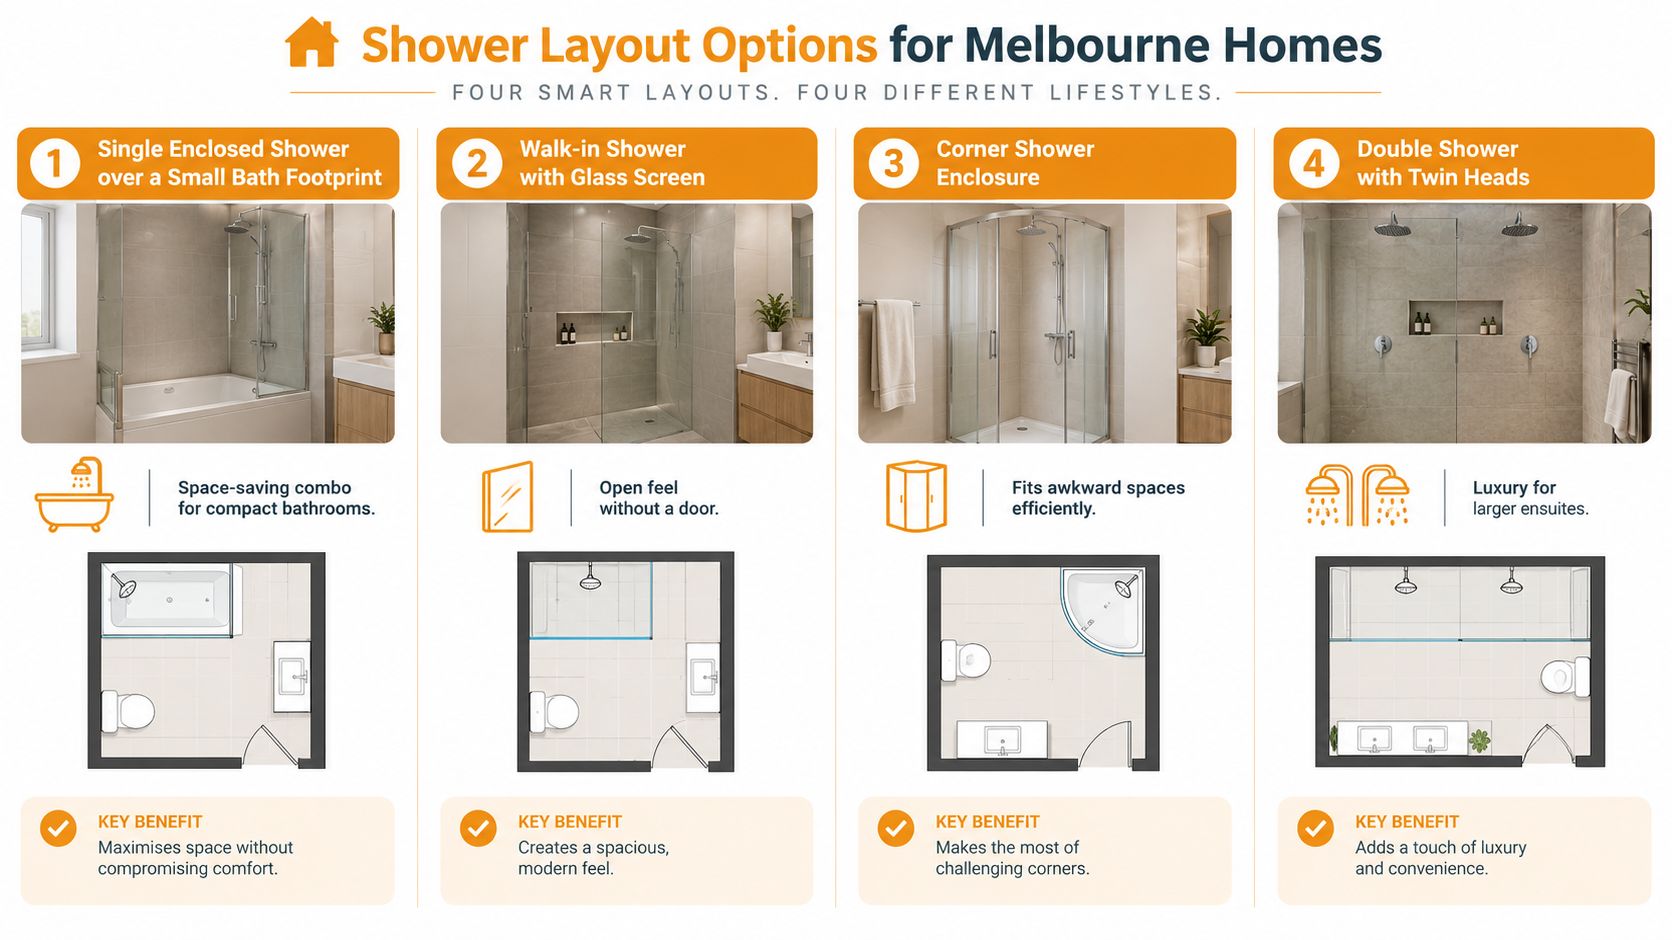
A retained small bath with an over-bath shower makes sense if the household uses the bath and can step in comfortably. If it rarely gets used, consider an enclosed shower in the same footprint. Keeping a difficult bath entry just to reuse existing plumbing is a poor trade-off.
Where the room already has a suitable recess, a three-wall alcove is often the simplest option to build and contain. It gives the screen supplier a defined opening and keeps the shower separate from the rest of the room. Check the proposed hinged door against the vanity, toilet and bathroom door before ordering glass.
A walk-in shower behind a fixed screen suits a plan with enough room for a usable entry and to keep spray away from the dry circulation area. Don't choose it just to remove visible hinges. A short screen and exposed opening can leave water across the floor after every shower.
A fully open wet-room zone needs a clear reason. It puts more of the room in the path of water, so assess drainage, wet-area detailing and cleaning before committing. I'd skip it in a compact bathroom where the toilet, cabinetry and towels sit close to the shower.
Walk the plan before ordering a screen
Mark the enclosure on the floor and act out a normal morning routine. Reach for the mixer, towel and shampoo, then check whether someone else can use the basin without squeezing past. This catches practical problems before they become glass, tile and plumbing changes.
Pay attention to the door's swing, window privacy and cleaning access, as well as how the screen contains water. Compare the arrangement and hardware on your actual plan with this guide to shower screens. Ask the supplier to confirm the proposed screen suits the entry and bathroom layout.
The video provides another visual reference for judging how a shower arrangement sits within a bathroom.
A contained shower can be the better choice. In the right room, it is comfortable, practical and easier to manage.
Tiles, Mosaics and Finishes That Actually Work in a Shower
A shower tile decision reaches beyond appearance. The floor finish needs to suit wet, barefoot use and the planned drainage geometry; the wall finish can carry more of the visual drama. Choose both with the tiler's cut plan and the maintenance you'll accept in mind.
Polished marble-look porcelain can give a bathroom the Calacatta or Statuario effect without putting a polished surface underfoot. Use that look on the walls, then select a floor tile for its own performance. Matching colour is enough. The surfaces do not need to match.
Start with the floor and waste
Large-format porcelain can create a calm, uninterrupted wall pattern. On a shower floor, the waste layout may require cuts that break up the design. Before ordering, ask the tiler to mark the proposed cuts on the plan. A sample board won't show how the tile will sit around a central waste.
Mosaics can follow changing floor planes, but grout joints alone do not make a tile slip-safe. The actual product's suitability matters more than its format. Check the tile's product documentation and the relevant wet-area suitability information, rather than relying on a generic finish description.
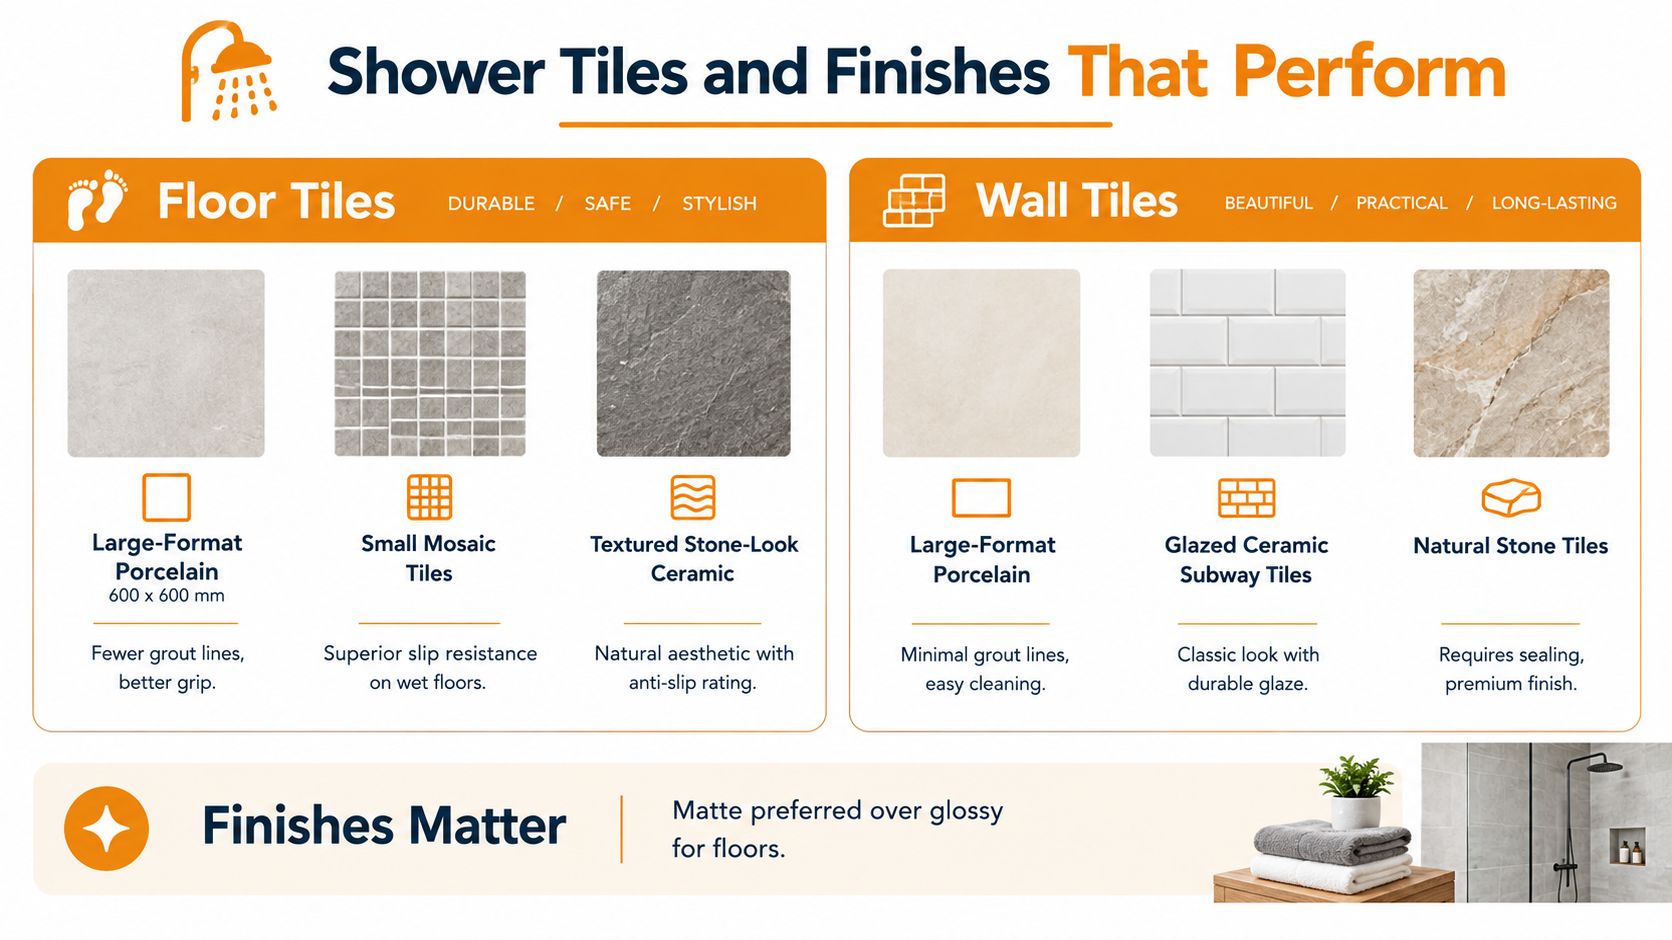
Use this comparison to shortlist options, not as a substitute for checking each product's specifications:
| Format | Best Position | Finish Guidance | Slip Note |
|---|---|---|---|
| Large-format porcelain | Walls, or floors with a compatible cut plan | Use polished effects on walls; assess floor finishes separately | Request product-specific wet-area suitability |
| Porcelain mosaics | Floors with changing planes, or feature walls | Check texture and cleaning access | More joints don't establish a slip rating |
| Glazed subway tiles | Walls | Choose the glaze for appearance and maintenance | Don't assume wall tiles suit shower floors |
| Natural stone mosaics | Feature surfaces or suitably specified floors | Confirm sealing and care requirements | Assess the actual stone and finish |
| Textured stone-look tiles | Floors or walls where documented as suitable | Balance texture against cleaning effort | A textured appearance isn't certification |
Choose a finish you'll maintain
Genuine Carrara mosaics and porcelain marble looks are different specifications. Natural stone may require sealing and specific care, so ask the supplier about approved cleaners and ongoing maintenance before you commit. For a simpler routine, start with porcelain alternatives. Genuine stone is a choice, not a requirement for a premium-looking bathroom.
Matt, honed and textured describe appearance, not a complete safety assessment. Ask which slip-testing information applies to the exact product and whether it suits a wet, barefoot shower. The shower floor tile selection guide can help focus those questions.
Check samples beside the vanity and under the proposed lighting. Look closely at the surface, edges and cleaning requirements, then compare the care instructions with any advice from the supplier. For mold-related upkeep, consult AMPM shower mold expertise alongside product-specific care guidance.
Skip an oversized niche feature or intricate mosaic border unless it serves a clear purpose. Put the effort into a floor tile that suits the drainage plan, has suitable product documentation and fits the maintenance routine you'll follow.
Waterproofing, Drainage and Falls the Tiler Sequences First
A shower can look finished and still fail at the parts you can no longer see. Before tiles arrive, require a documented agreement on the substrate, waterproofing, drain connection and floor falls. Those decisions form one assembly, so don't let the tile choice dictate them after the fact.
Set the falls and drain before tiling
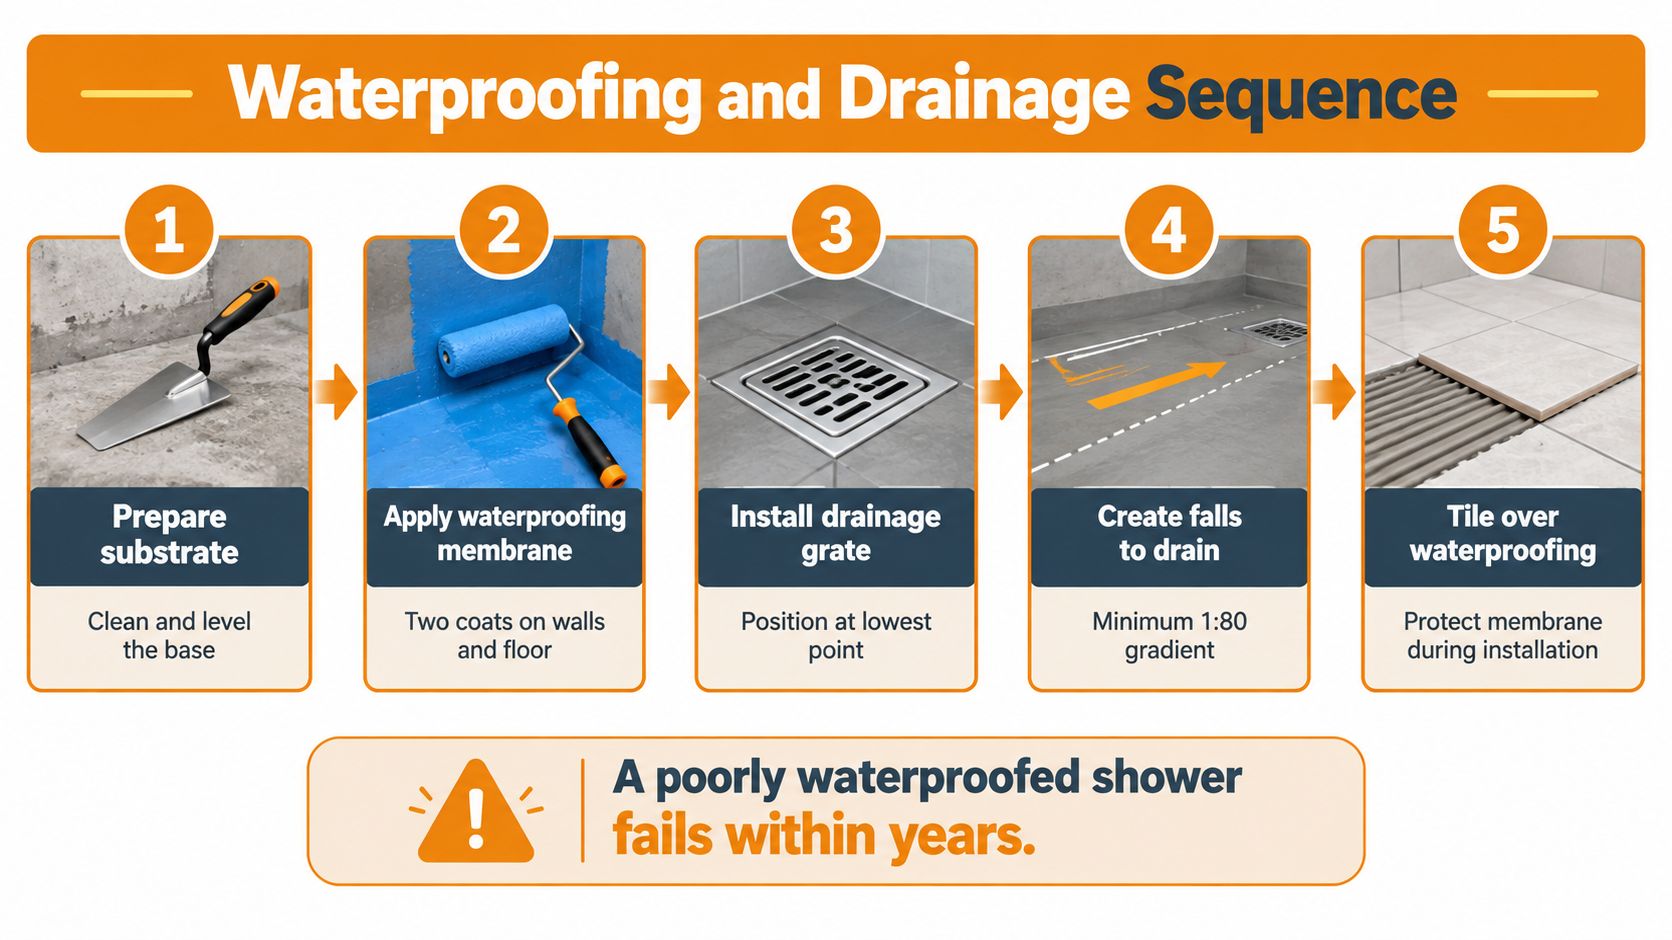
Start by confirming the substrate and finished floor levels. The builder, plumber and tiler should agree how the floor will be prepared, how the waste connects and how the nominated waterproofing system fits the assembly. Ask for the applicable requirements, the specific system and its installation instructions. A membrane brand name alone is not a specification, and a generic promise of compliance is not enough.
The drain affects the floor layout. A central waste and a linear drain call for different planes and tile cuts; neither is automatically the better choice. Have the tiler draw the falls and proposed cuts, then get the plumber to confirm the drain arrangement and access for servicing.
A puddle flange is the connection between the drainage fitting and waterproofing, not just a choice of visible grate. Ask the trades to explain that junction before work begins. Falls, waste position and tile layout need to suit each other, or the finished floor may hold water.
Use the illustration to understand the sequence of work, not as a site specification. The approved waterproofing system sets the required application and inspection steps.
Inspect the junctions before tiling
Arrange a pre-tile inspection with the person responsible for accepting the work. Confirm what checks or testing the specified system requires, and keep the records. Photographs help document progress, but they do not replace competent inspection or required paperwork.
Focus on the places where components meet:
- Hob corners and junctions: Confirm how movement and changes of plane are treated.
- Mixer and outlet penetrations: Check the specified seal around plumbing.
- Niches: Inspect the internal shape and waterproofing before tiles conceal them.
- Screen fixings: Agree where hardware will attach and how each penetration will be sealed.
- Bathroom transitions: Set the boundary between the shower area and adjoining floor.
A late change to a niche, drain or mixer can mean revisiting concealed work. Before approving a variation, ask which trades must inspect or redo affected areas.
Protect the membrane while other work continues. If a trade damages it or adds an unplanned penetration, stop and have the responsible installer assess and repair the damage under the specified system. Don't rush to make the room look finished. An inspected, documented assembly is a better milestone than early tile delivery.
Designing for Accessibility Without Designing a Hospital
A shower should remain useful when someone's balance, reach or mobility changes. Design for that possibility while the walls are open, rather than assuming accessibility can be added neatly afterwards.
A flush entry removes a step, but it doesn't complete the safety brief. The drainage and containment decisions already described still need to work, and the user needs somewhere stable to stand, turn or sit. An open-looking shower that's awkward to reach or leaves the circulation route wet isn't a good accessibility outcome.
Design around the person using it
Start with actions, not labels. Can someone turn the water on from outside the spray? Can they reach soap without bending or stretching? Would a shower chair leave enough usable space, and could a carer assist if needed?
Don't place the mixer according to visual symmetry alone. A beautifully centred fitting can be inconvenient for someone seated or standing at the entry. Likewise, a niche that looks balanced on a drawing may be beyond comfortable reach.
Future grab-rail reinforcement is worth discussing before lining the walls. Ask the builder to locate suitable backing for the likely rail positions, coordinate it with services and document where it sits. That's preparation, not a promise that any future rail can be fixed anywhere.
- Keep access clear: Avoid layouts that depend on stepping around a door or squeezing past a fixed panel.
- Plan seated use: Consider the hand shower, controls and storage from a seated position.
- Check floor suitability: Select the finish using the intended users and wet conditions.
- Preserve assistance space: Discuss foreseeable mobility needs with an appropriately qualified adviser.
Include ventilation in the safety brief
Specify the exhaust system as part of the renovation, not as an accessory chosen after the ceiling is finished. The bathroom ventilation and mould-control guidance identifies at least 25 litres per second as a bathroom exhaust-capacity benchmark in relevant applications; your installer should confirm the requirements and suitable arrangement for your room.
Ask about the discharge route, replacement air, controls and cleaning access. Don't select a fan solely because it includes a heater or has an attractive grille.
Design priority: Make safe use convenient. People shouldn't have to choose between an attractive bathroom and one they can comfortably use.
Accessible showers can look entirely domestic. Coordinated hardware, considered storage and discreet preparation are more useful than a clinical-looking accessory added without a clear purpose.
Fixtures, Flow Rates and the Real Cost of a Luxurious Shower
Specify the experience you want, then choose the fittings that deliver it. A rainhead, hand shower and body jets aren't a complete design brief, and running every outlet together shouldn't be the default definition of luxury.
For most households, I'd start with a well-chosen main outlet and a practical hand shower. Add body jets only if you want that experience and the plumber has assessed the system. Otherwise, you're purchasing extra fittings, connections and cleaning tasks.
Read the label before the finish catalogue
Australia's WELS shower rating guidance lists 3-star showers above 7.5 and up to 9 L/min, 4-star showers above 6 and up to 7.5 L/min, and 5-star showers above 4.5 and up to 6 L/min, with higher-rated products also assessed for performance.
That same government guidance estimates that replacing a 15 L/min shower with a 9 L/min model can save approximately 70 kilolitres and $210 annually, while a 6 L/min model can save approximately 105 kilolitres and $315, under its family-use and water-price assumptions. These are water-cost examples, not guaranteed Melbourne bills or installed-project payback figures.
Don't buy on the words water saving alone. Record the actual model, labelled flow and outlet arrangement in the plumbing schedule.
Check performance in the actual house
A low-flow fitting needs to suit the pressure and hot-water system. The government's flow-controller and shower-performance guidance explains the importance of spray coverage and force alongside flow reduction. Ask the plumber to assess dynamic pressure, pipework, valves and simultaneous demand before ordering.
- Prioritise tested delivery: Compare coverage and comfort, not just nominal flow.
- Control outlet combinations: Specify whether the diverter selects outlets individually or permits simultaneous use.
- Keep the hand shower useful: Check its reach, parking position and ease of adjustment.
- Verify the complete selection: A display fitting isn't enough information for rough-in.
Use the shower-head selection guide to compare configurations. For reach and adjustability considerations, DME Superstore's ADA shower tips from DME Superstore offer an additional reference, but American accessibility advice isn't a substitute for Victorian project requirements.
Usage still matters. Water Corporation's shower-time guidance attributes 24% of household water use to showers in its WA benchmark and recommends showers of four minutes or less.
Choose comfort you'll use, not hardware you'll mainly admire.
Budgeting and the Real Difference Between DIY, Owner-Builder and Trade
A defensible Melbourne shower budget starts with itemised local quotes, not a national average. Ask contractors to separate tile supply, substrate preparation, screed or levelling work, waterproofing, plumbing, fixtures, screens, ventilation and labour.
Include demolition, waste removal, delivery and finishing work too. For operating costs, the Australian Government's household water-efficiency guidance connects shower selection with both water and heating demand. Keep that ongoing expense separate from the installation quote so you can compare both.
Compare responsibility as well as price
| Renovation route | Where it can suit | Main budgeting risk |
|---|---|---|
| DIY-supported project | Owners handling agreed preparation and finishing tasks | Taking on work beyond their skills or permitted scope |
| Owner-coordinated trades | Owners with time to manage selections, access and scheduling | Missing interfaces, exclusions and responsibility gaps |
| Builder or bathroom specialist | Owners wanting a clearly managed scope | Assuming the headline quote includes every finish and variation |
DIY can be sensible for agreed painting, cleaning and some preparation. Don't assume demolition is automatically a safe saving, especially before services and existing materials have been assessed. Leave regulated work to appropriately licensed trades and specialist wet-area work to competent installers.
Coordinating trades yourself isn't DIY with subcontractors. You need to resolve conflicting advice, organise inspections and make decisions before they hold up the job. Ask whether your proposed scope creates owner-builder obligations rather than adopting the label casually.
Build contingency from unresolved scope
I wouldn't invent a contingency percentage before inspecting the room. List the uncertainties, such as concealed damage, substrate condition, plumbing alterations and electrical work, then ask contractors how those discoveries would be priced.
- Compare equivalent scopes: Match preparation, installation, finishing and documentation.
- Price changes before approval: Get variations in writing before work proceeds.
- Ask trade buyers about sourcing: Trade pricing and personalised sourcing may help with repeated specifications, but compare the delivered cost.
- Cut decorative complexity first: Simplify feature tiles or extra outlets before compromising concealed construction.
A cheaper fitting can be replaced later. Reopening finished wet-area work is a different proposition. Put the budget into a shower that's properly specified, built and maintainable before spending on visual extras.
For porcelain tiles, natural stone mosaics, samples and finish guidance, visit Tiles Mate Pty Ltd. Bring your bathroom plan, proposed waste position and preferred wall look, and ask for help comparing shower-floor suitability with a coordinated wall selection before you place the order.